User Manual
Your complete QC-GED guide — from folders and permissions to approval, distribution, search and the AI assistant.
Real application screens with demonstration data. Updated October 2026.
QC-GED overview
QC-GED is QualiChart's electronic document management system. It stores and organizes the documents of the laboratory's quality system — manuals, policies, standard operating procedures (SOPs), work instructions, forms and records — and controls the life cycle of each one: preparation, review, approval, distribution of the controlled copy, periodic review and withdrawal from circulation.
| Concept | What it is |
|---|---|
| Folder | Where documents are organized, in a tree (folder → subfolder). Each folder defines who can read, create, edit and delete. |
| Document | A controlled file, such as an SOP. It sits in a folder and can have a code, a type and an approval workflow. |
| Version | Each new file uploaded to the same document creates a version (v1, v2, v3…). Previous versions are kept. |
| Document type | A classification such as SOP, Manual or Form. It defines the approval workflow and the validity period. |
| Approval workflow | The document statuses (Draft, In Review, Approved…) and the transitions between them, with the groups that can perform each one. |
| Distributed status | The status that makes a version current: the controlled copy the team must use. In the default workflow, it is the Approved status. |
| Group | A set of users. Groups define access to folders and who performs each transition. |
The path of a document
- Prepare (administrator): create the groups, review the approval workflow, set up the document types and organize the folders with their permissions.
- Upload: in the folder, click Upload document, choose the type and enter the code. With a workflow, the document starts in the initial status, such as Draft.
- Review and approve: members of the groups assigned to each stage click the document status and perform the transition, with an optional comment. Everything is recorded in the history.
- Distribute: when it reaches the distributed status, the version becomes the controlled copy, gets a distribution date and a next review date, and can be found by search and by the AI assistant. Assign required reading to the people who need to know it.
- Review periodically: upload a new version when the document changes or expires. It restarts the workflow, and the previous distributed version remains valid until the new one is distributed.
- Withdraw from circulation: moving the document to a non-distributed status, such as Obsolete, takes the version out of use and removes it from search and the assistant.
This manual follows the same order: access and navigation, daily work with folders and documents, approval and distribution, search and the AI assistant, GED setup (groups, workflows, document types, permissions and users), reports and your account. Use the table of contents to go straight to any topic.
Accessing GED
GED uses the same account as QualiChart. Open docs.qualichart.com in your browser, enter your QualiChart Email and Password and click Sign in. The address can set the screen language: /br (Portuguese), /en (English) and /es (Spanish). After you sign in, you can change the language in the header.

If your account has two-factor authentication (MFA), GED then asks for the 6-digit code from your authenticator app. See how to enable it in My account.
First sign-in and access approval
On your first sign-in, GED loads your details and your laboratory from QualiChart. Anyone who is a laboratory administrator in QualiChart signs in as a GED Administrator, with all permissions. Everyone else sees the Waiting for access to be granted screen until a GED administrator grants access and sets their permissions and groups (see Users). Once access is granted, click Check access.
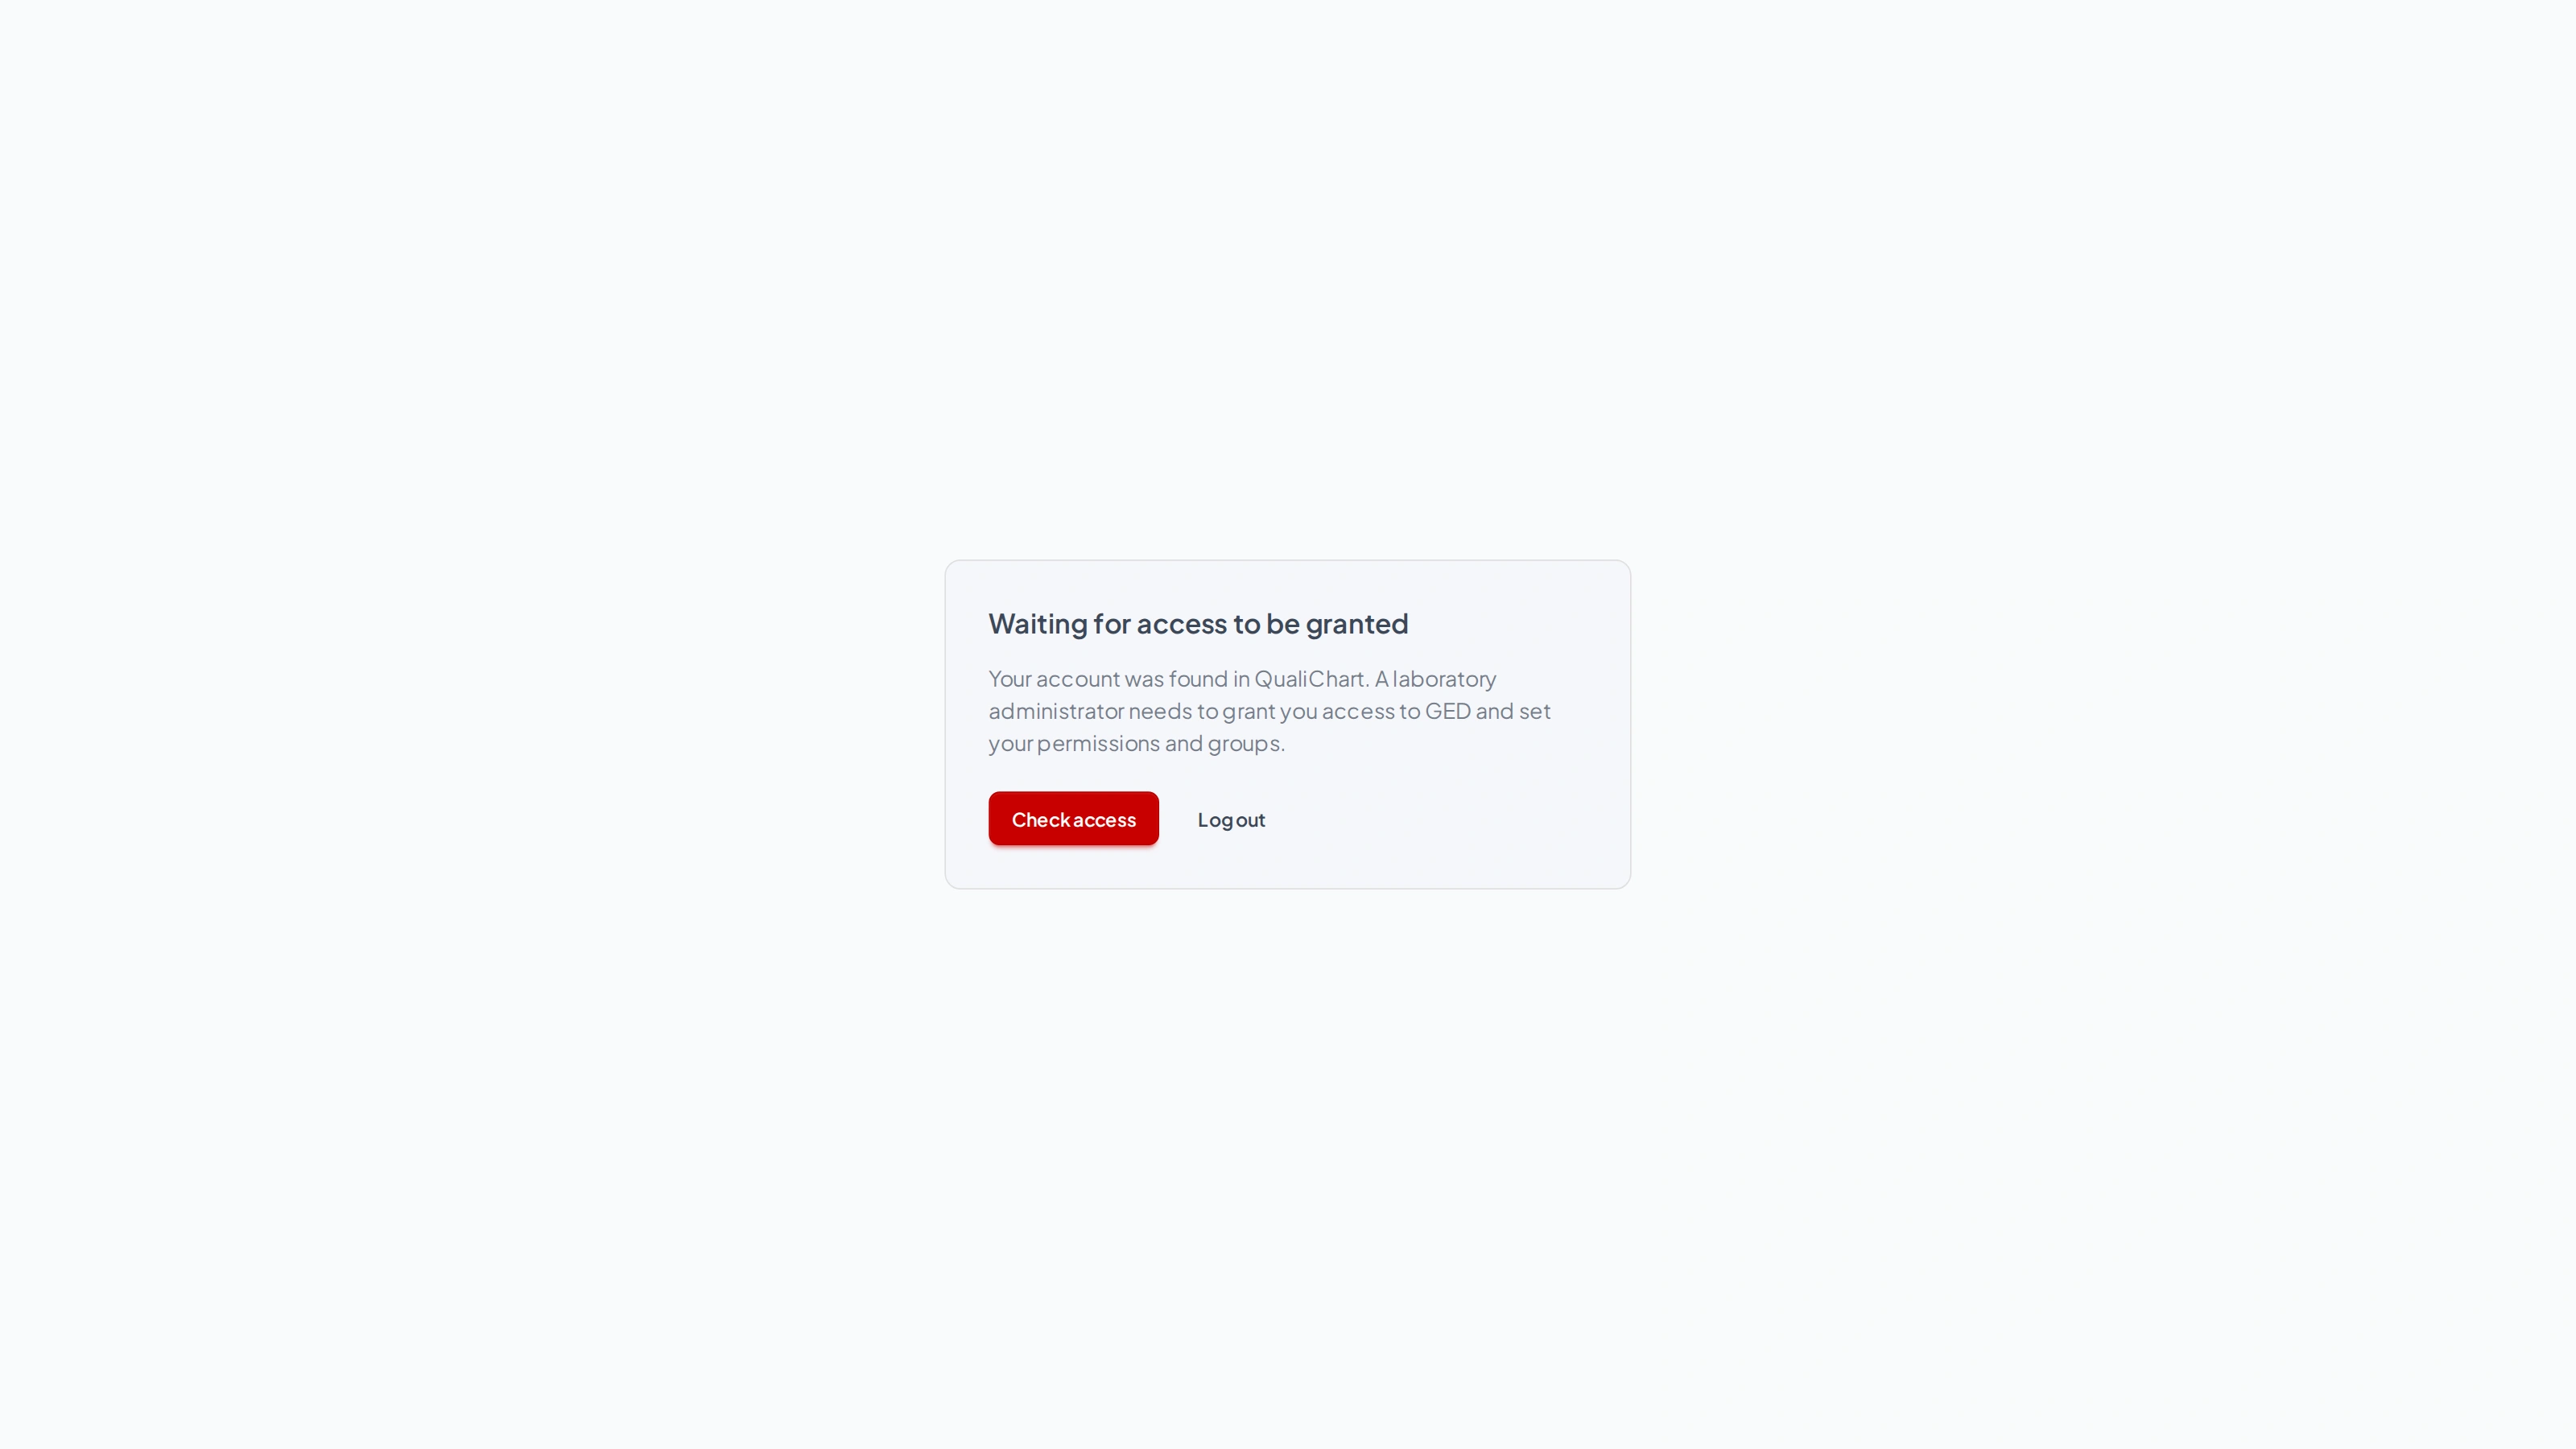
GED-only accounts
People who are not registered in QualiChart can receive a GED-only account, created by an administrator in Users. At first sign-in, enter your email and the temporary password you received: GED asks for a New Password, which must meet the requirements shown, and then signs you in. If the account was created without a temporary password, set your password with Forgot your password?.

I forgot my password
- On the sign-in screen, click Forgot your password?.
- Enter your email and click Send Instructions. For security reasons, the confirmation message is the same whether or not the email exists.
- Open the link you receive by email — valid for 1 hour and for a single use — and set a new password that meets the requirements shown.
If you sign in with your QualiChart account, the password is the same in both systems: when you change it in one, it also changes in the other. For security, your session ends after 8 hours; just sign in again. To log out earlier, use the menu under your initials › Log out.
Back to contentsNavigation: header, folders and shortcuts
The header is always visible at the top of the screen:
| Element | What it is for |
|---|---|
| Search bar | Searches the content of documents. Type at least two letters and press Enter (see Search). |
| Language | Portuguese, English or Spanish. Screens, messages, emails, the cover page and assistant answers follow the selected language. |
| Bell | Documents waiting for your action in the approval workflow, with the total highlighted (see Pending approvals). |
| Help (?) | User Manual and First steps. |
| Gear | Shortcuts to Document Types, Document Workflows, User Groups and Users and, for people with the View audit log permission, Audit log. |
| Your initials | Your name and email, My Account and Log out. |
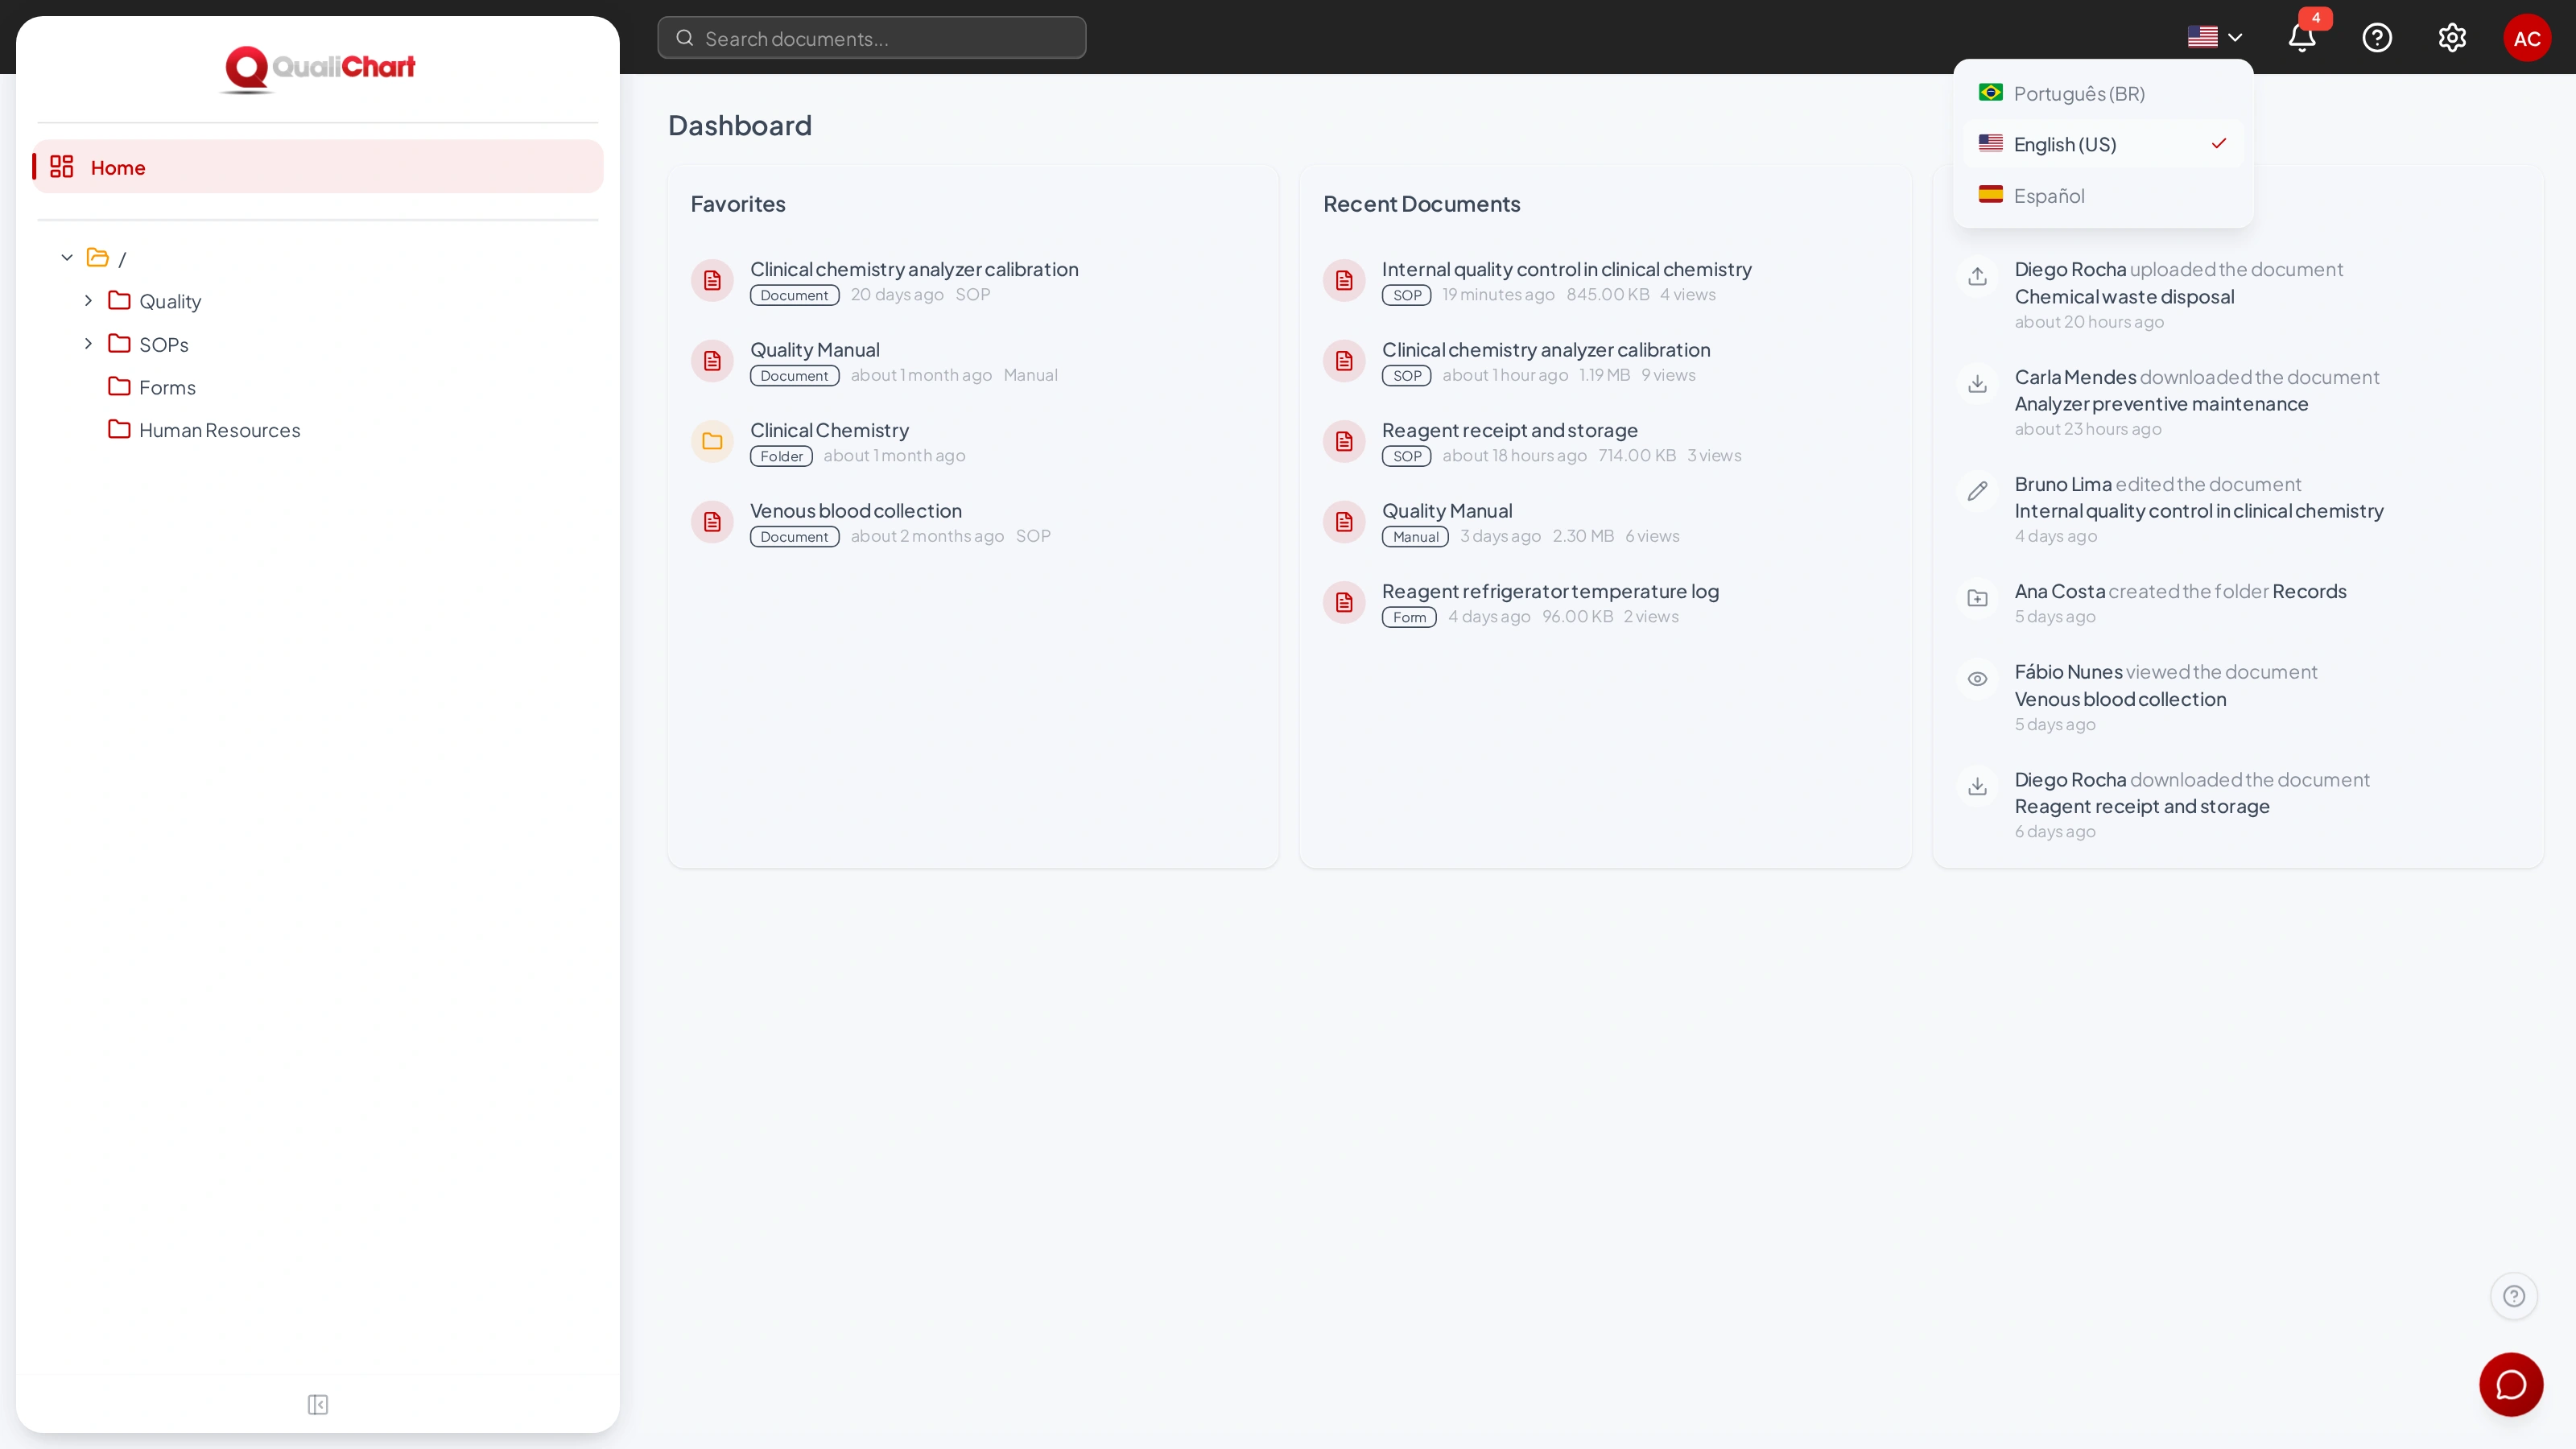
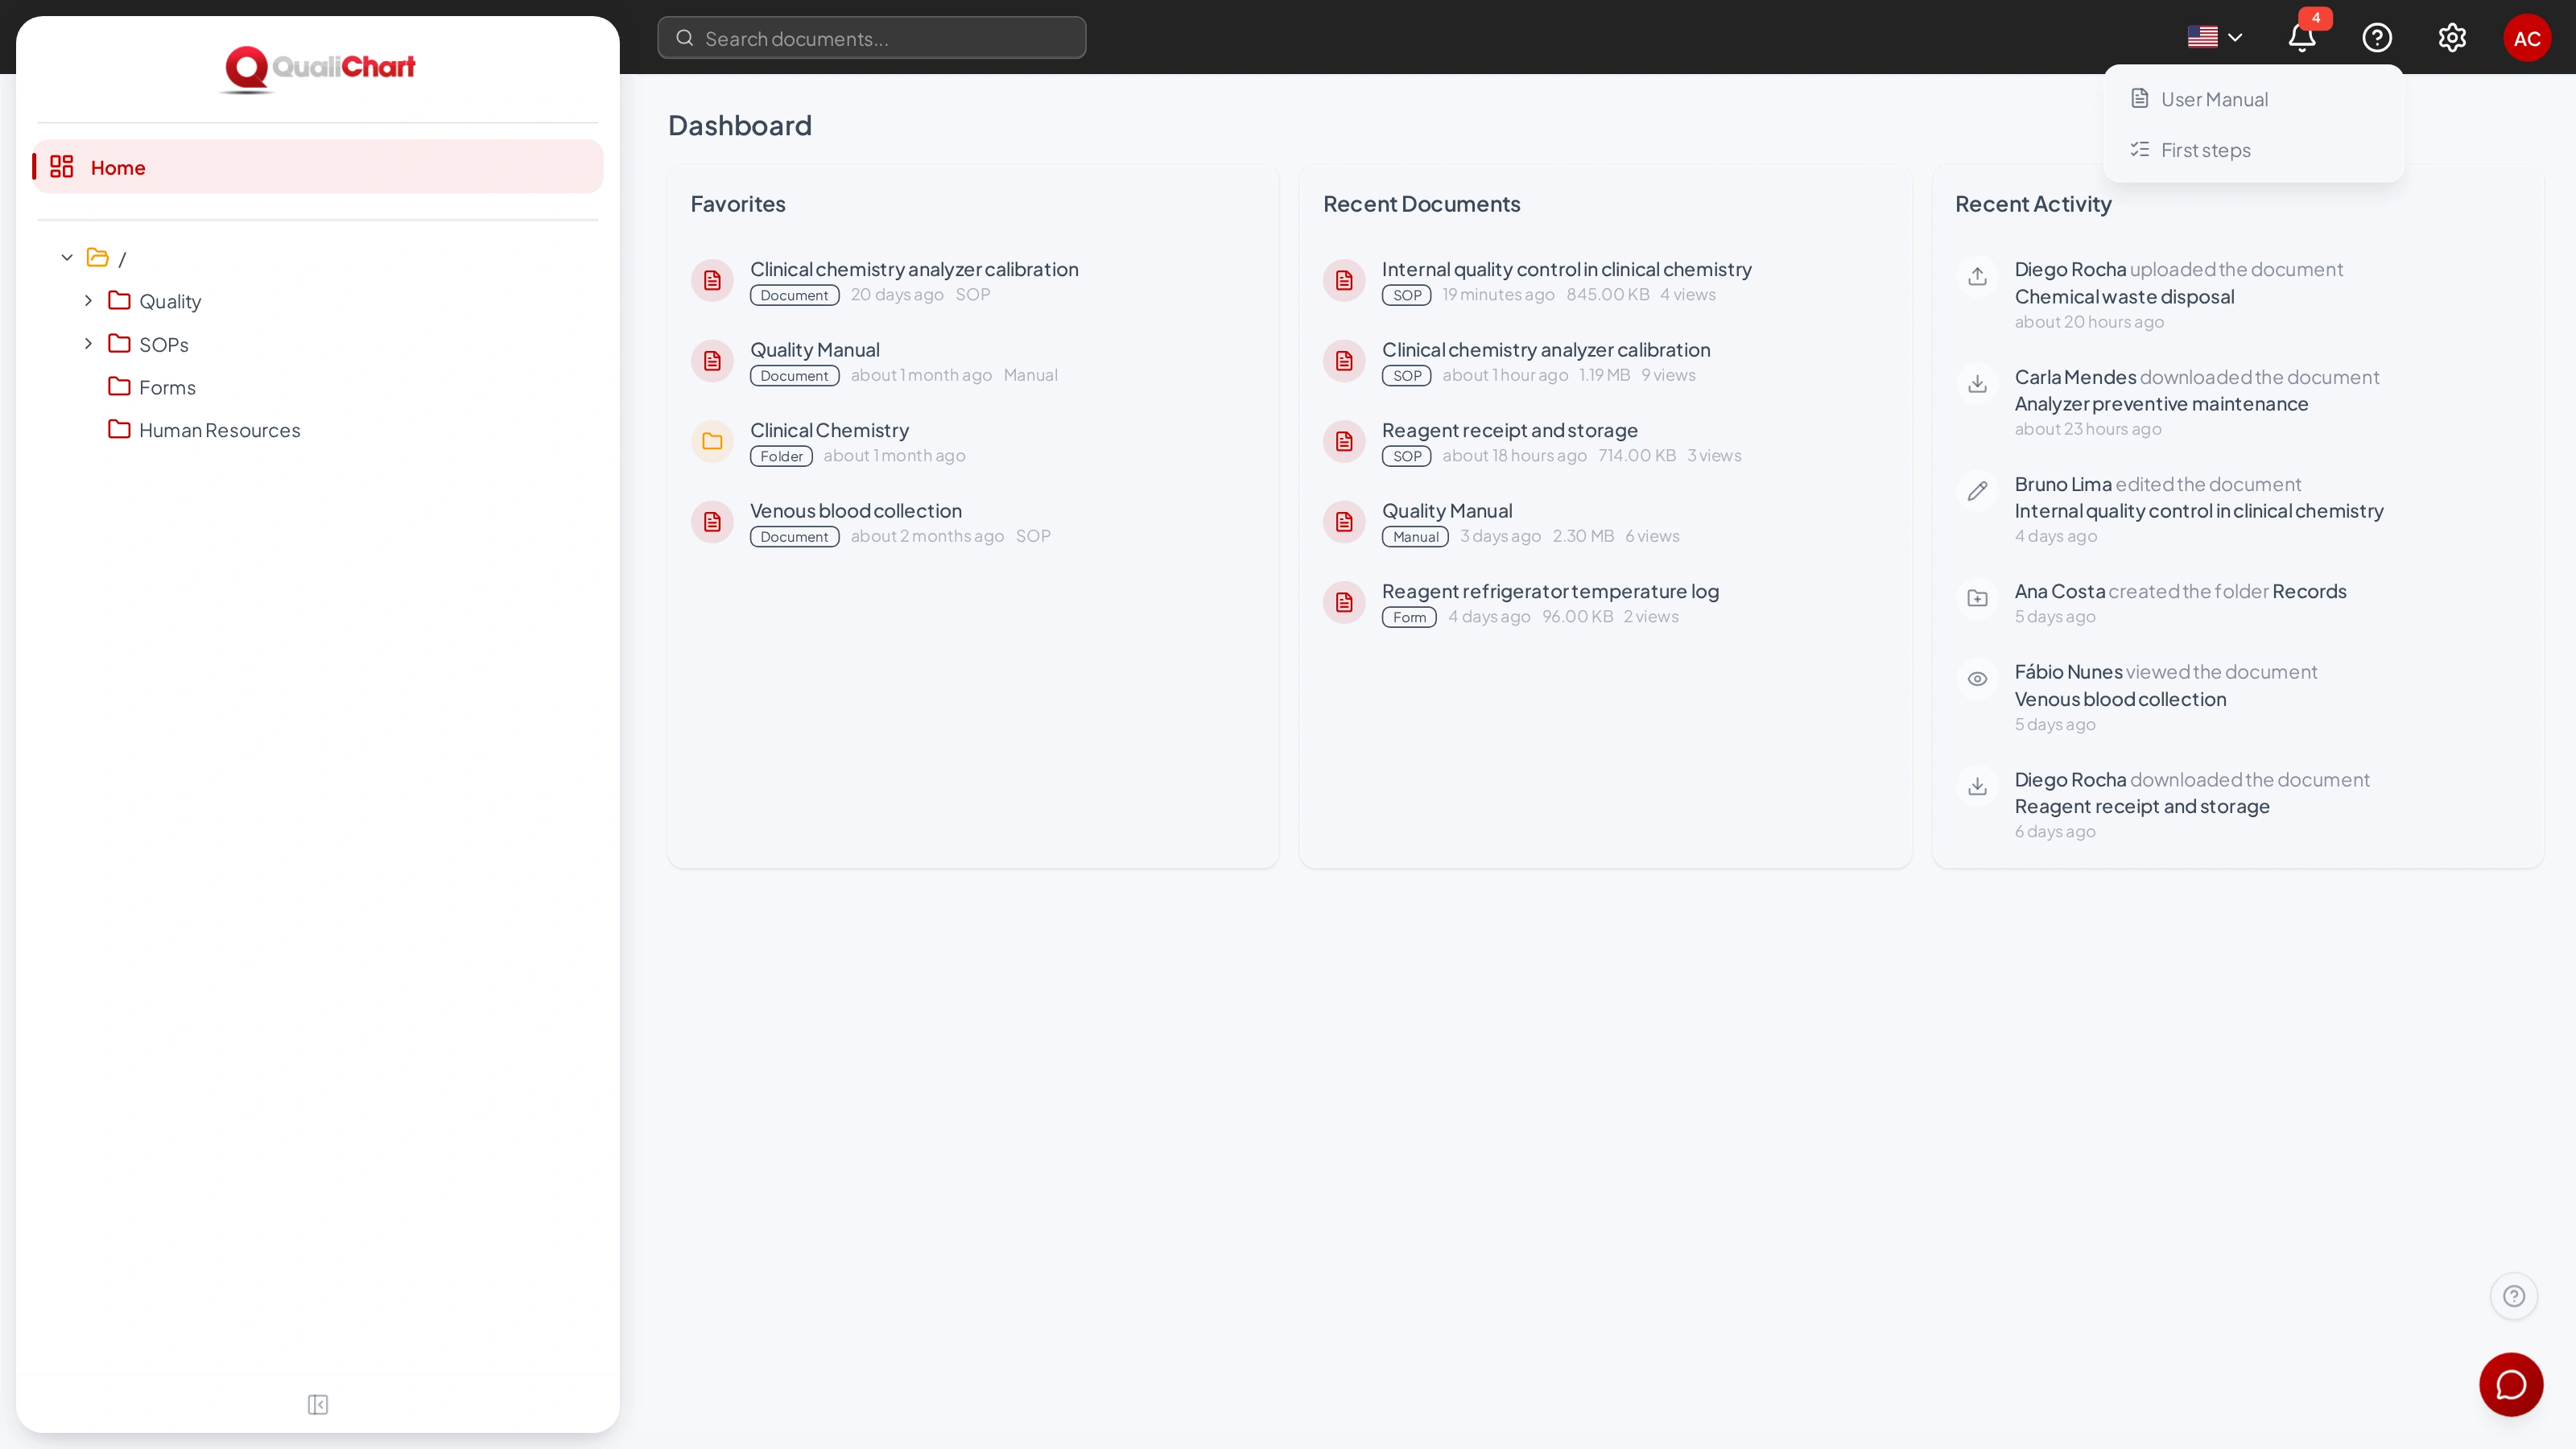
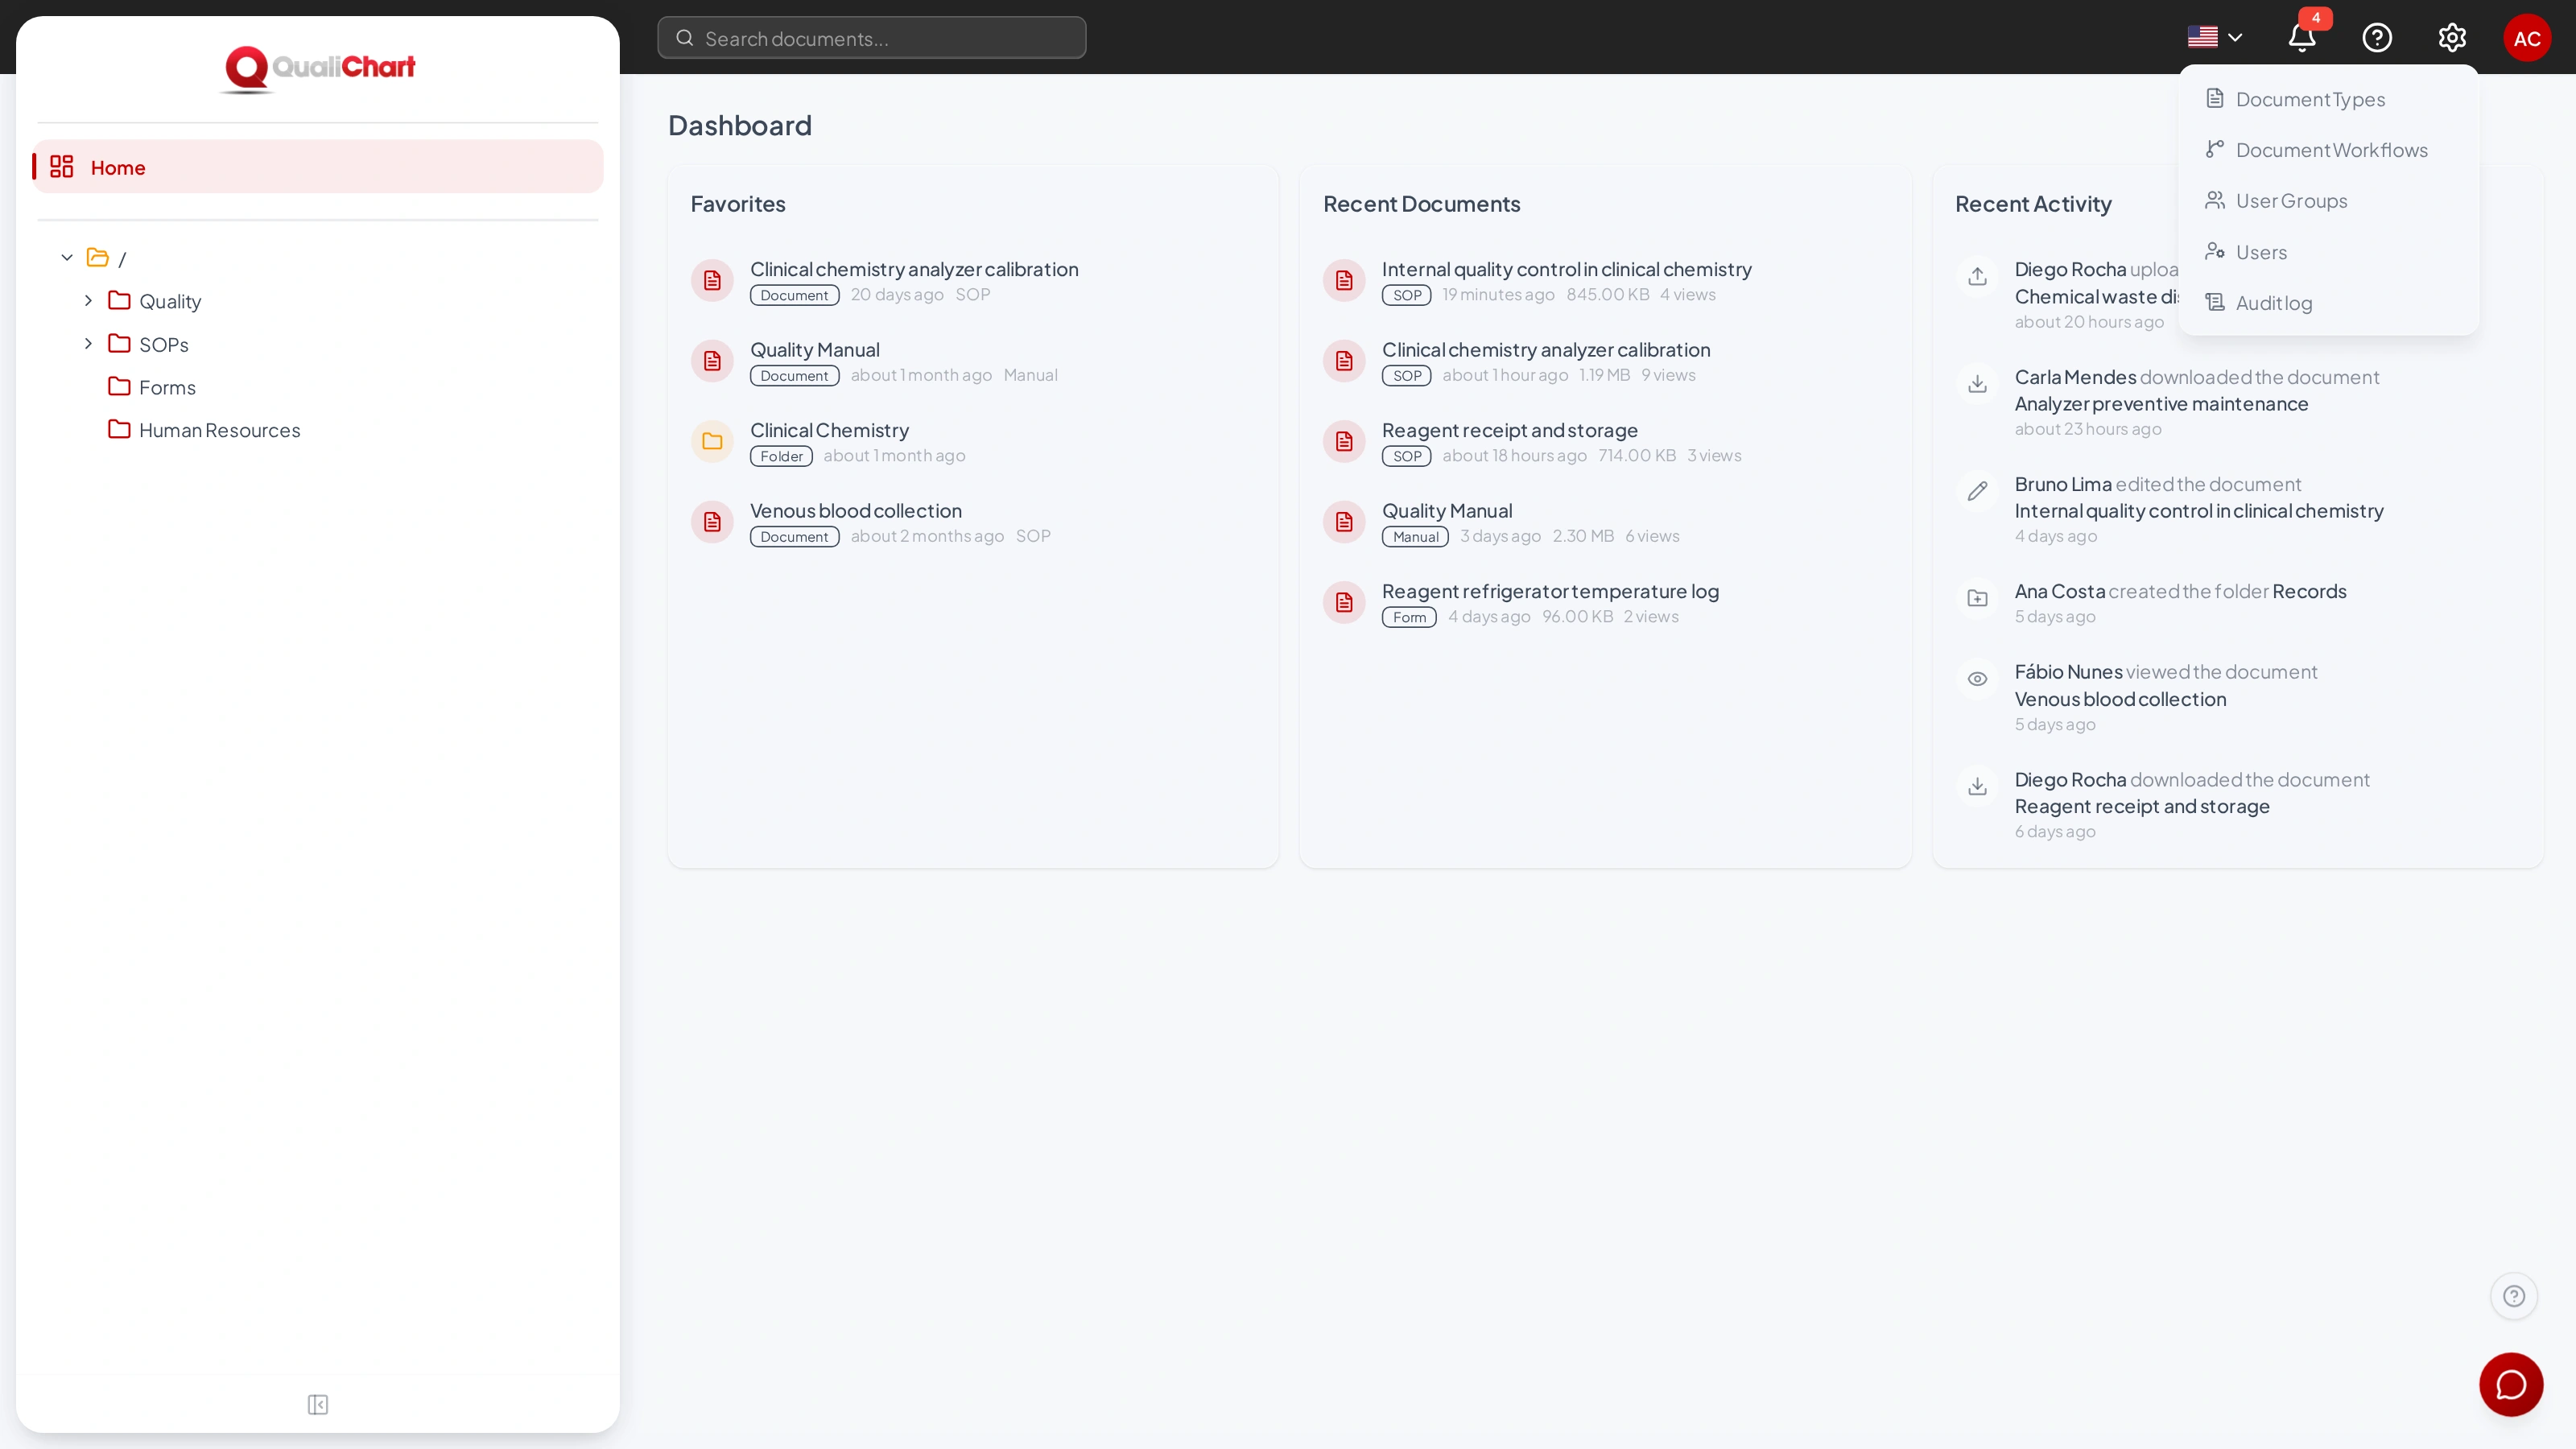
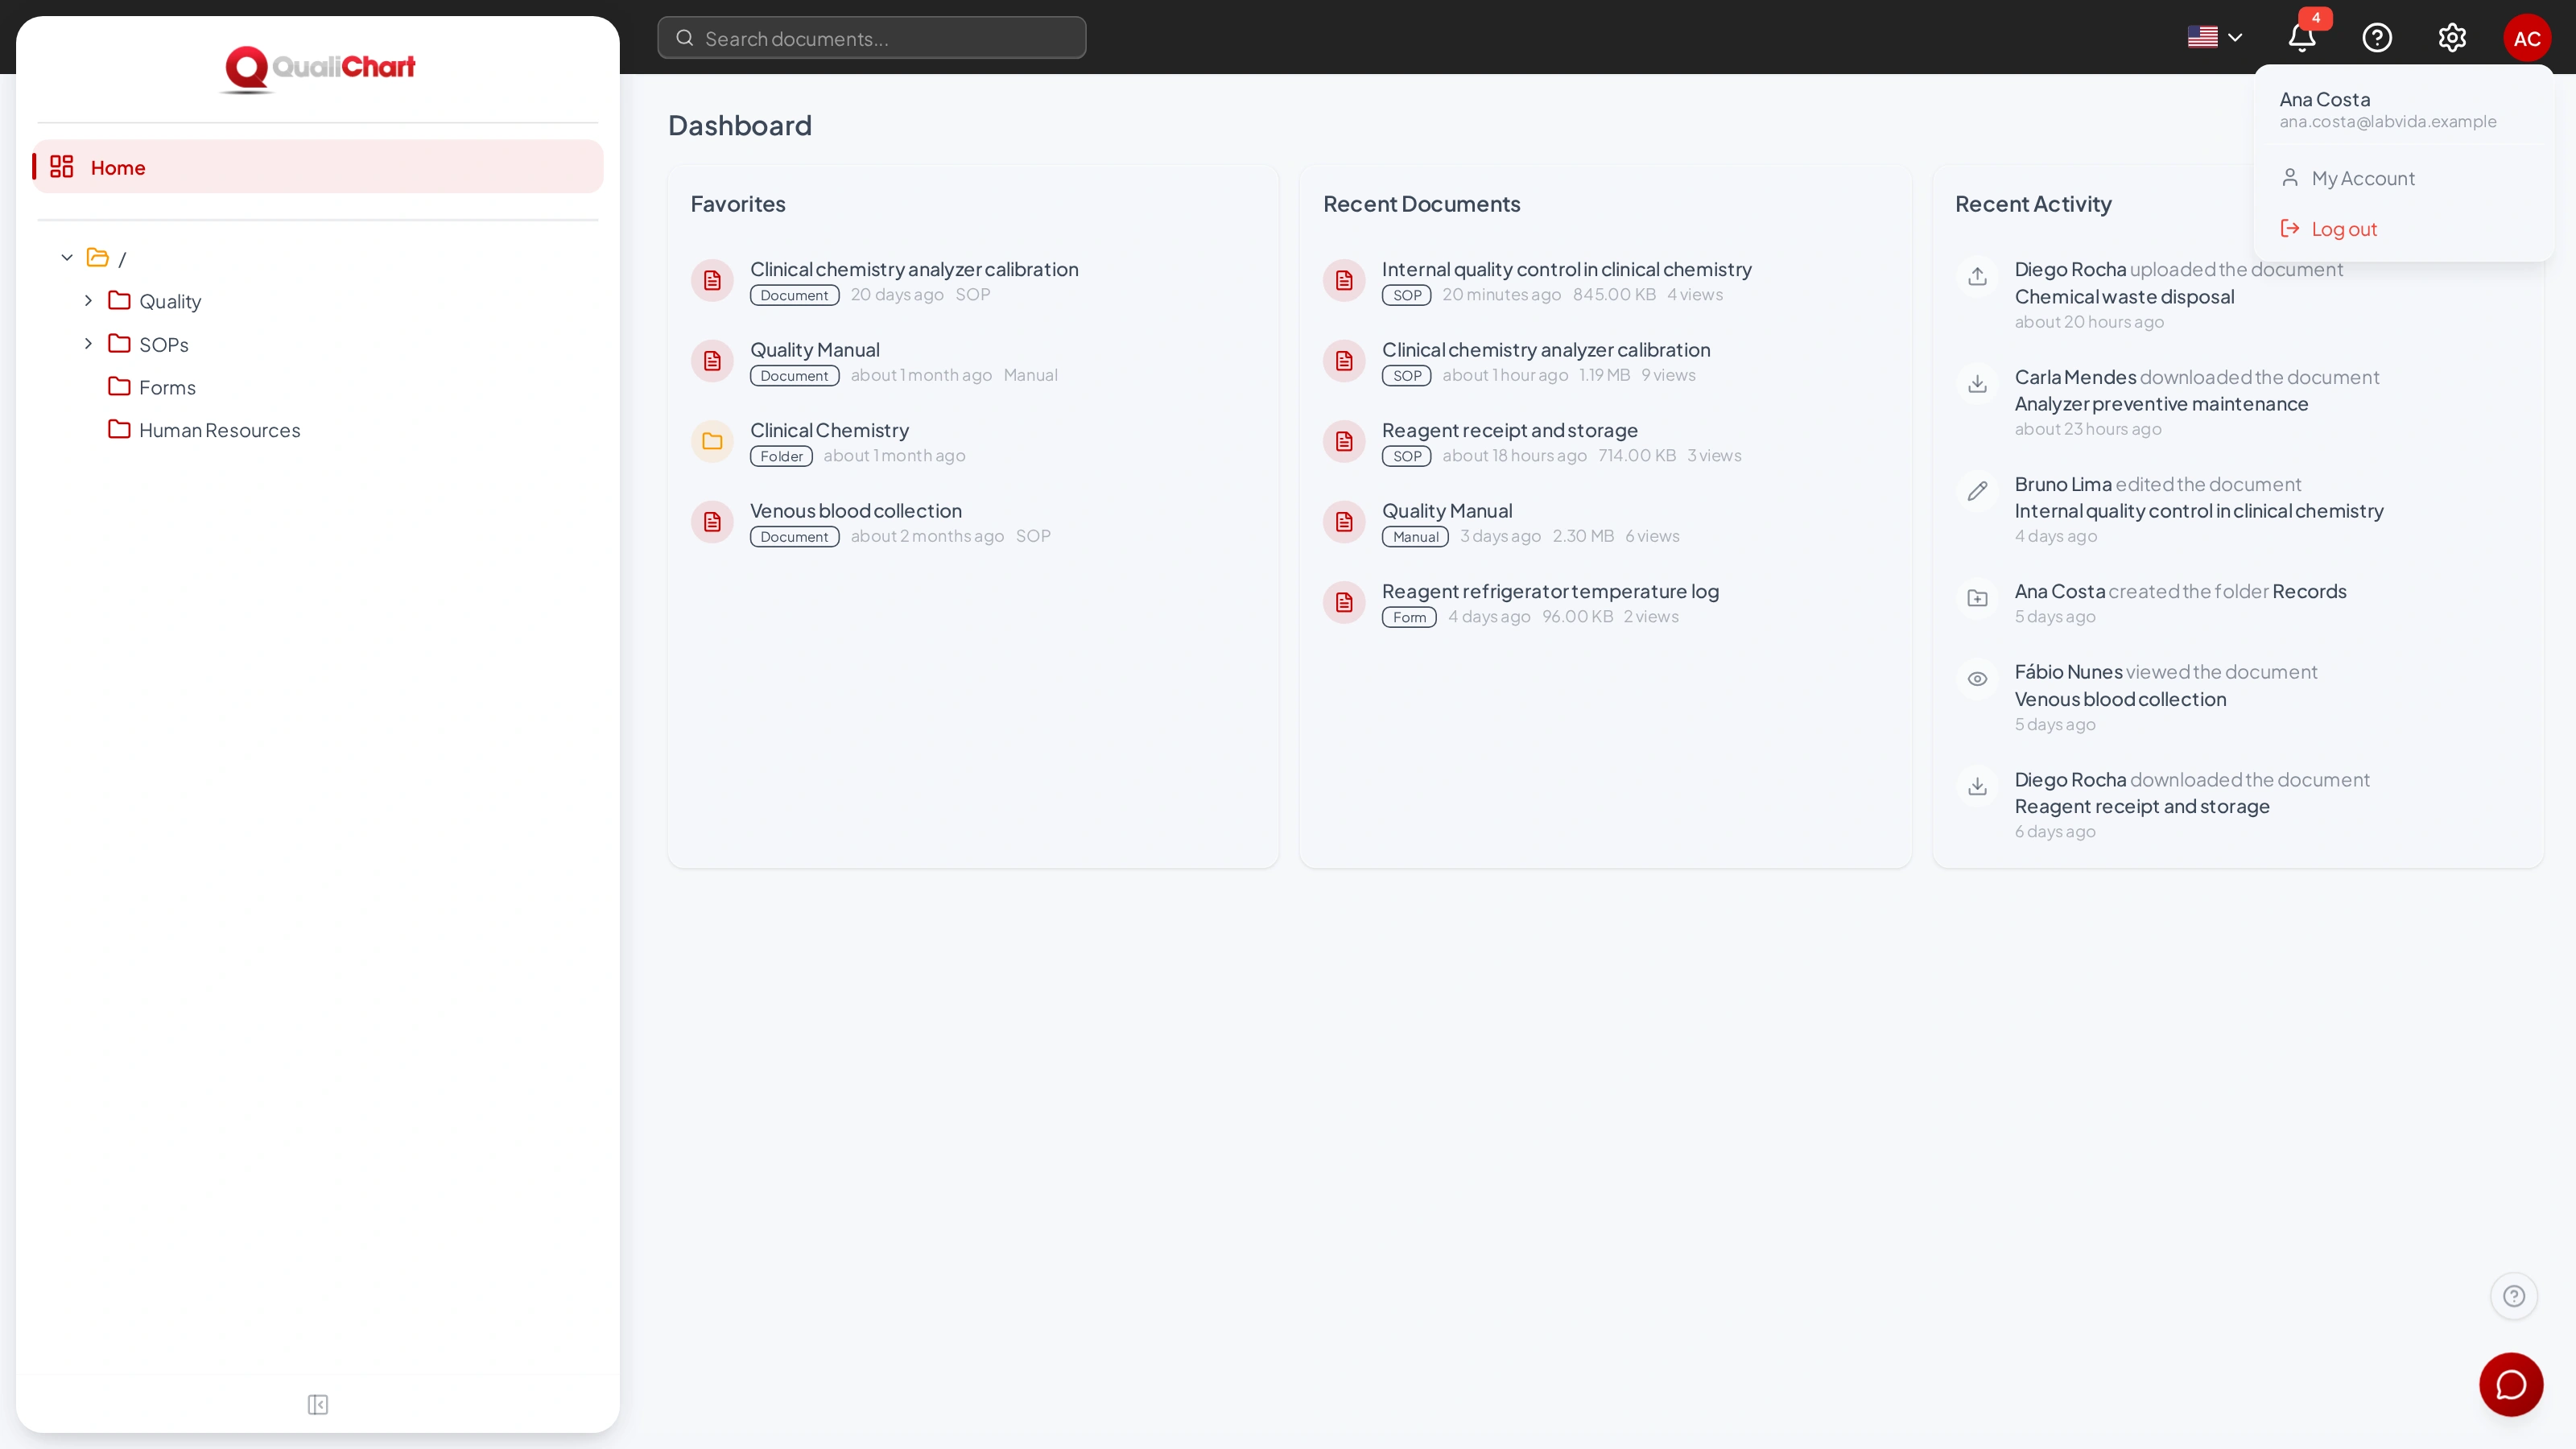
On the left is the folder tree, with the folders you can access. Click a name to open the folder, and the arrow to expand or collapse it. Hovering over a folder shows shortcuts to favorite, edit, delete and create a subfolder; GED only completes the actions your permissions allow.
In the bottom-right corner there are two fixed buttons: the ?, which opens this manual at the section for the current screen, and the round AI assistant button.
Back to contentsGuided first steps
GED offers a first-steps guide for all users. On your first sign-in, a welcome window presents the steps: click Start guided tour to follow the guide, or Explore on my own to use it later.
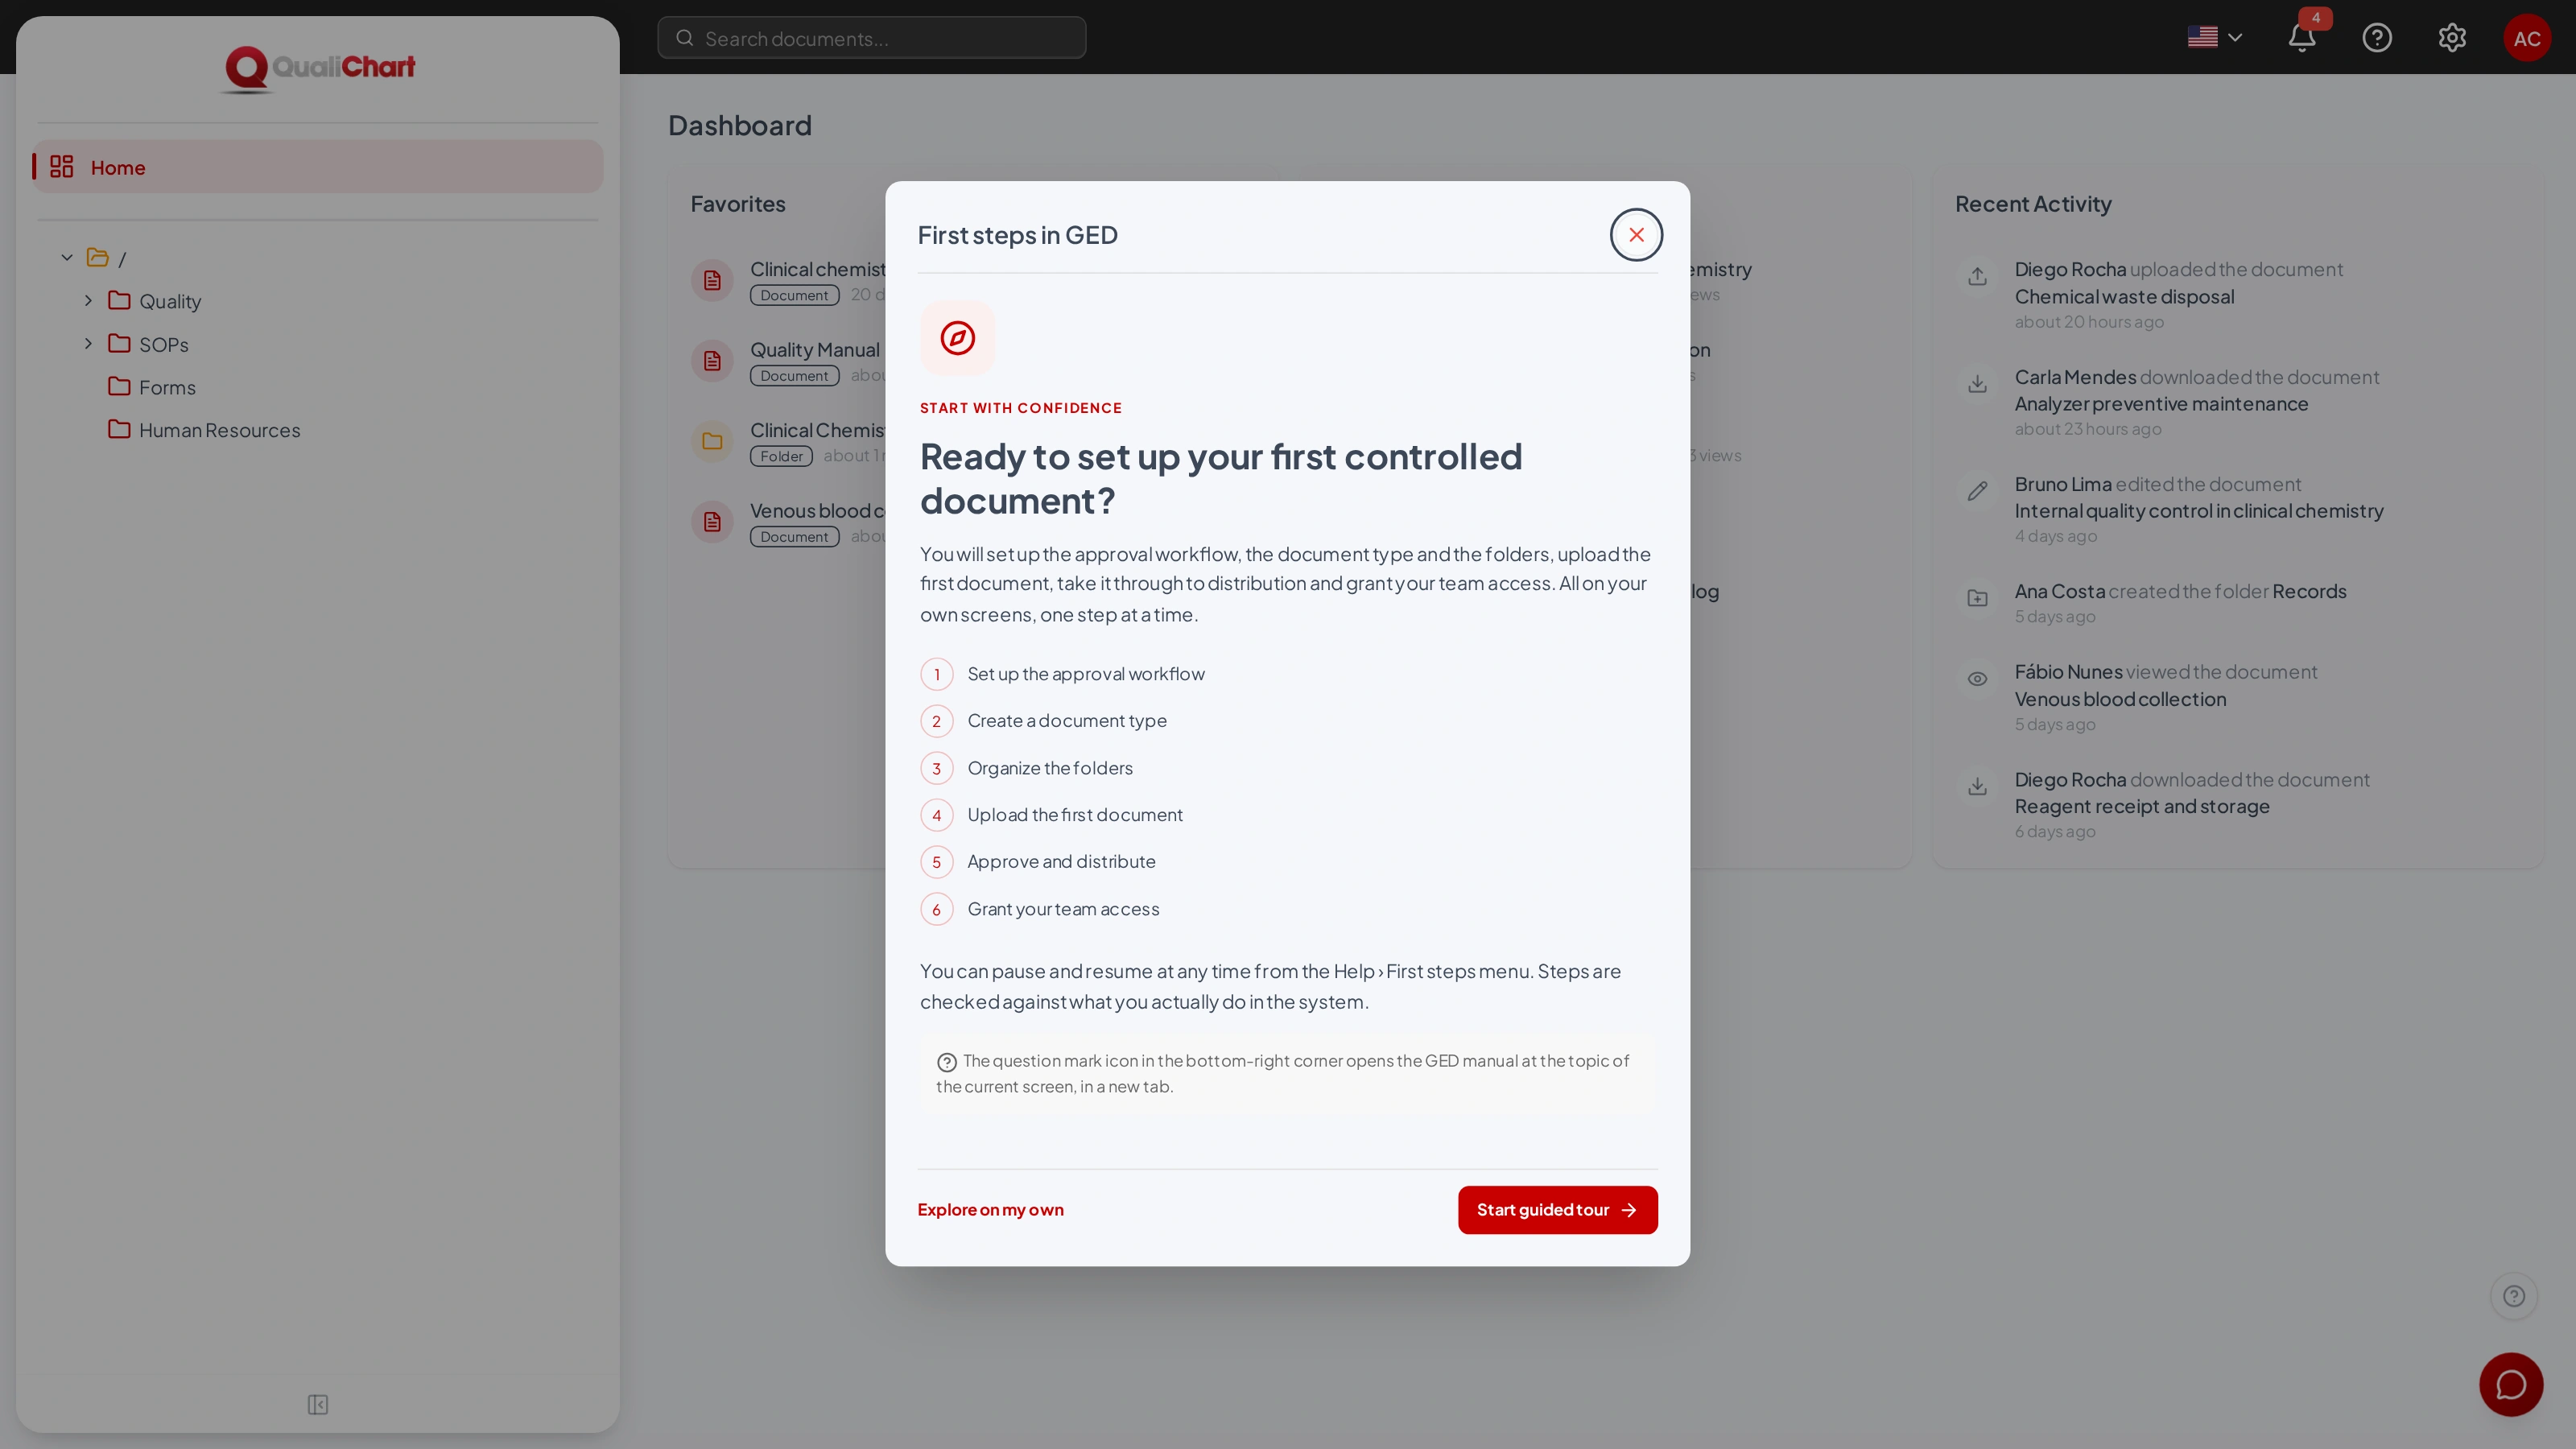
The guide has two tracks, set by your permissions:
| Track | For whom | Steps |
|---|---|---|
| Setup | Administrators and users with the Manage folders permission | Set up the approval workflow, create a document type, organize the folders, upload the first document, approve and distribute it, and grant your team access. Each step unlocks after the previous one. |
| Daily use | All other users | Open a folder, download a document, run a search, save a favorite and ask the AI assistant, in any order you like. |
Each step is checked against what actually exists in GED: an active workflow, a type with a workflow, a folder created, a distributed version, another active user, a search performed and so on. Reading an explanation does not complete a step. Each step's button takes you to the right screen and shows step-by-step guidance, with the relevant area of the screen highlighted.
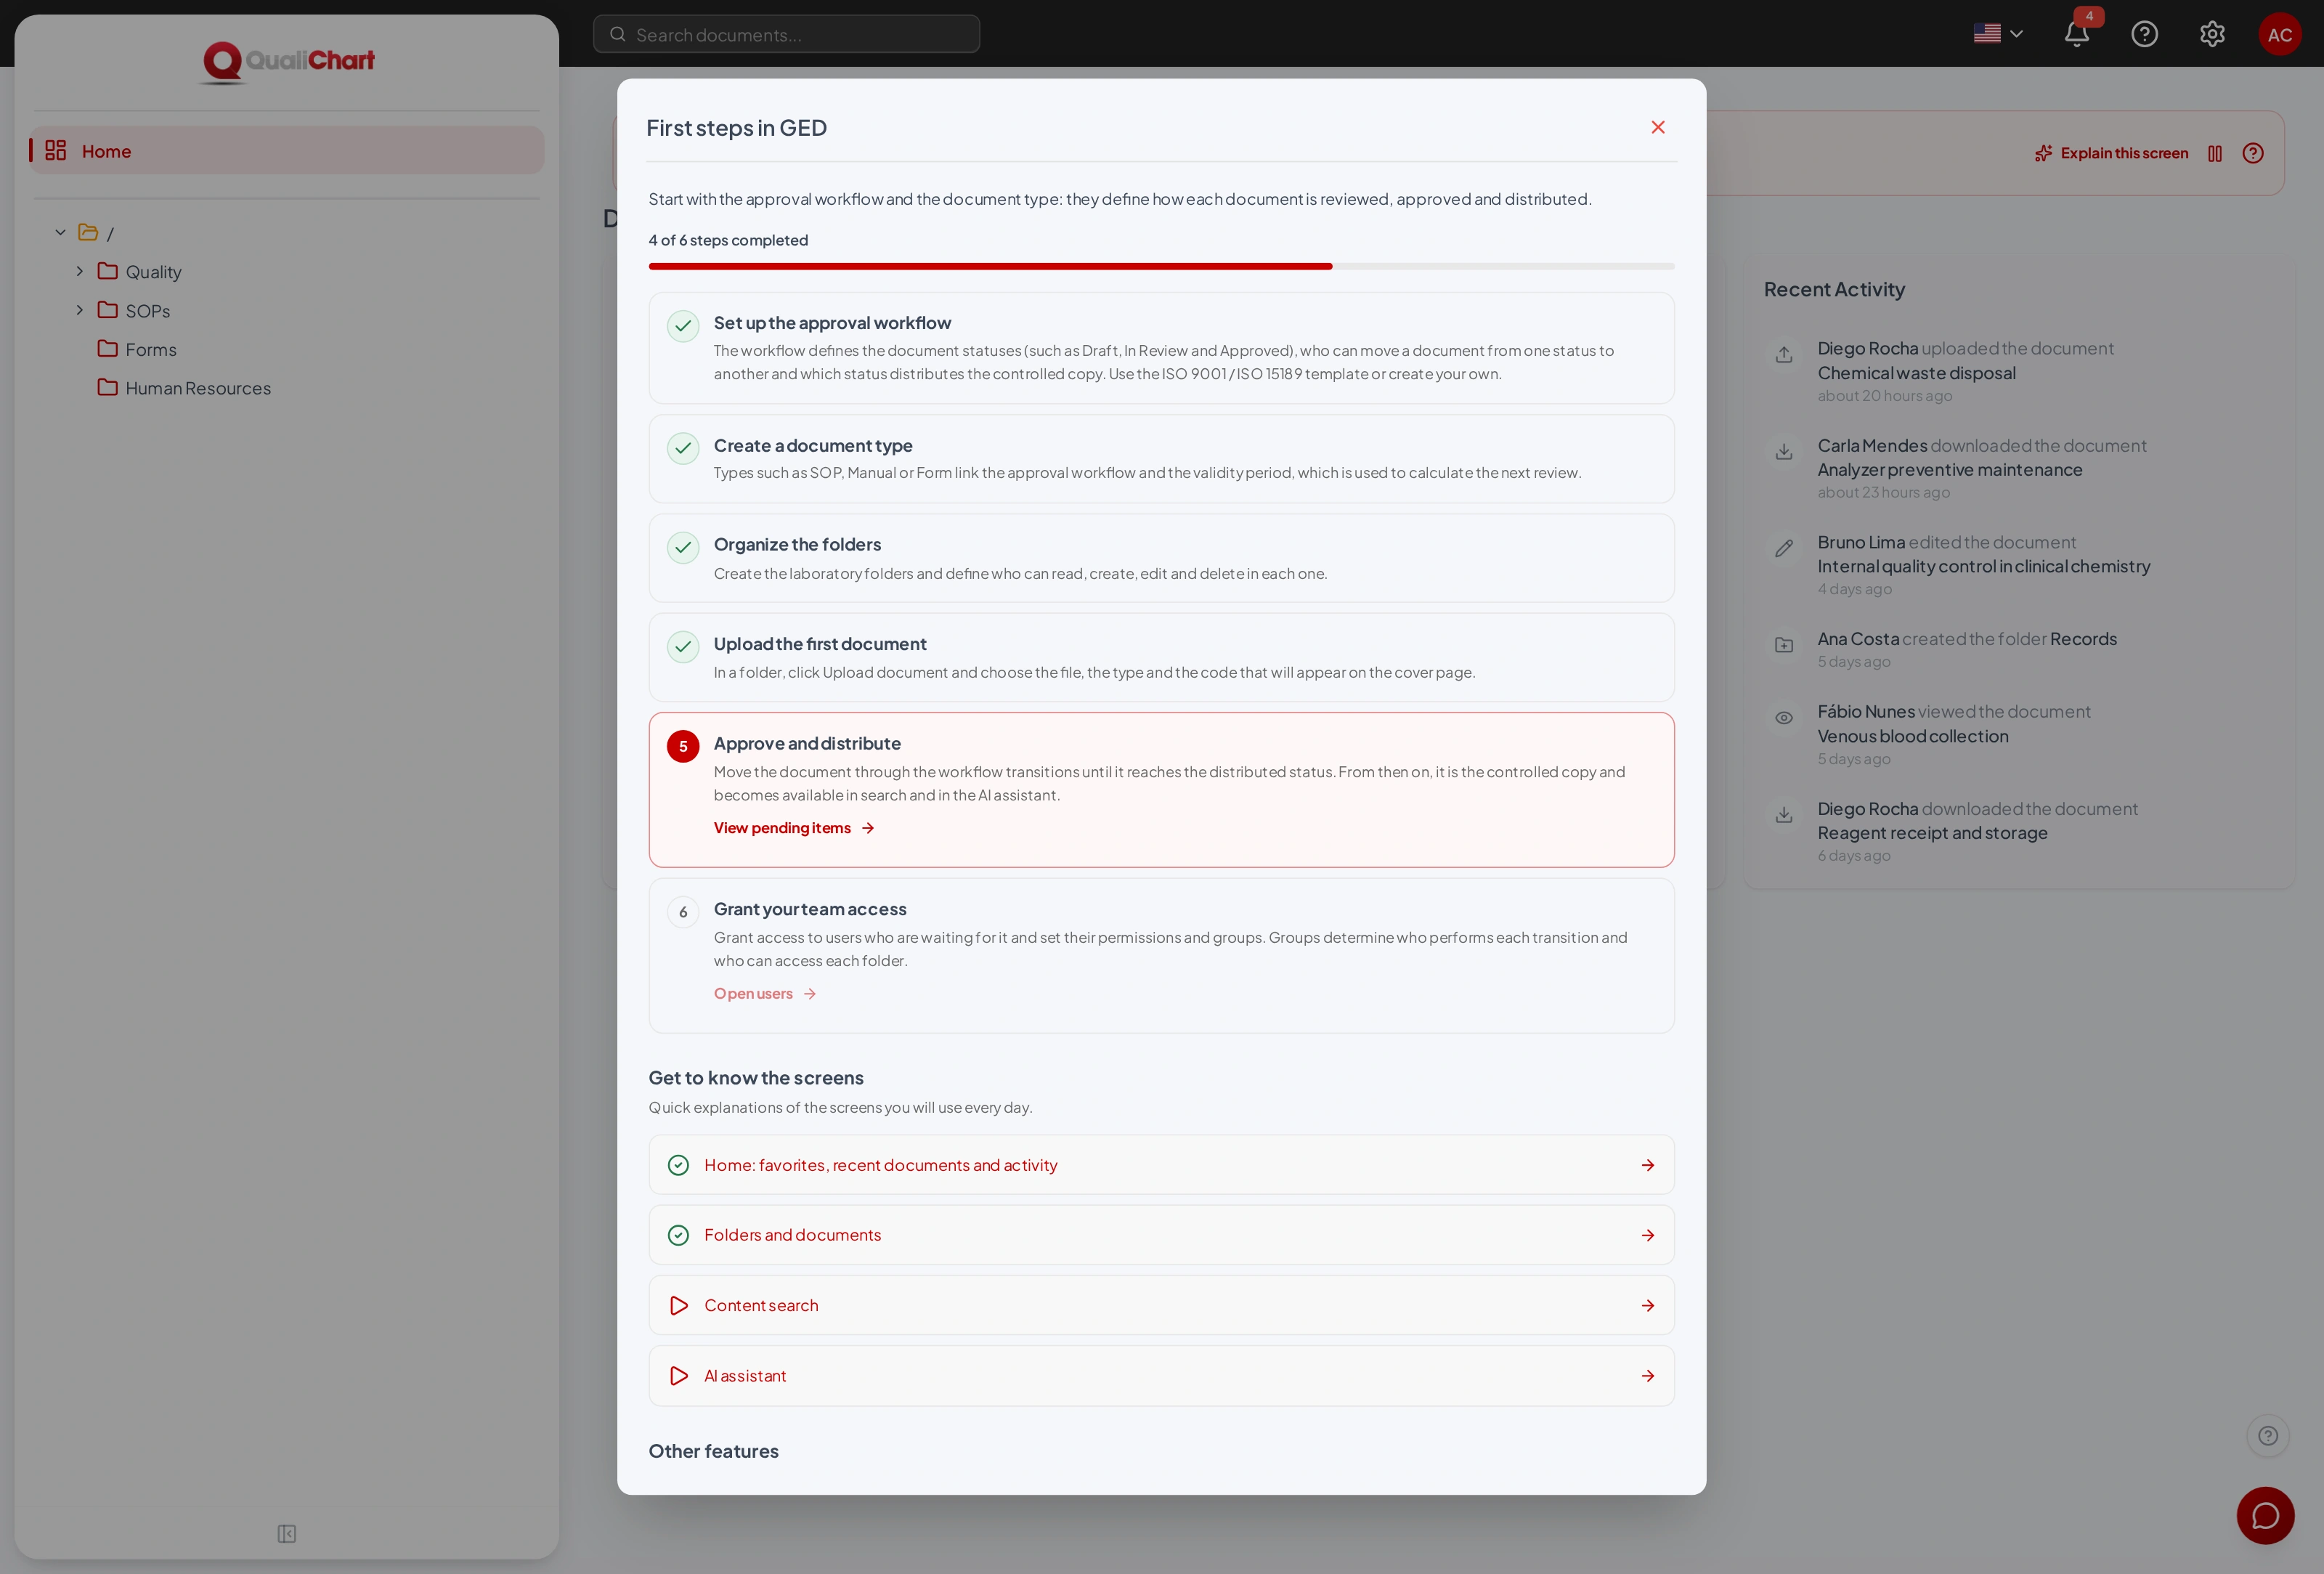
While the guide is active, a banner at the top shows the next step and your progress. From it you can choose Explain this screen, pause the guide or open the manual for the screen. The Get to know the screens section gathers the explanations recommended for your track, and Other features has the rest; groups and users appear for those who can manage them.
Home
The Home screen has three panels:
| Panel | What it shows |
|---|---|
| Favorites | Documents and folders marked with the star. Click a document to download it or a folder to open it; the star removes the favorite. |
| Recent Documents | The last documents you opened or downloaded, with their size and when they were accessed. |
| Recent Activity | What the team did with documents and folders — uploads, edits, downloads, views and folders created — with who did it and when. You only see activity in folders you can access. |
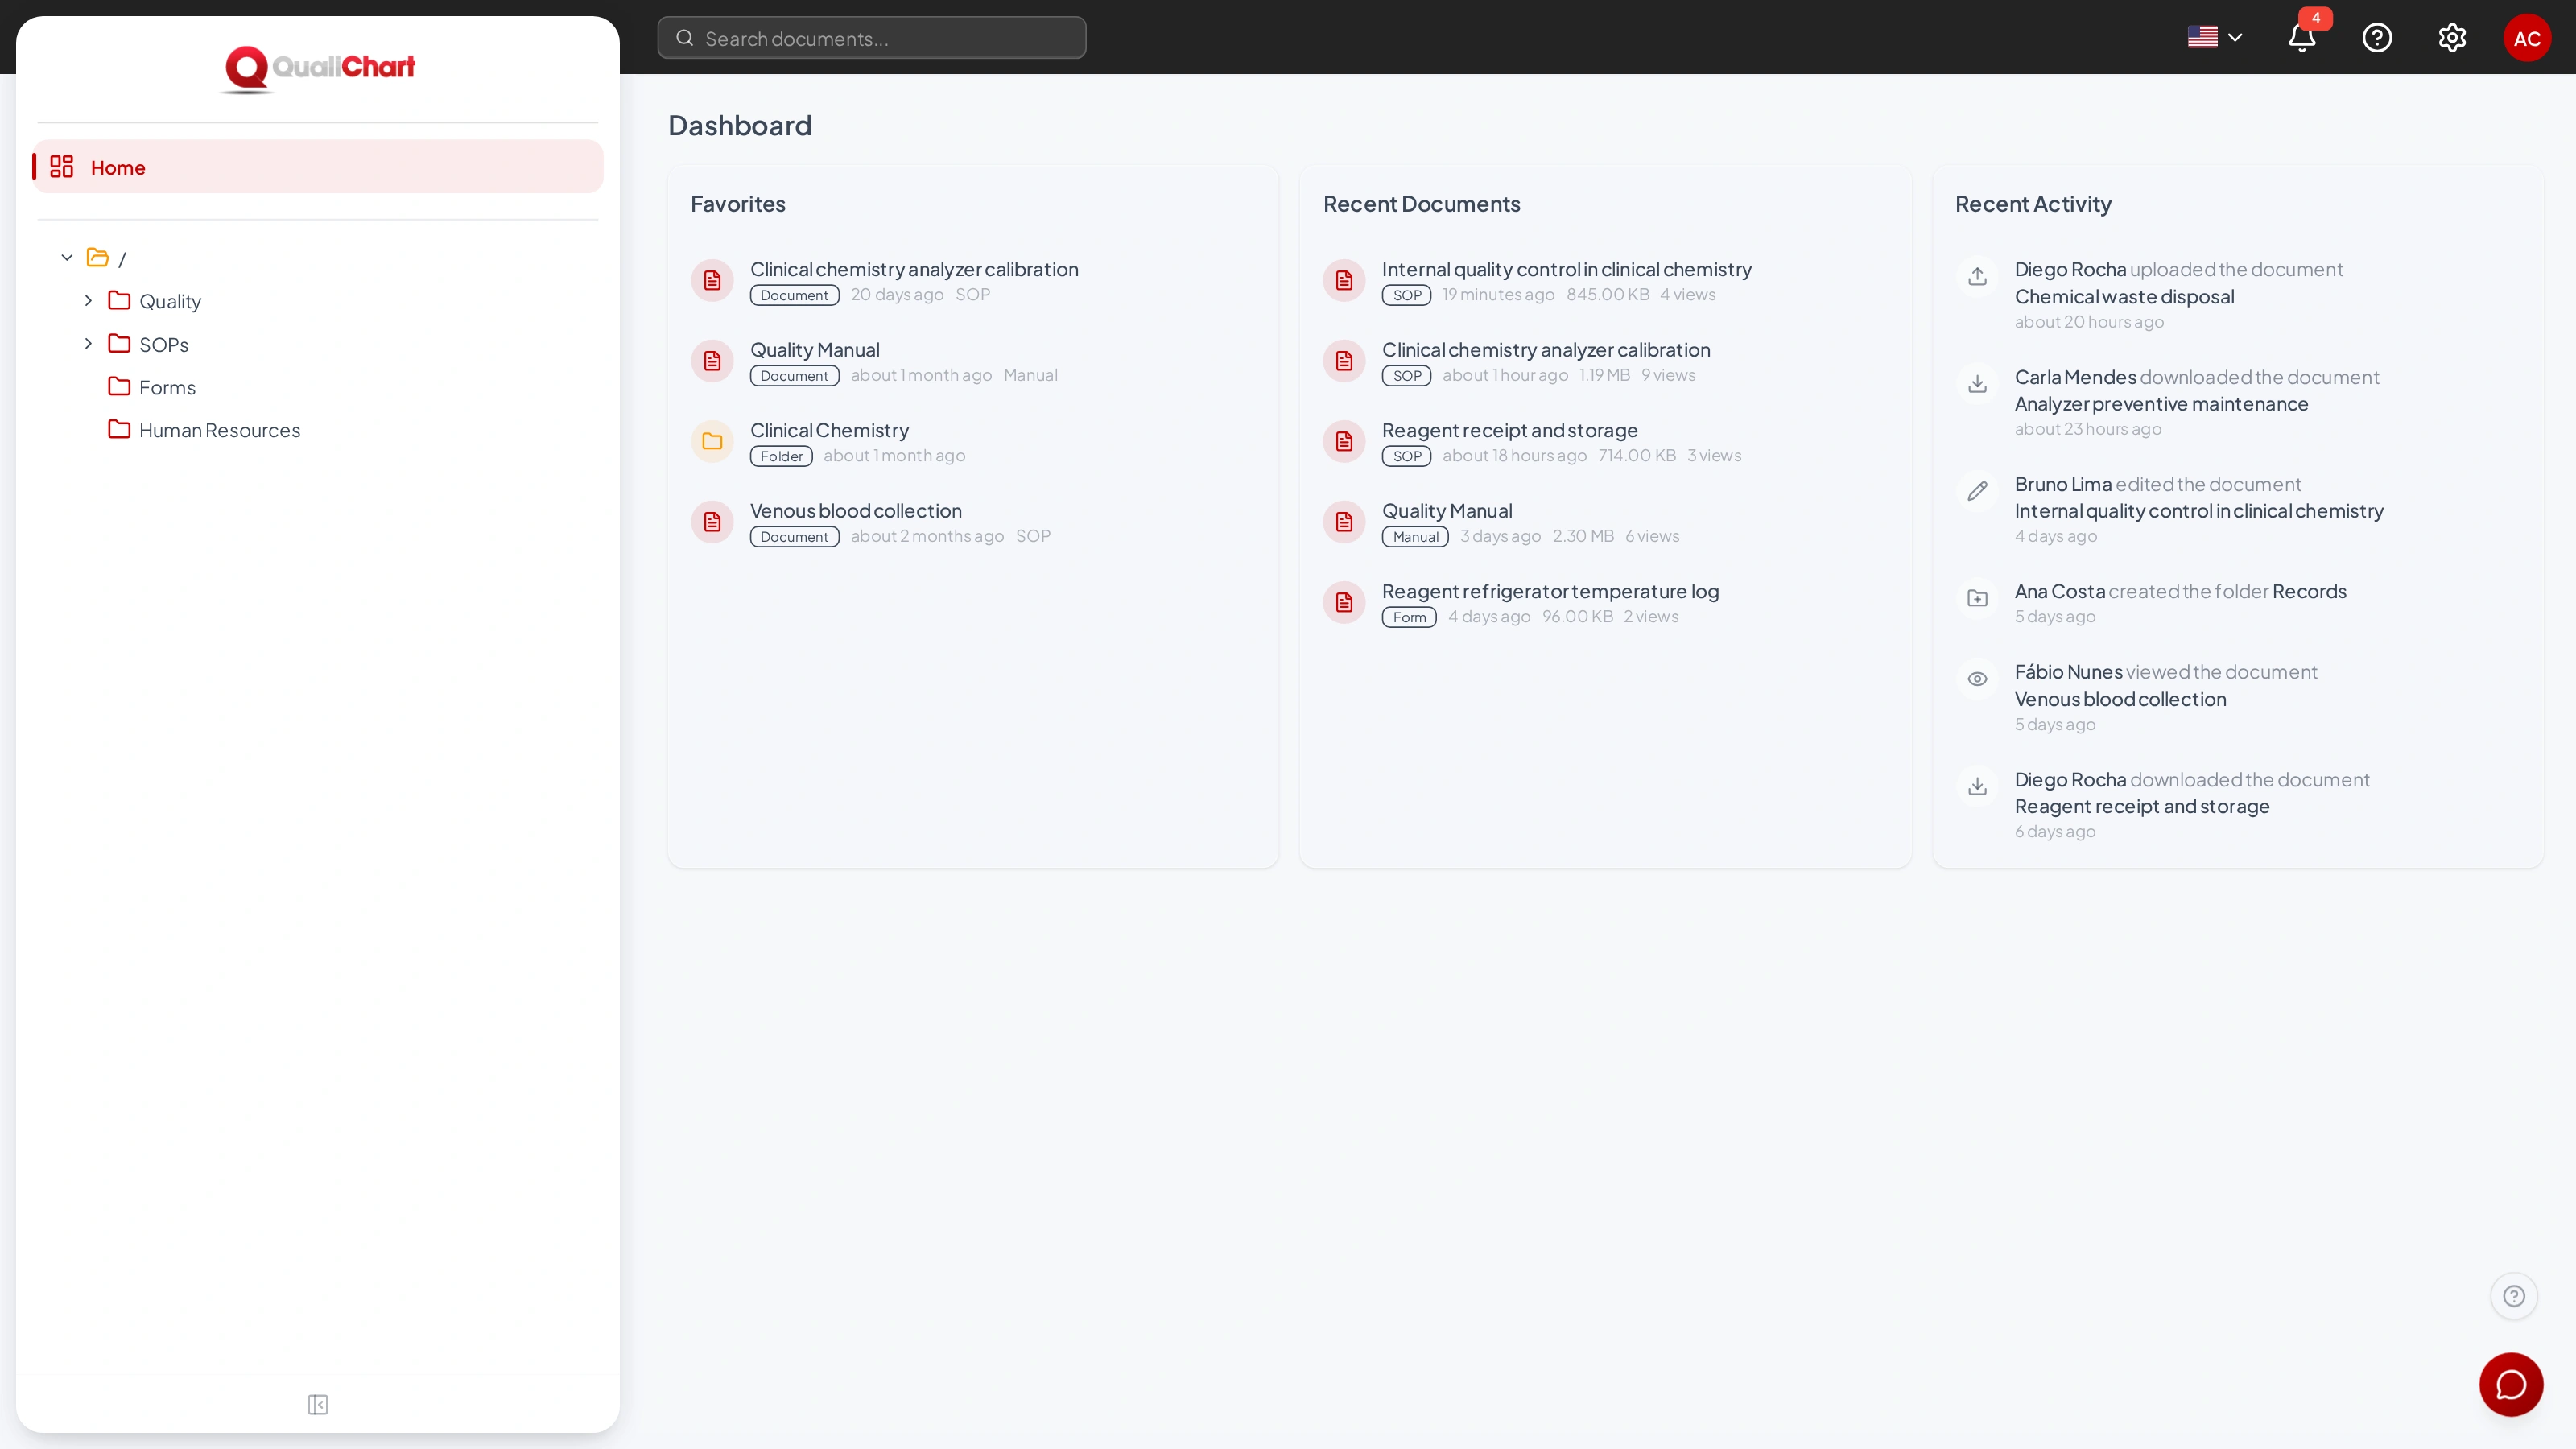
At the bottom of each panel, Load more shows older items.
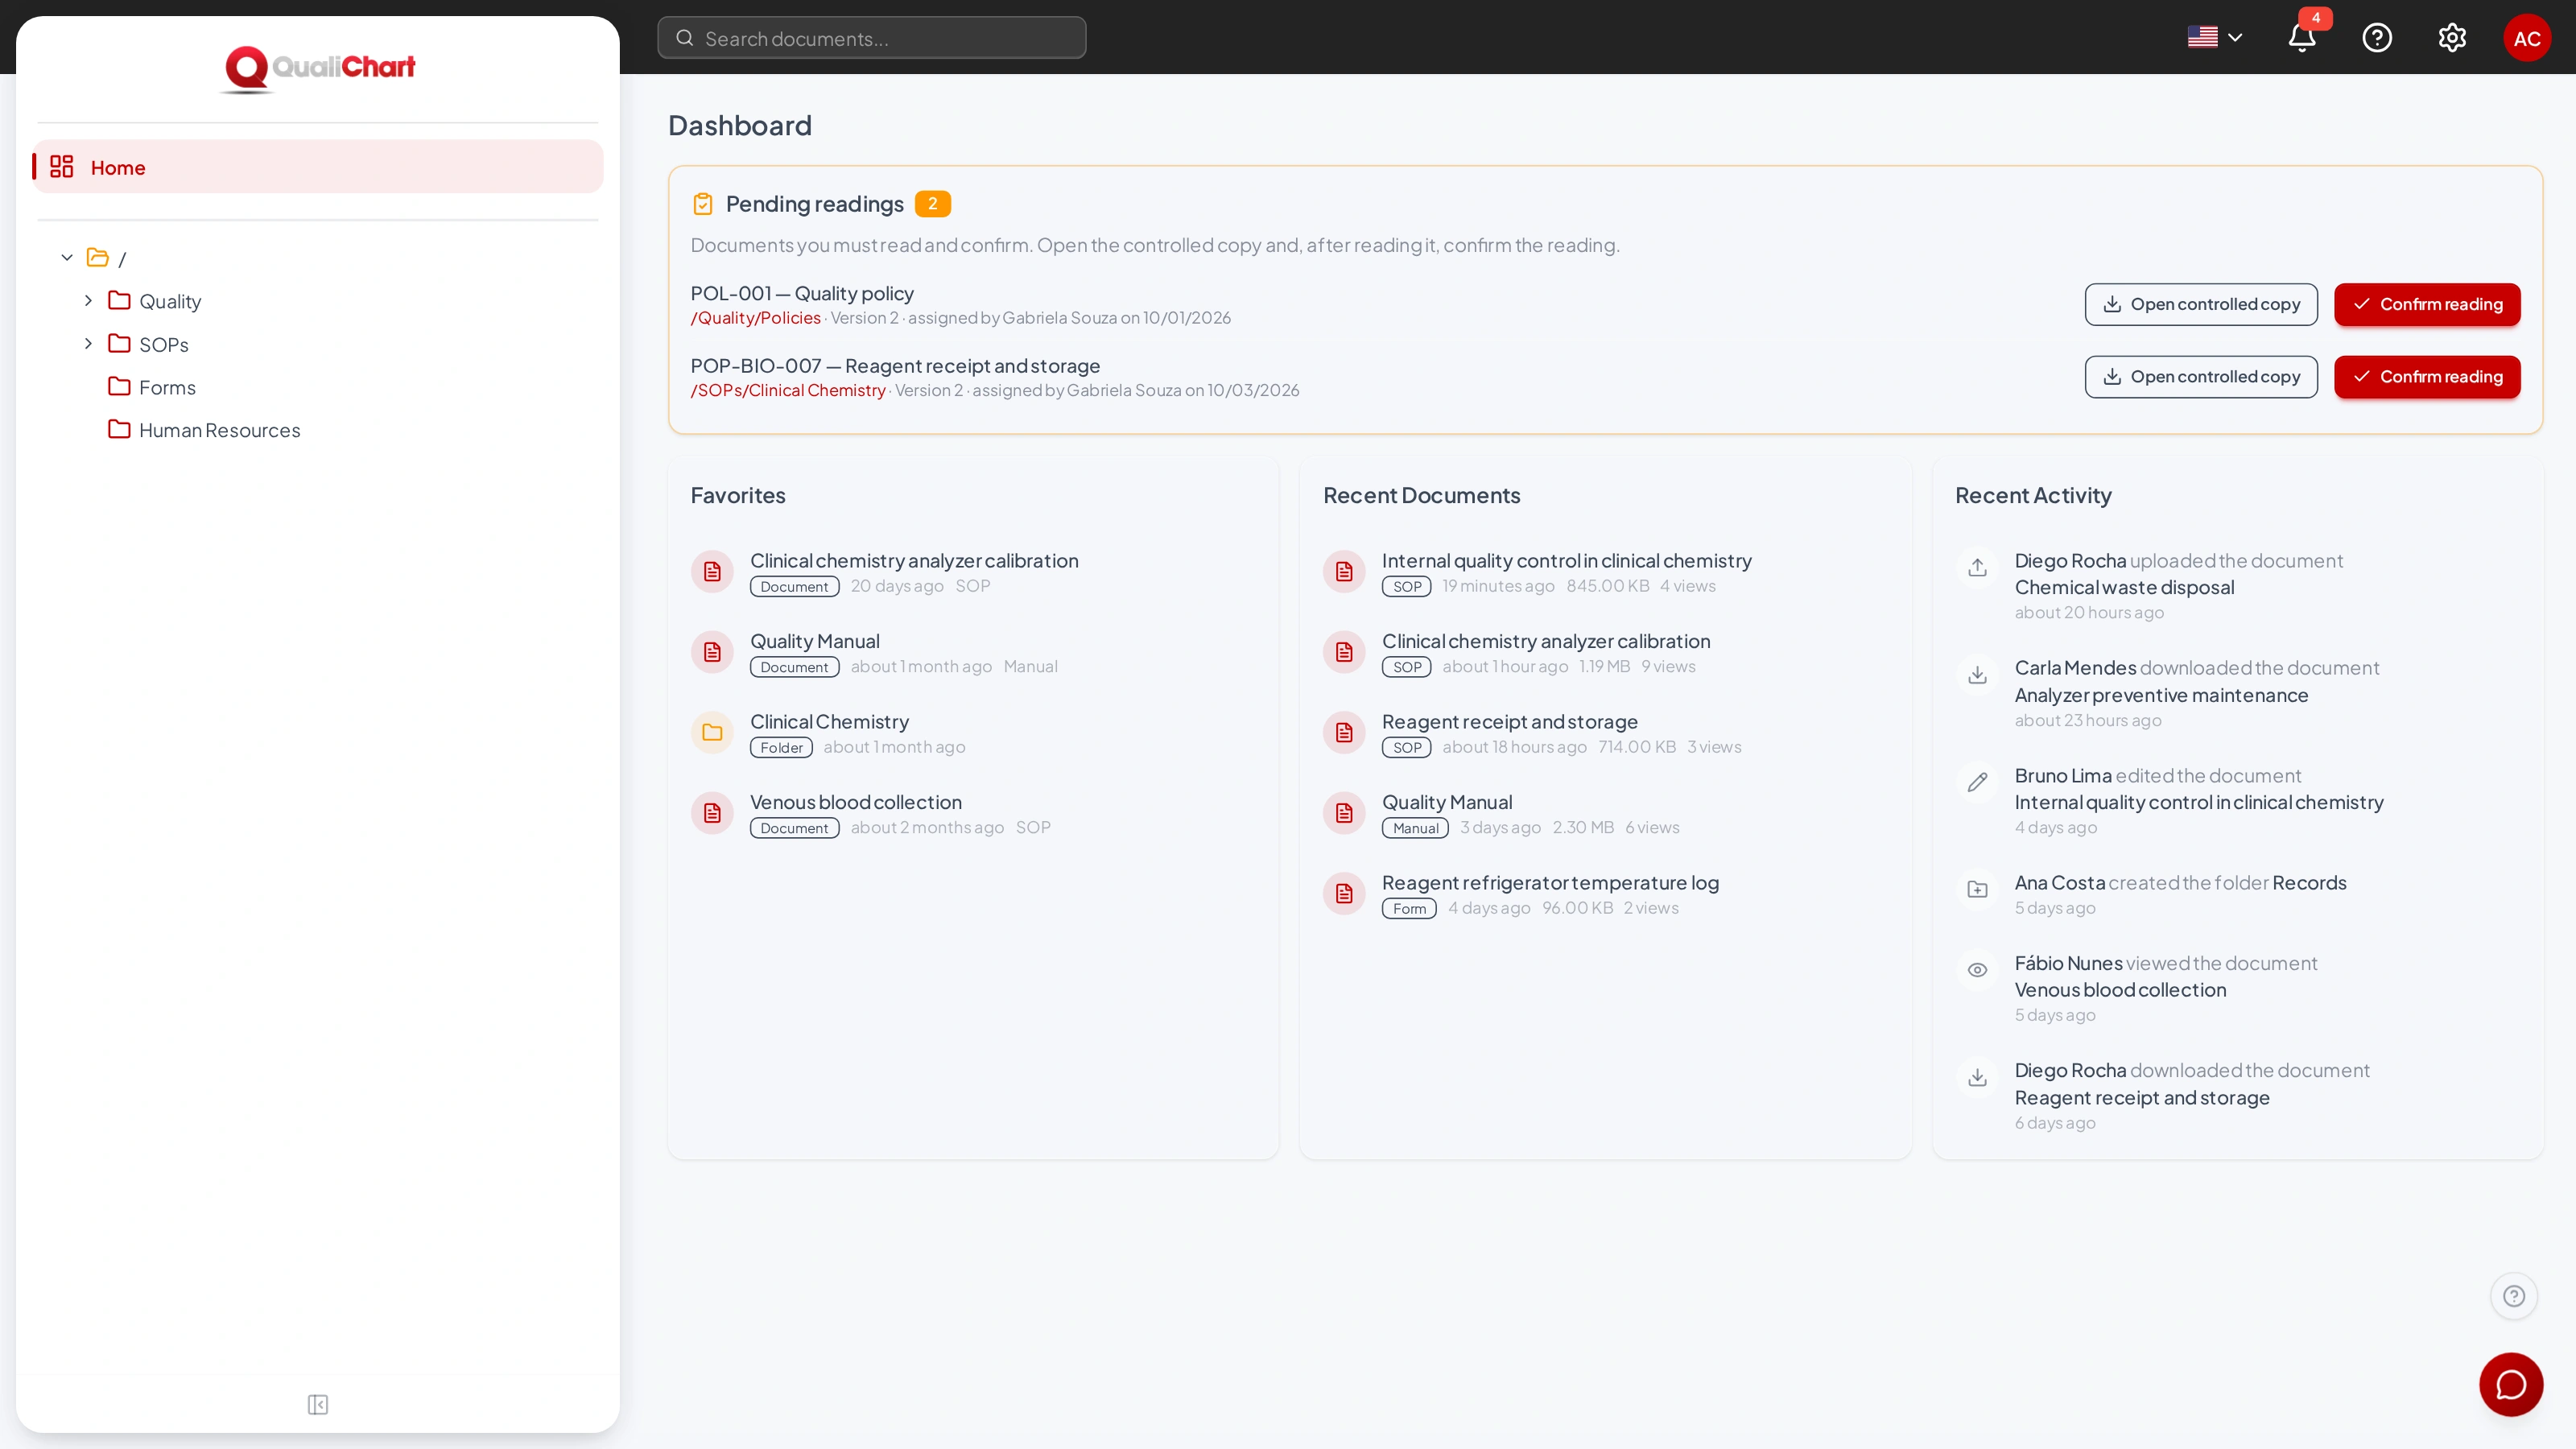
When you have pending required readings, the Pending readings panel appears at the top of the screen (see Required reading).
Folders
Folders organize documents in a tree that starts at the root folder /. Open a folder from the tree on the left or from the subfolder cards. The path at the top of the screen takes you back to the parent folders.
Create a folder or subfolder
- Open the folder where the new folder should go and click Create Subfolder — or use the + next to the folder in the tree.
- Enter the Folder name and, optionally, a Description.
- Set the Access Permissions: keep Access for everyone or turn it off to choose the groups (see Folder permissions).
- Click Create.
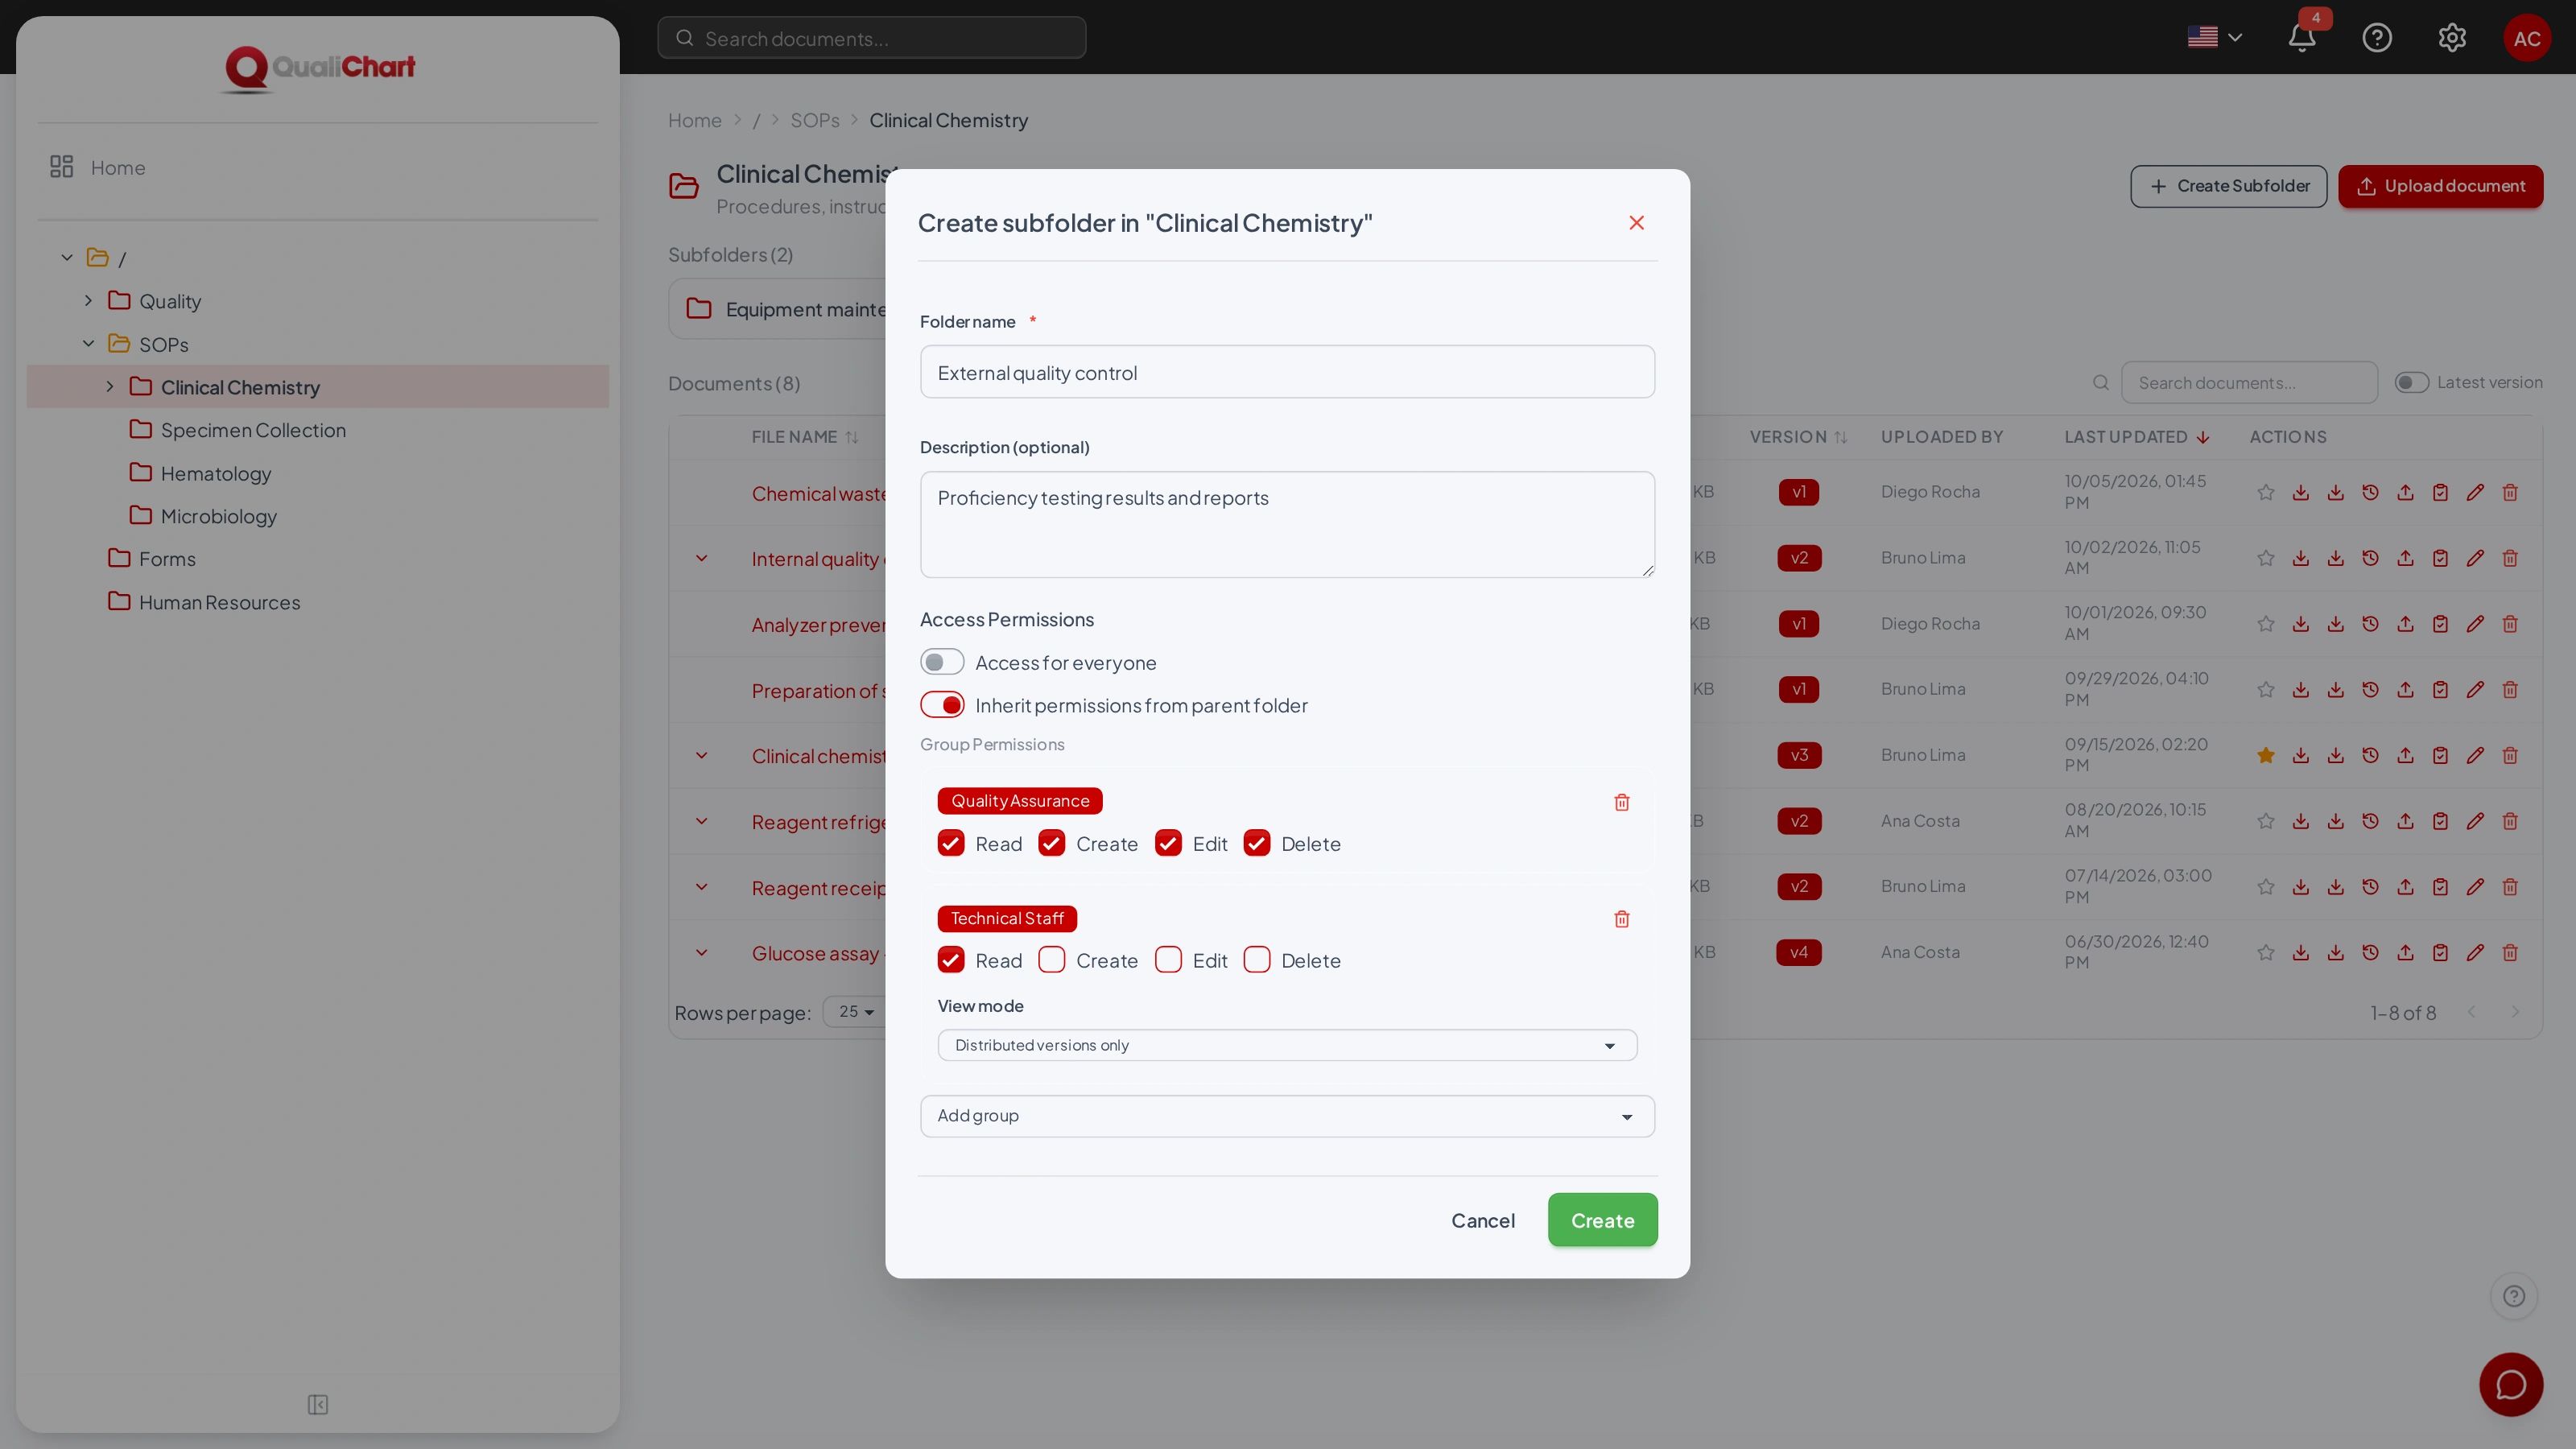
Creating folders requires the Manage folders permission and the Create right in the folder where the new folder will go.
Edit, favorite and delete
In the tree, hover over the folder: the star adds it to your favorites, the pencil opens Edit folder (name, description and permissions) and the trash can deletes it. The header of the open folder also has the favorite star. Editing requires the Edit right in the folder.
Folder documents
When you open a folder you see its name, its description, the subfolder cards — with the number of documents and subfolders in each — and the documents table.
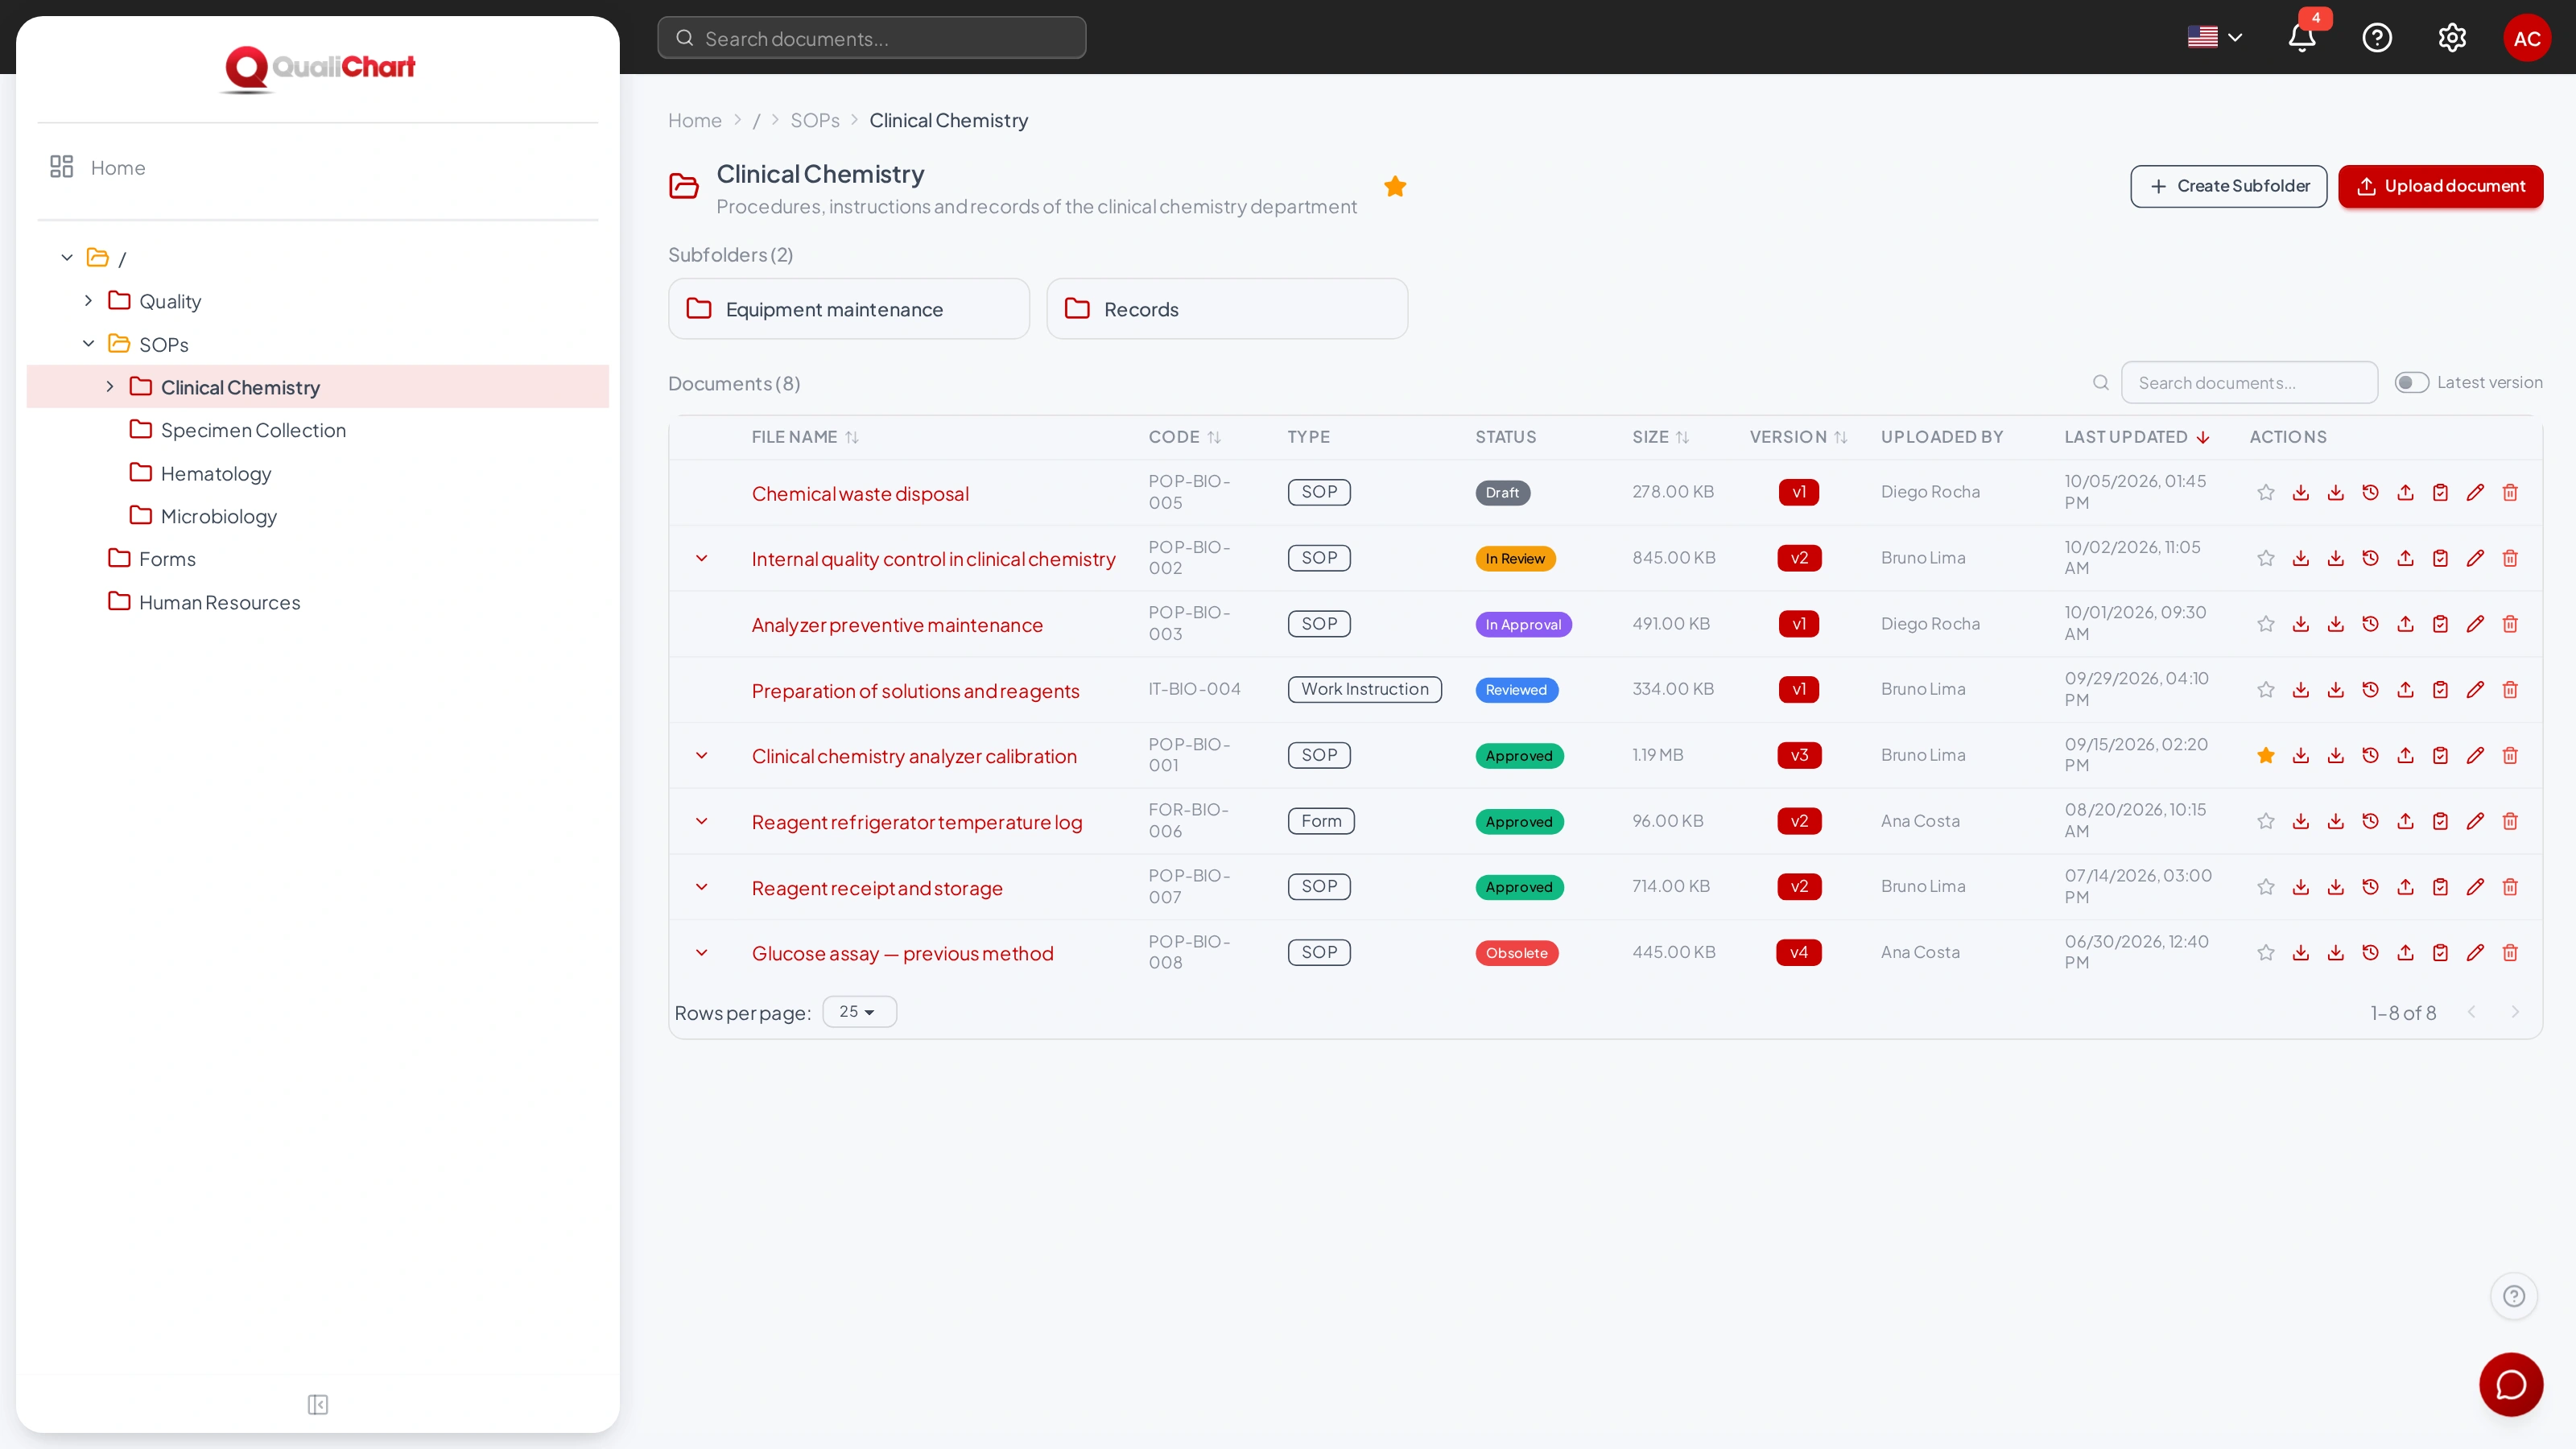
| Column | Content |
|---|---|
| File Name | The document name. Click it to download the file. |
| Code | Identification code, such as POP-BIO-001. It appears on the cover page. |
| Type | Document type, such as SOP or Form. |
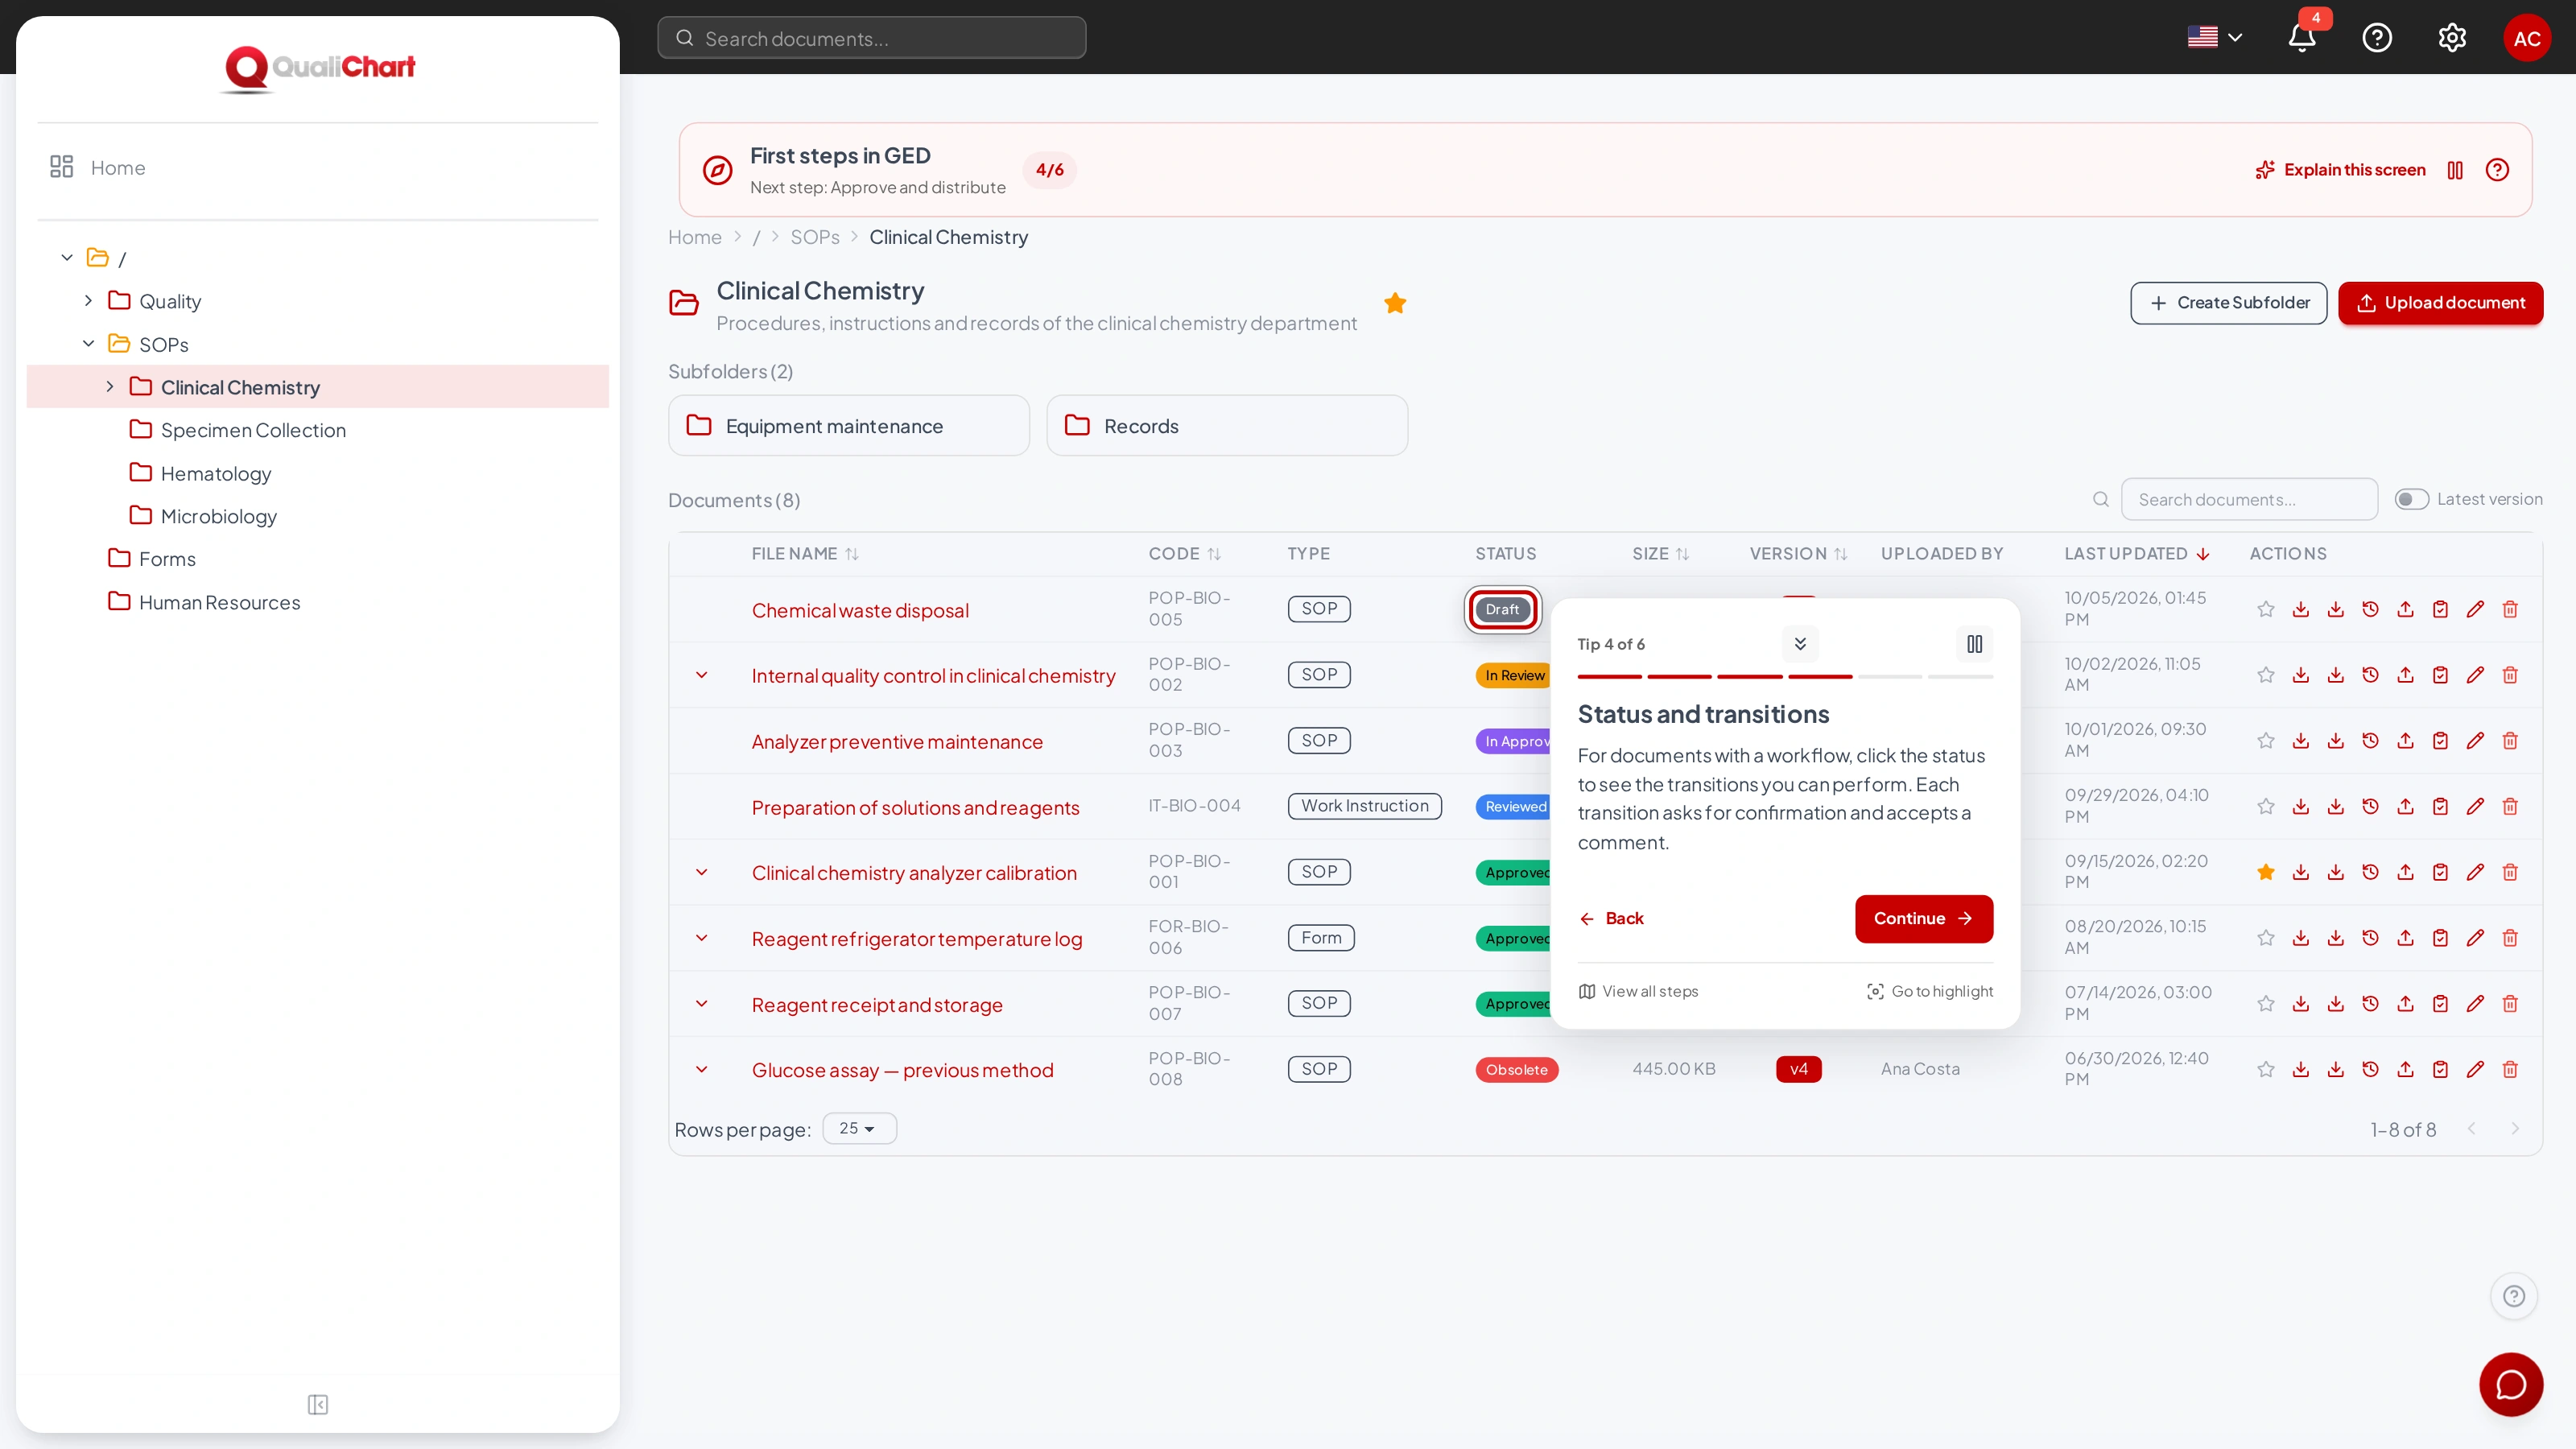
| Status | Current status in the approval workflow. For documents with a workflow, click it to see the transitions. |
| Size, Version, Uploaded by and Last Updated | The file size, the version number shown, who uploaded it and the date of the last update. |
| Actions | Favorite, download, download with cover page, version history, new version, required reading, edit and delete. |
Click a column title to sort, and use Search documents... to filter the folder by name. Documents with more than one version have an arrow on the left: click it to see the previous versions and download any of them.
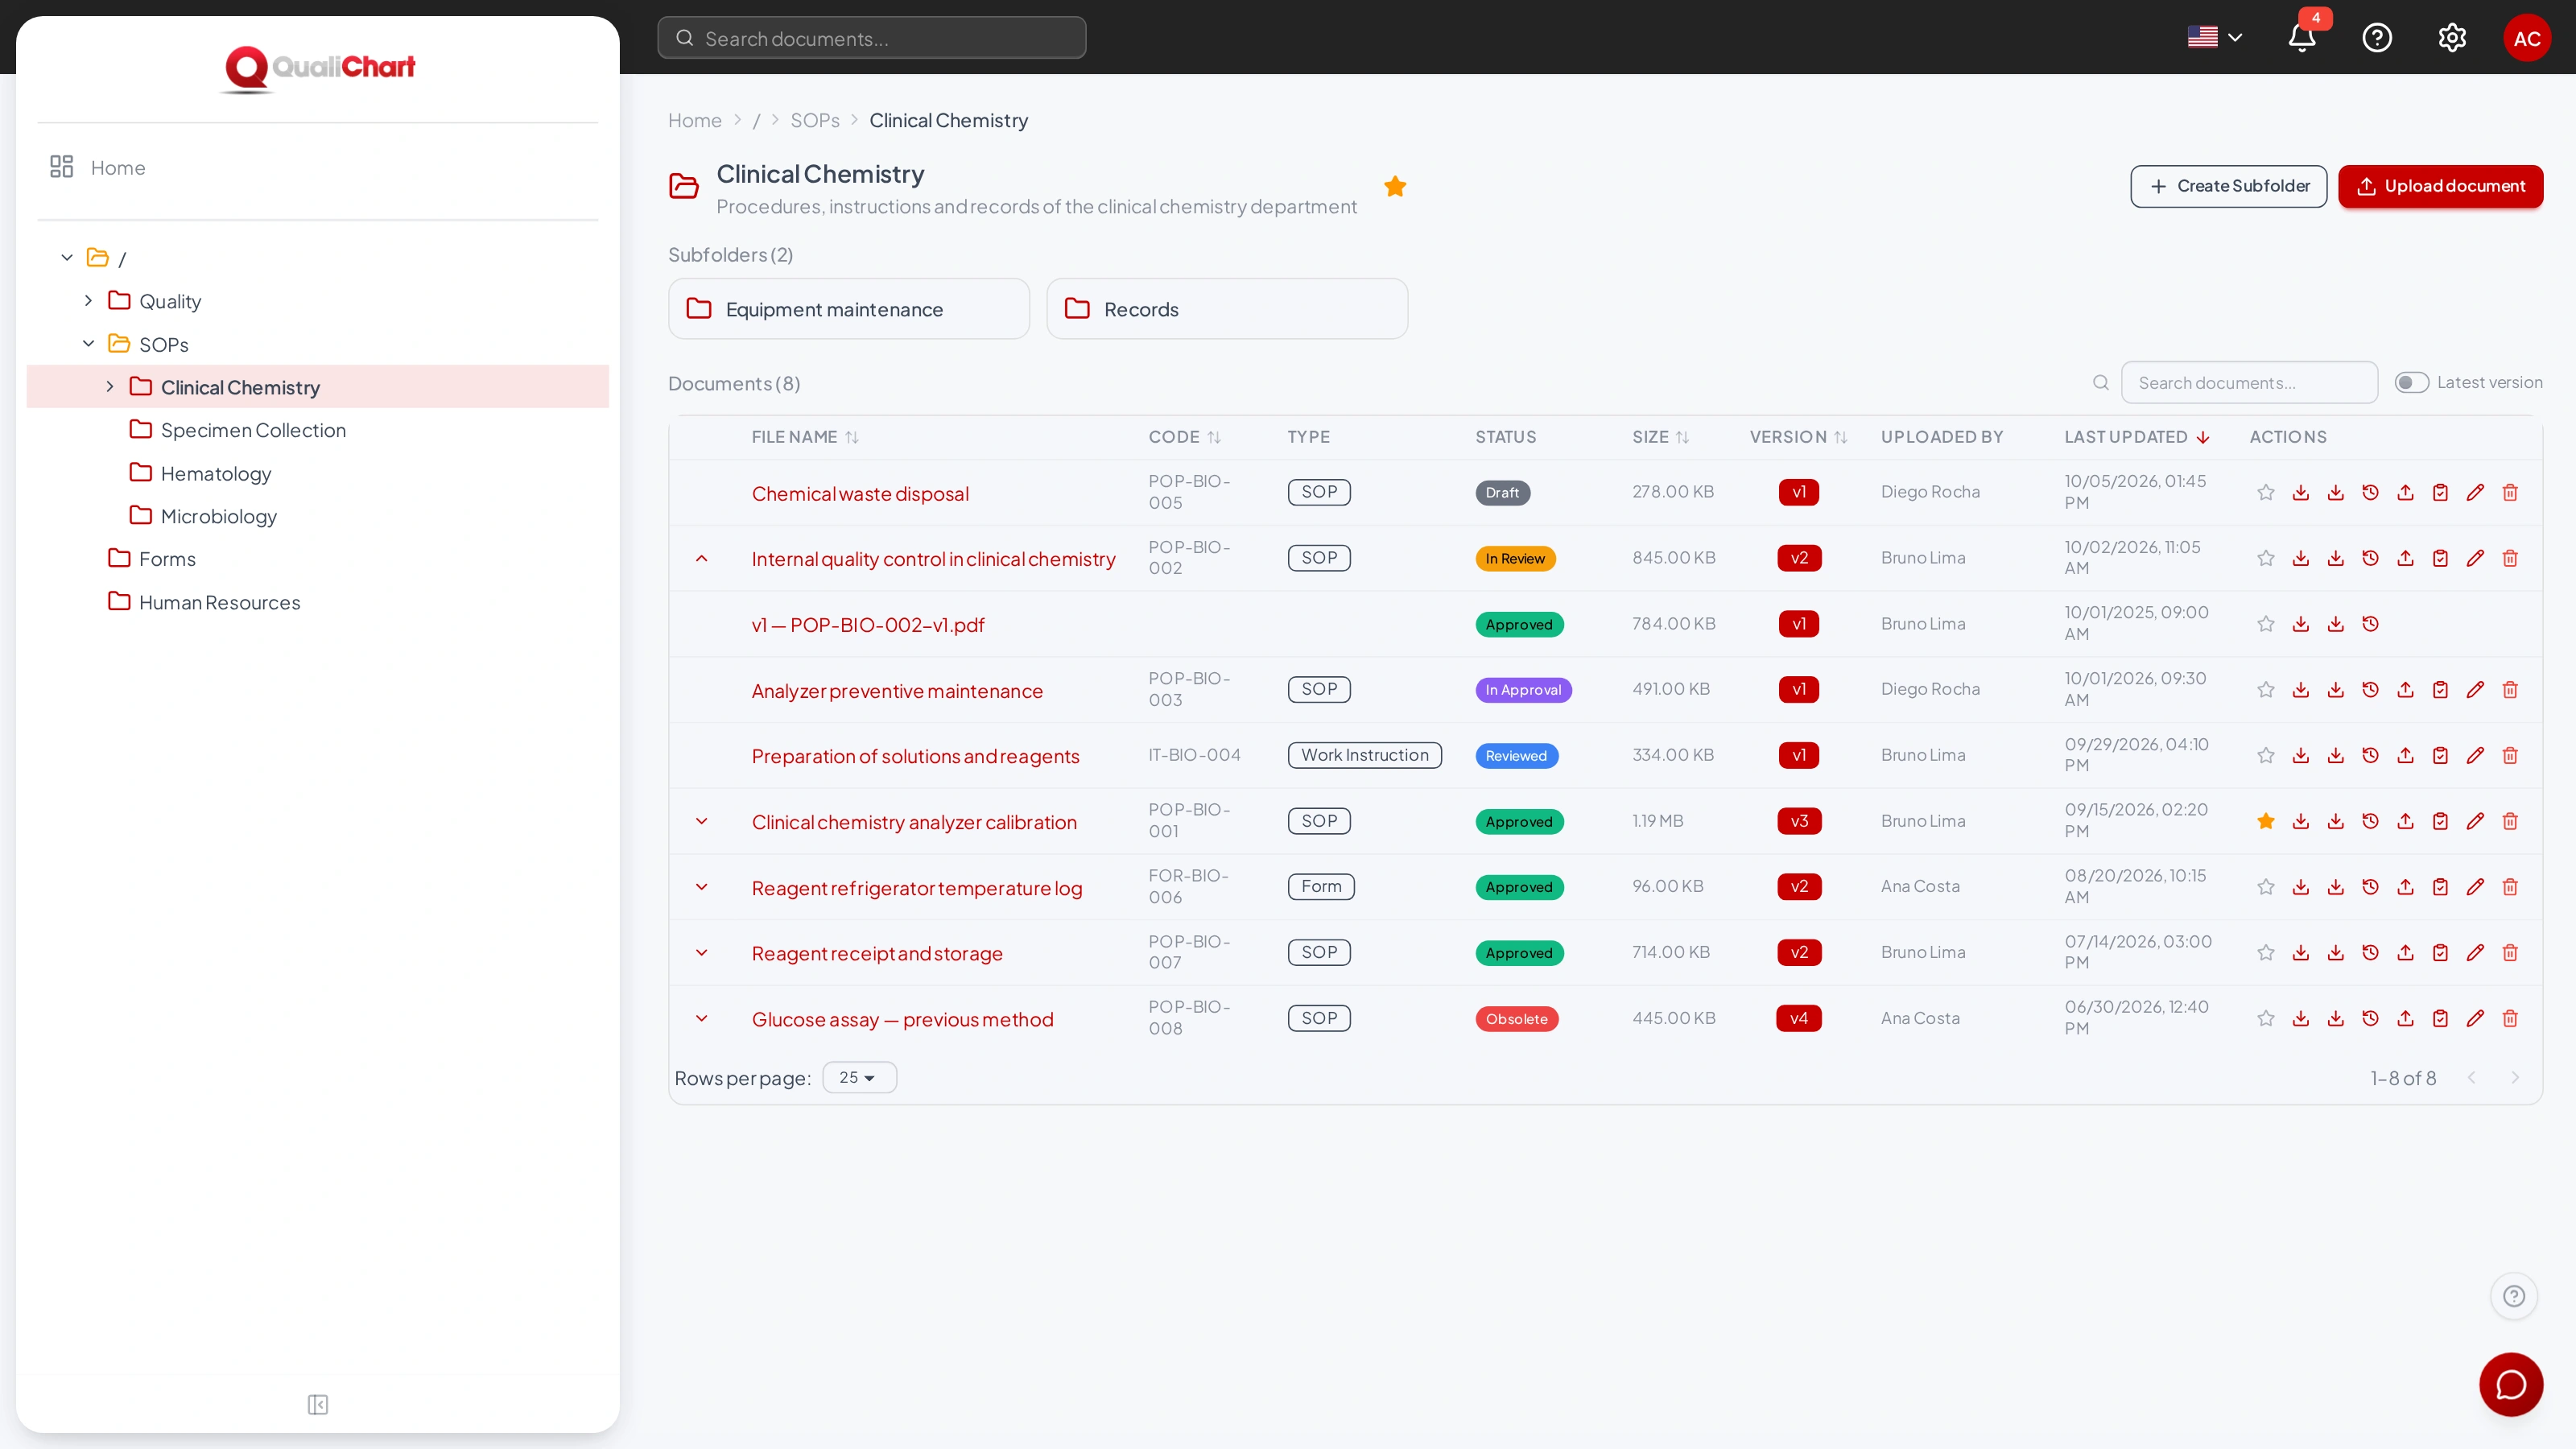
Latest version or distributed version
The selector next to the search box switches between Latest version — the most recent version of each document, in any status — and Distributed Version, which shows only the current controlled copy. In the distributed version view, the actions that change documents are hidden.
Users who only belong to groups set to Distributed versions only always see the controlled copy, without the selector, and do not see documents that have not been distributed yet.
Actions and permissions
| Action | Who can do it |
|---|---|
| Open, download, download with cover page and view the history | Anyone with the Read right in the folder. |
| Upload a document | Upload documents permission + Create right in the folder. |
| Upload a new version | Upload documents permission + Edit right in the folder. |
| Edit document details | Edit right in the folder. |
| Perform a transition | Edit right in the folder + membership in a group allowed for the transition. |
| Assign required reading | Edit right in the folder. |
| Delete | Delete documents permission + Delete right in the folder. |
Uploading documents
- Open the destination folder and click Upload document.
- Drag the file into the window or click Select File. The Document Name is filled in with the file name and can be changed.
- Choose the Document Type. The type defines the approval workflow and the validity period; without a type, the document has no status and no approval.
- Enter the Code, for example POP-BIO-001, and, optionally, a Description.
- Click Upload.
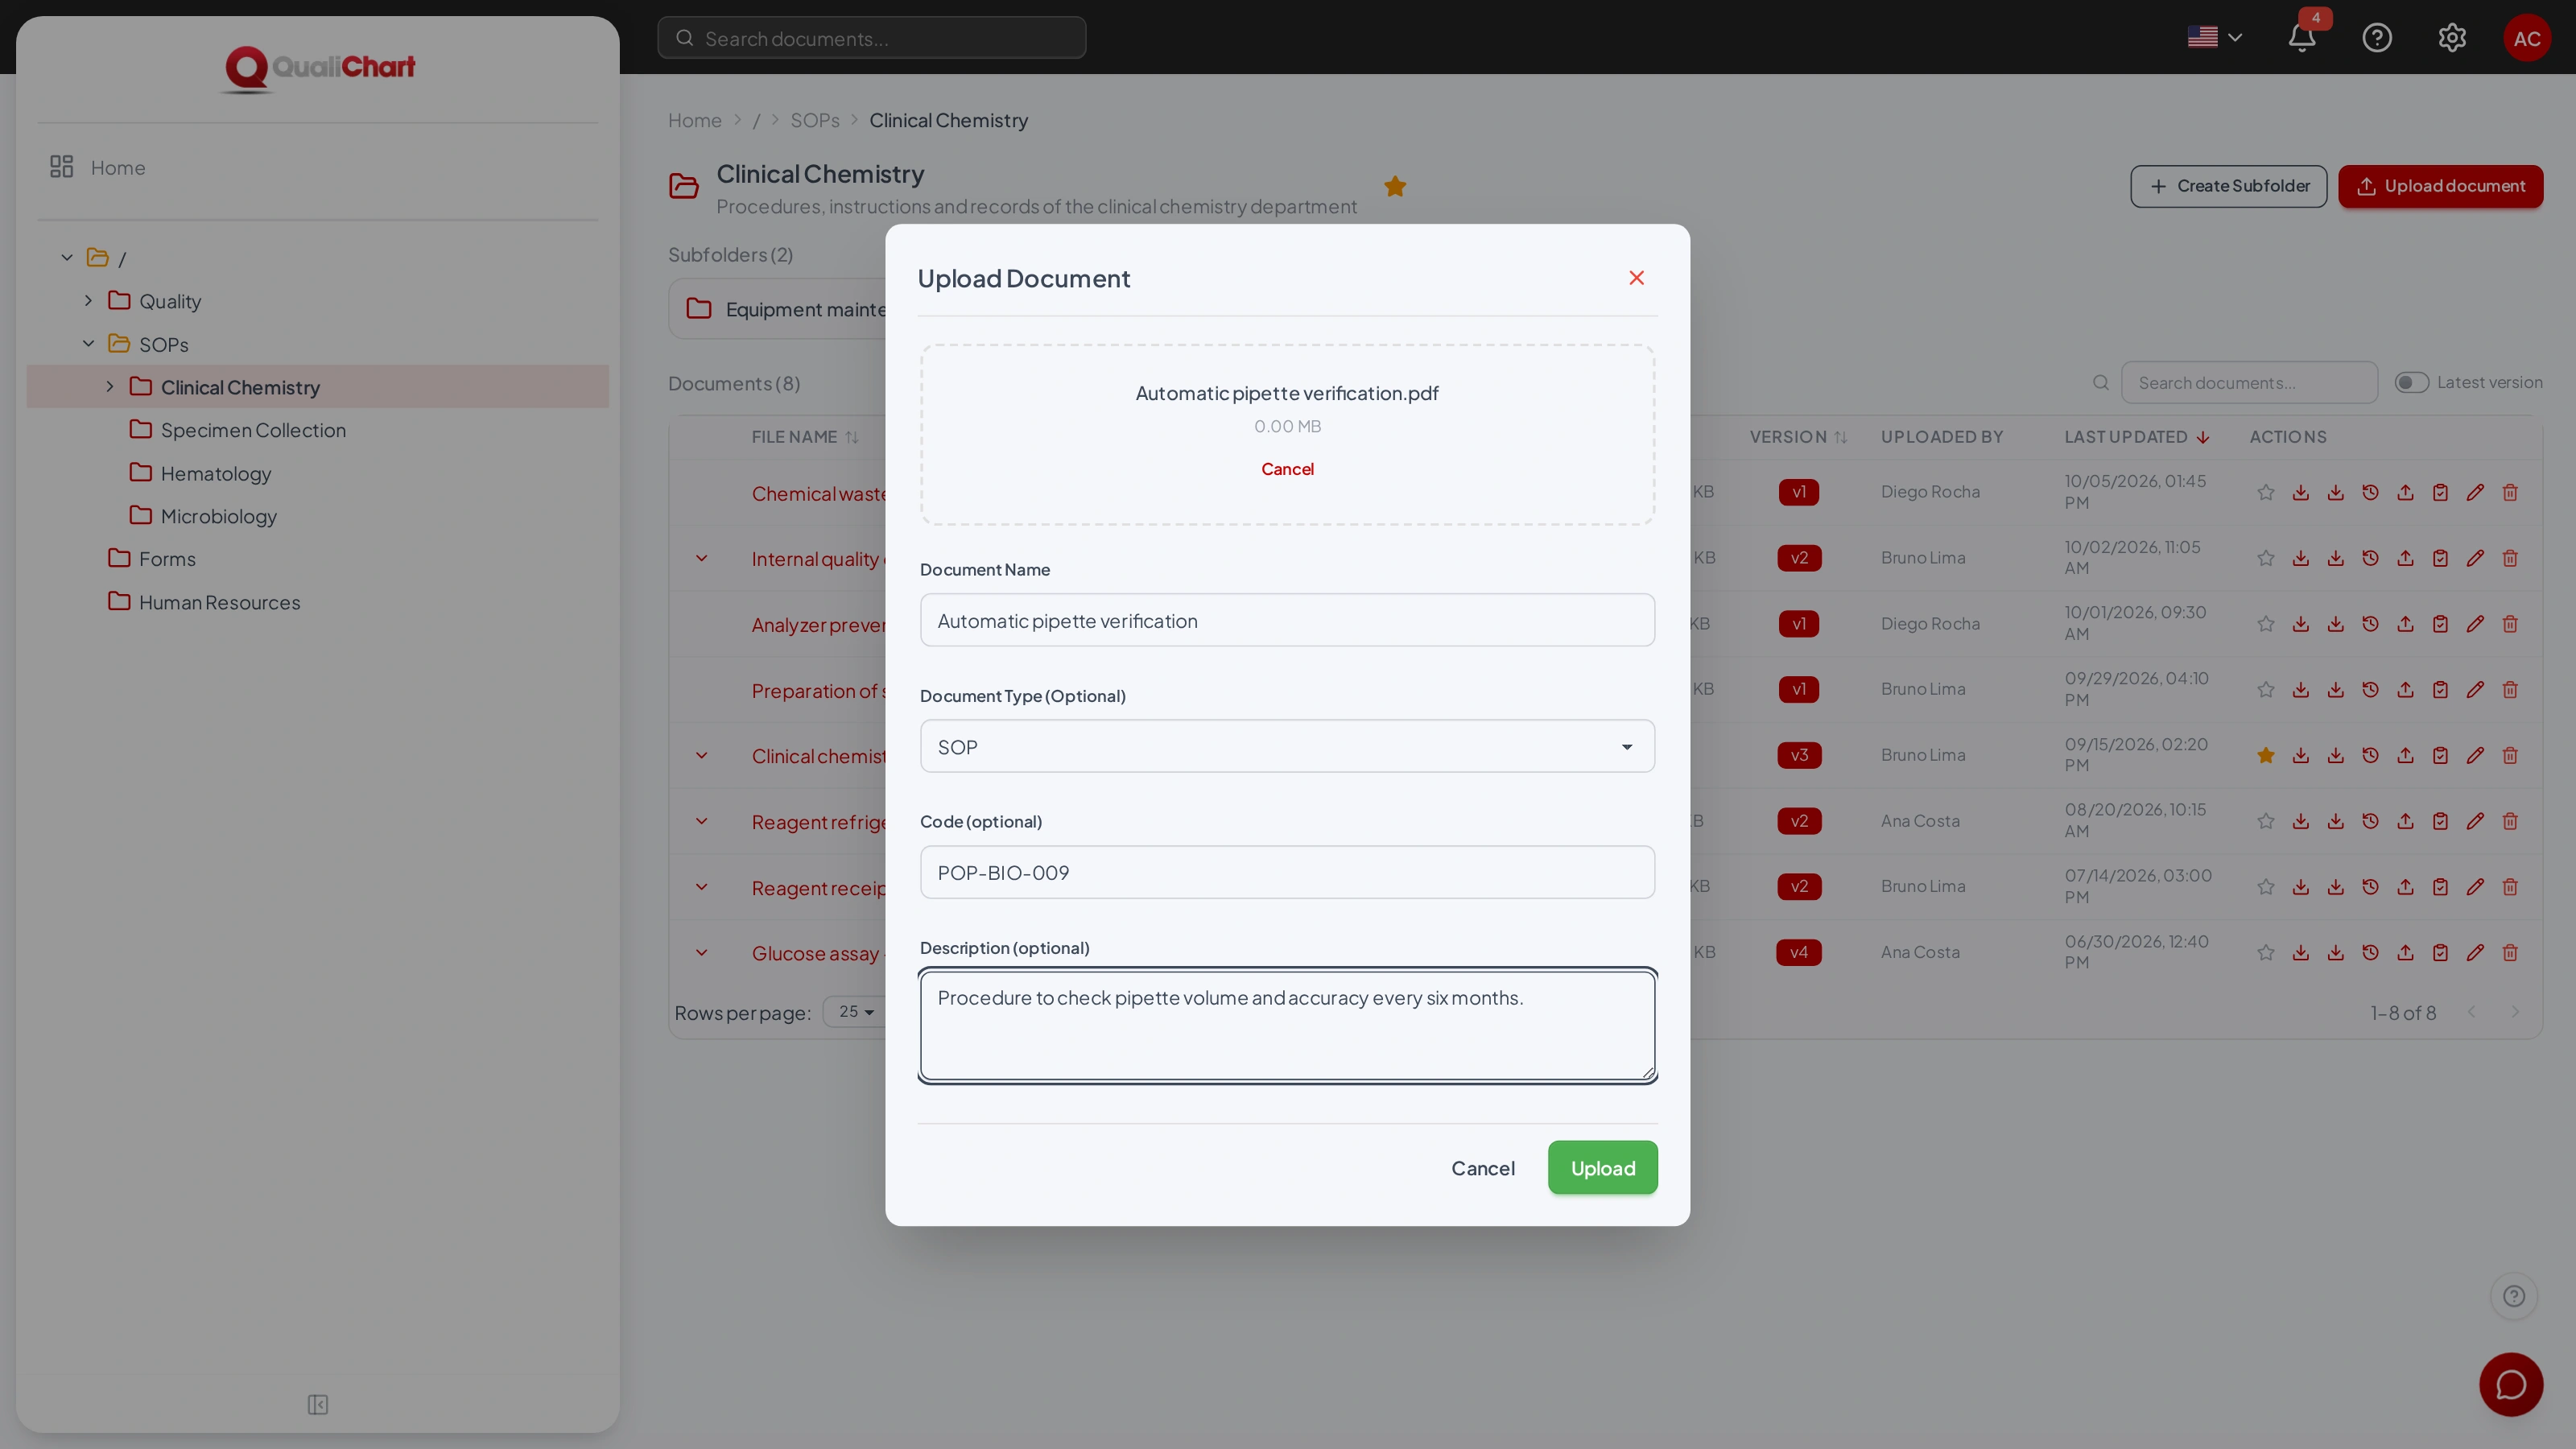
With a workflow, the document starts in the initial status, such as Draft, and moves on to review and approval (see Approval and distribution).
Warning about groups without access
When you choose the type, GED checks whether the groups that perform the workflow transitions can edit the folder. If any of them cannot, the Workflow Groups Without Access warning appears, listing each group and the affected transition. Cancel to adjust the folder permissions, or click Proceed Anyway; in that case, those people will only be able to perform the transition after they are given the Edit right in the folder.
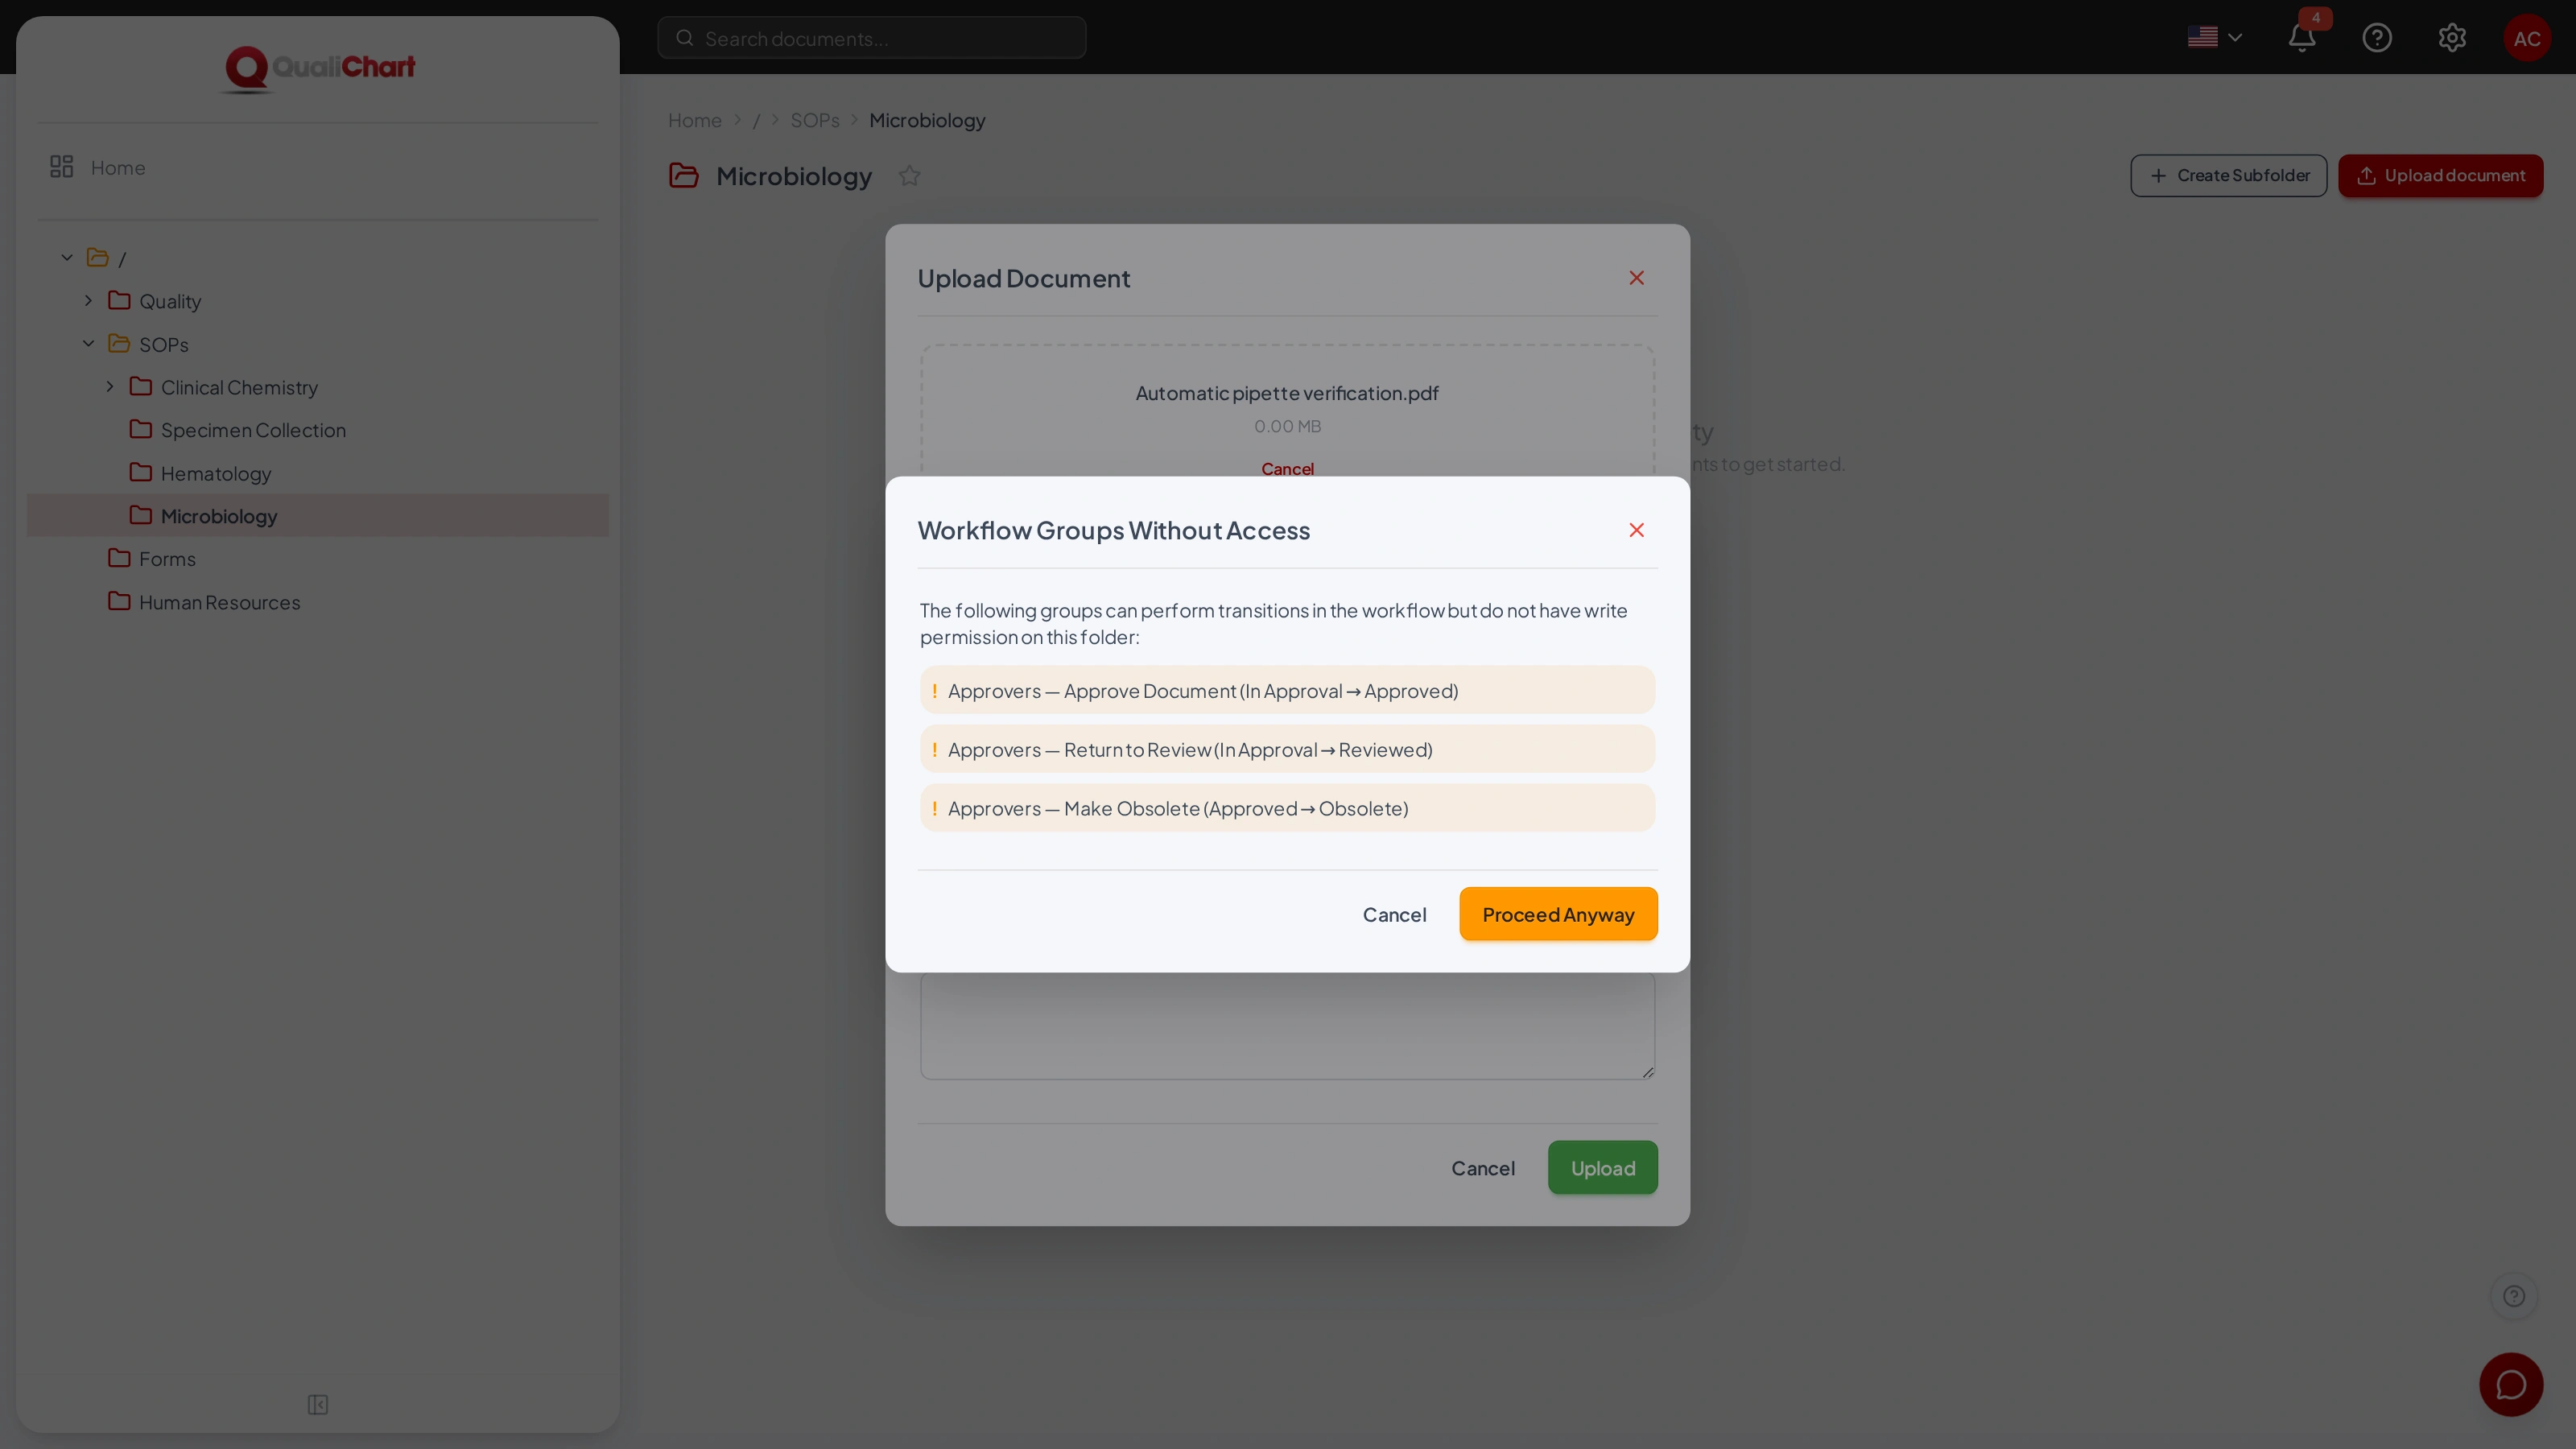
Formats, size and search
| Item | Rule |
|---|---|
| Accepted formats | Any file format. |
| Maximum size | Up to 50 MB per file; documents with a document type accept up to 10 MB. |
| Content read by search and the assistant | PDF, Word (DOC and DOCX), Excel (XLS and XLSX), TXT, CSV, HTML, Markdown and JSON. Documents without a workflow become searchable when they are uploaded; documents with a workflow, when they reach the distributed status. |
| Cover page | Generated on download for PDF and Word (DOCX) files. |
Versions, editing and history
Upload a new version
- In the document row, click New Version.
- Select the file. The window shows the current version number and the new one.
- Describe the changes — they appear in the history and on the cover page — and click Upload.
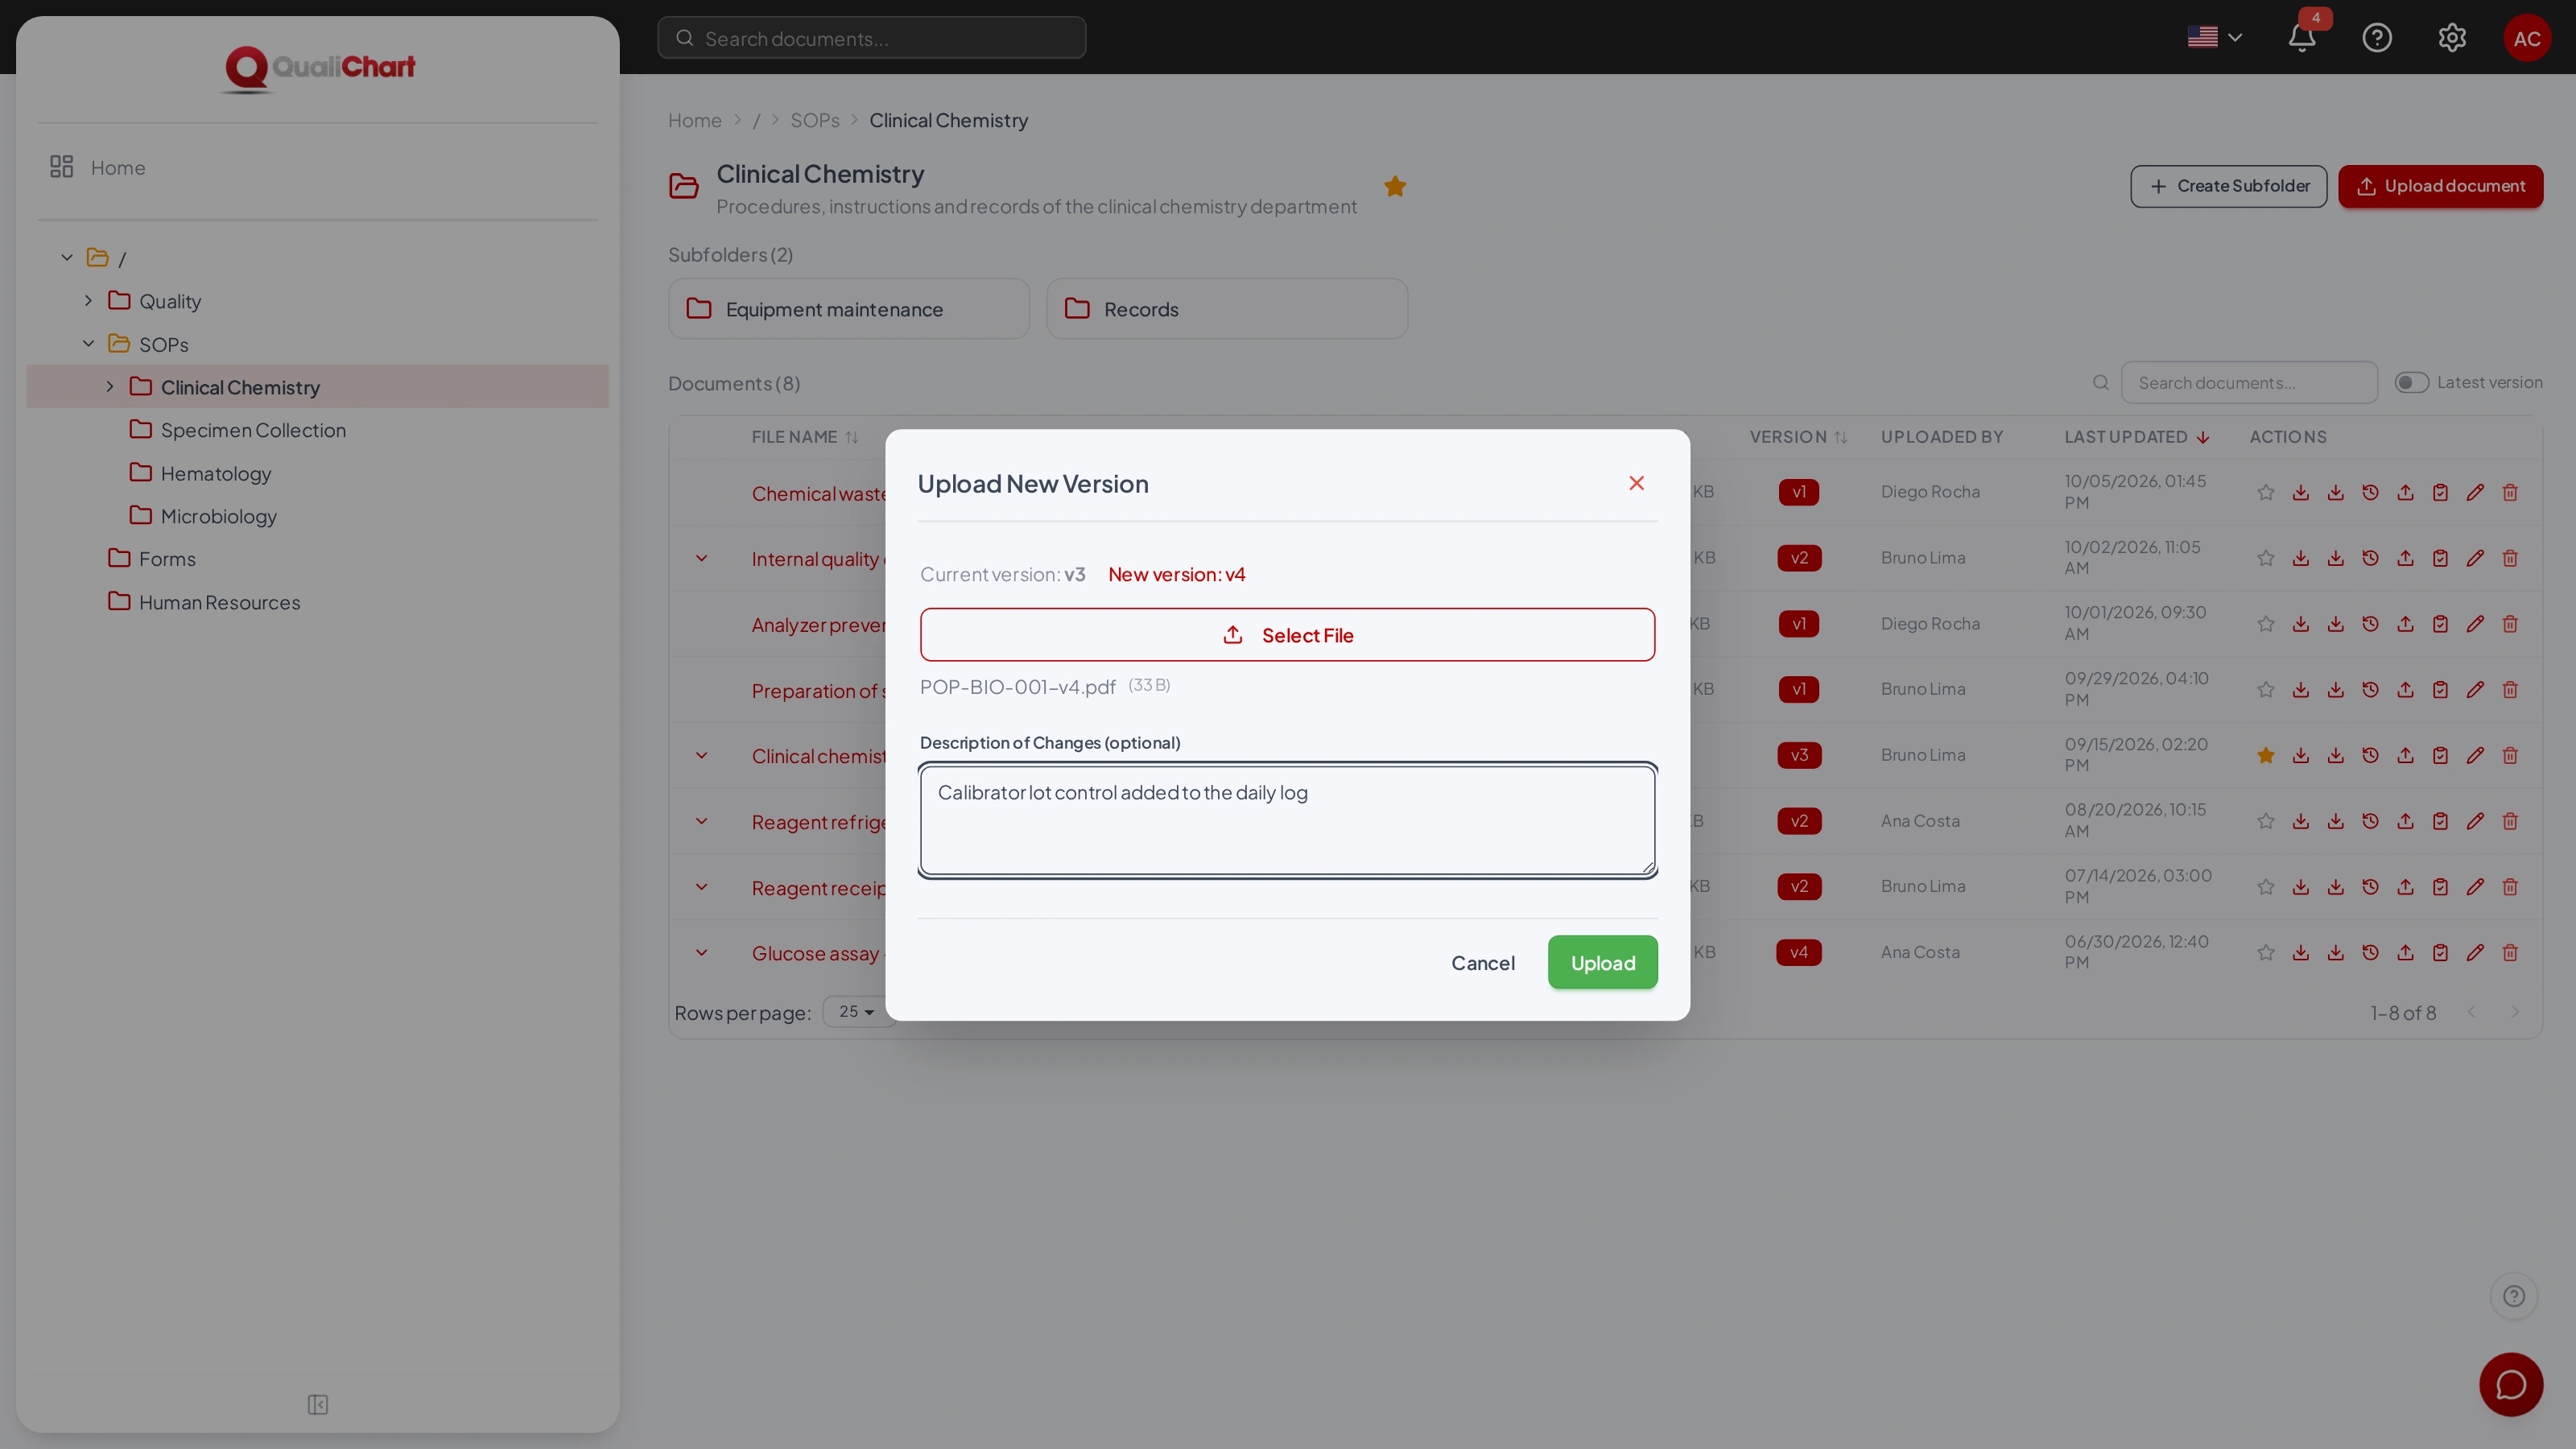
For documents with a workflow, the new version goes back to the initial status and must go through the workflow again; the history records "New version uploaded". The previous distributed version remains the controlled copy — and the one found by search — until the new one is distributed.
Edit document details
Edit changes the document name, description and type. The type can only be changed while the document has a single version.
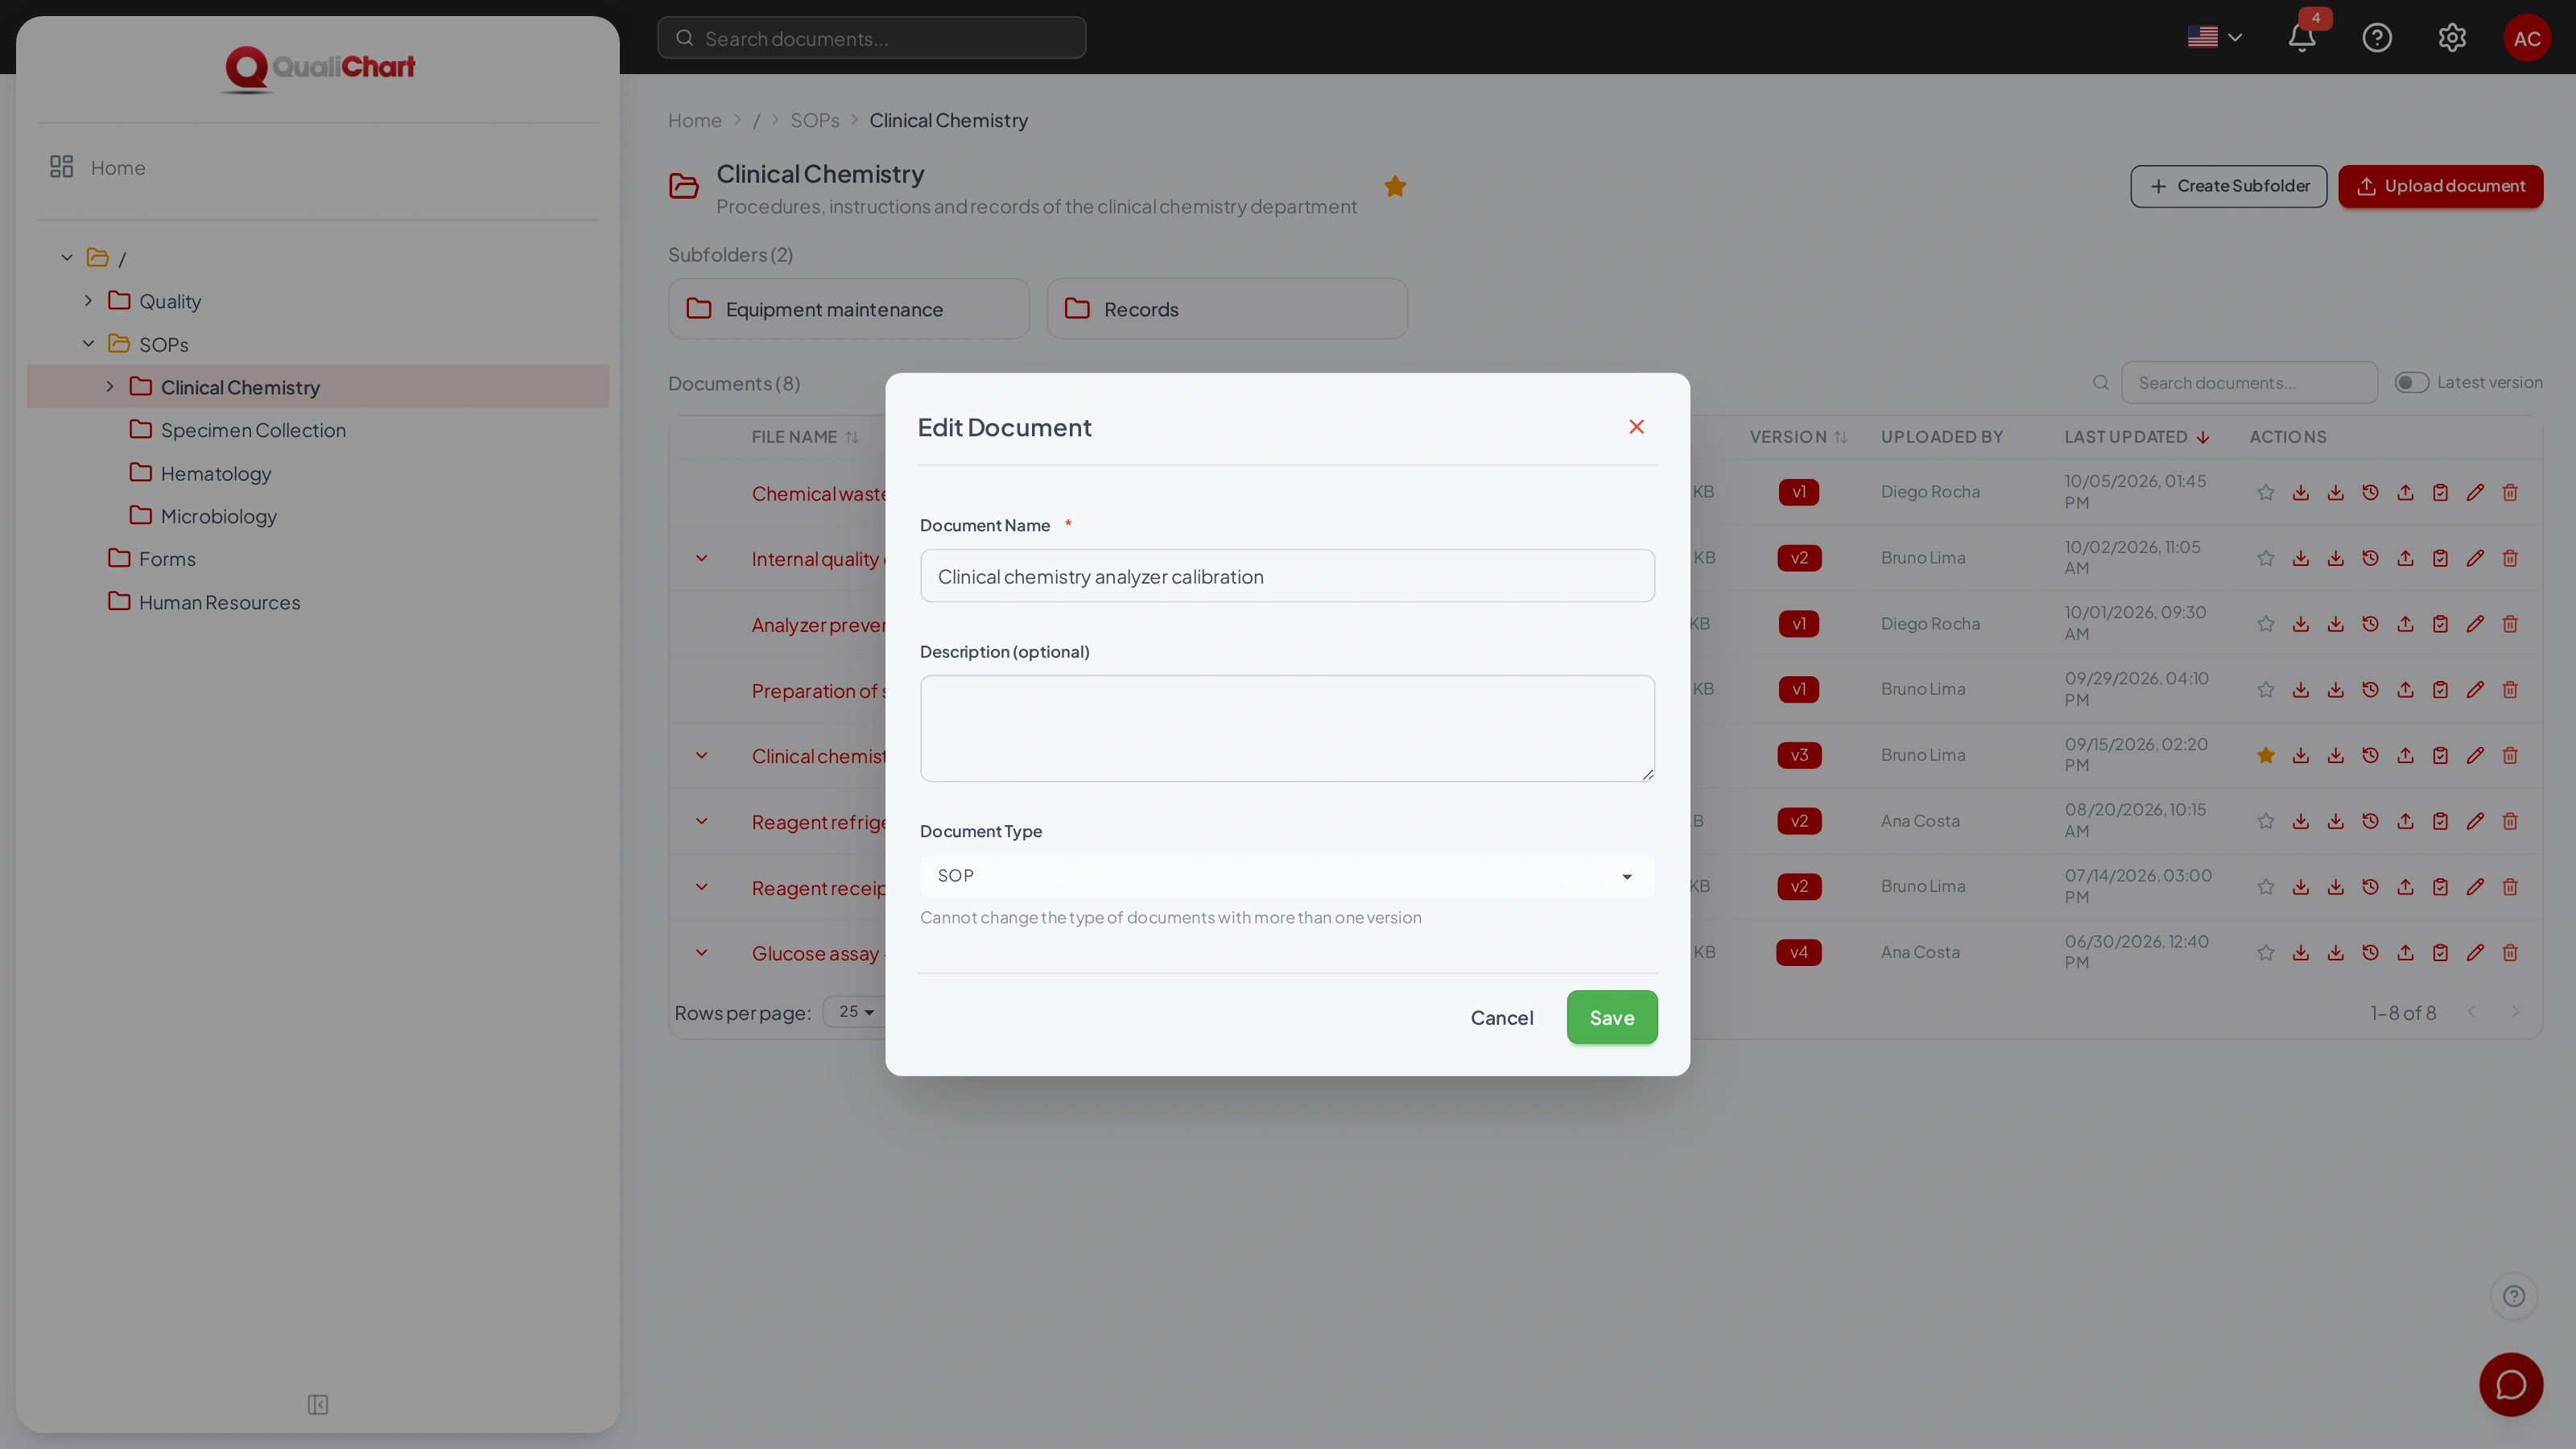
Version history
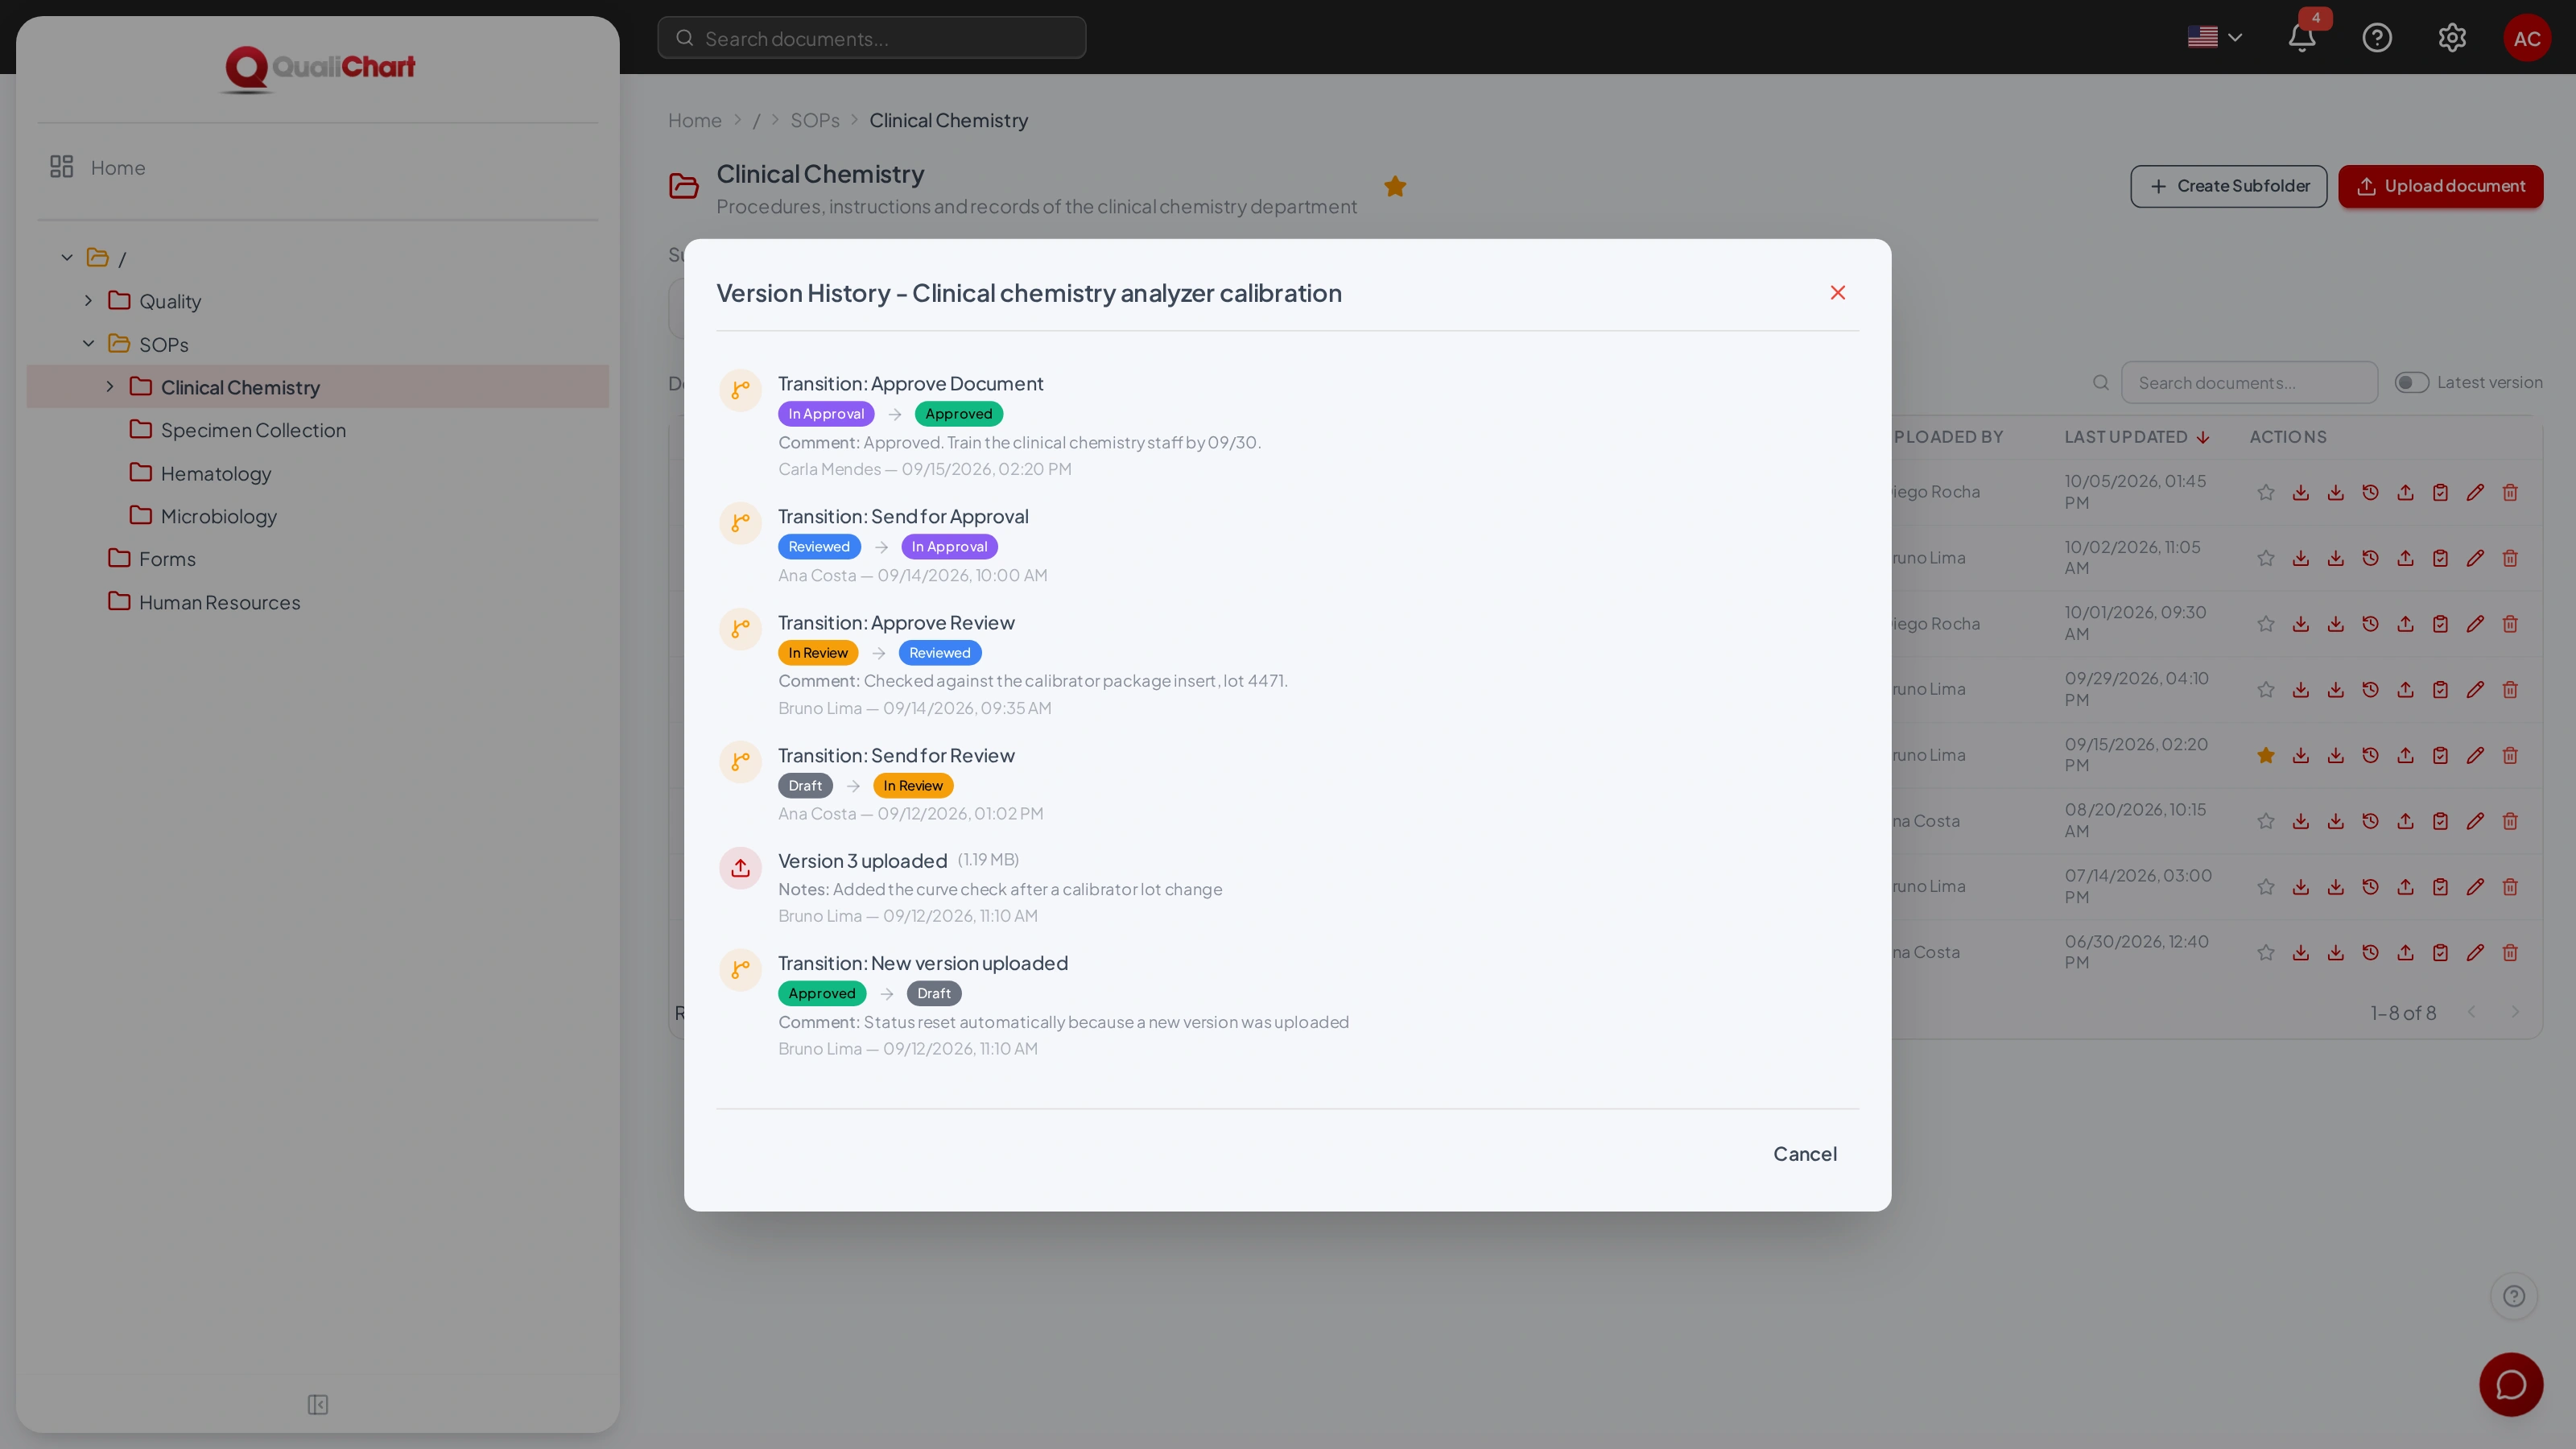
Version History lists, from newest to oldest, each version upload — with the description of changes — and each status transition, with who performed it, the date and time, and the comment.
Delete a document
Delete removes the document and all its versions after a confirmation, and the action cannot be undone. You need the Delete documents permission and the Delete right in the folder.
Back to contentsCover page and controlled copy
Download with cover page generates a PDF with an identification page before the content. PDF and Word (DOCX) files get the cover page; other formats are downloaded as they are.
| Cover page field | Where it comes from |
|---|---|
| Header | Laboratory name and CNPJ, when registered. |
| Document Name, Code, Version and Status | Details of the document and of the downloaded version. |
| Issue Date and Prepared by | Date the version was uploaded and who uploaded it. |
| Reviewed by, Approved by… | Workflow transitions marked with "Show on cover page", with the name of the person who performed them and the date. The label comes from the "Cover page label" field. |
| Next Review | Date calculated at distribution from the type's validity period; "Not defined" when there is no validity period. |
| Revision History | Document versions with date, author and reason (the description of changes). |
| Footer | "Controlled Document" and the date and time the PDF was generated. |
The cover page is generated in the language selected in GED, and dates follow the laboratory's time zone. Because it is generated on every download, it always shows the current status of the version.
Approval and distribution
Documents whose type has an approval workflow show their status in the Status column. Changing status means performing a transition. In the default ISO 9001 / ISO 15189 workflow, the path is:
| From | Transition | To |
|---|---|---|
| Draft | Send for Review | In Review |
| In Review | Approve Review | Reviewed — records "Reviewed by" on the cover page |
| In Review | Return for Correction | Draft |
| Reviewed | Send for Approval | In Approval |
| In Approval | Approve Document | Approved — distributed status; records "Approved by" on the cover page |
| In Approval | Return to Review | Reviewed |
| Approved | Make Obsolete | Obsolete |
Perform a transition
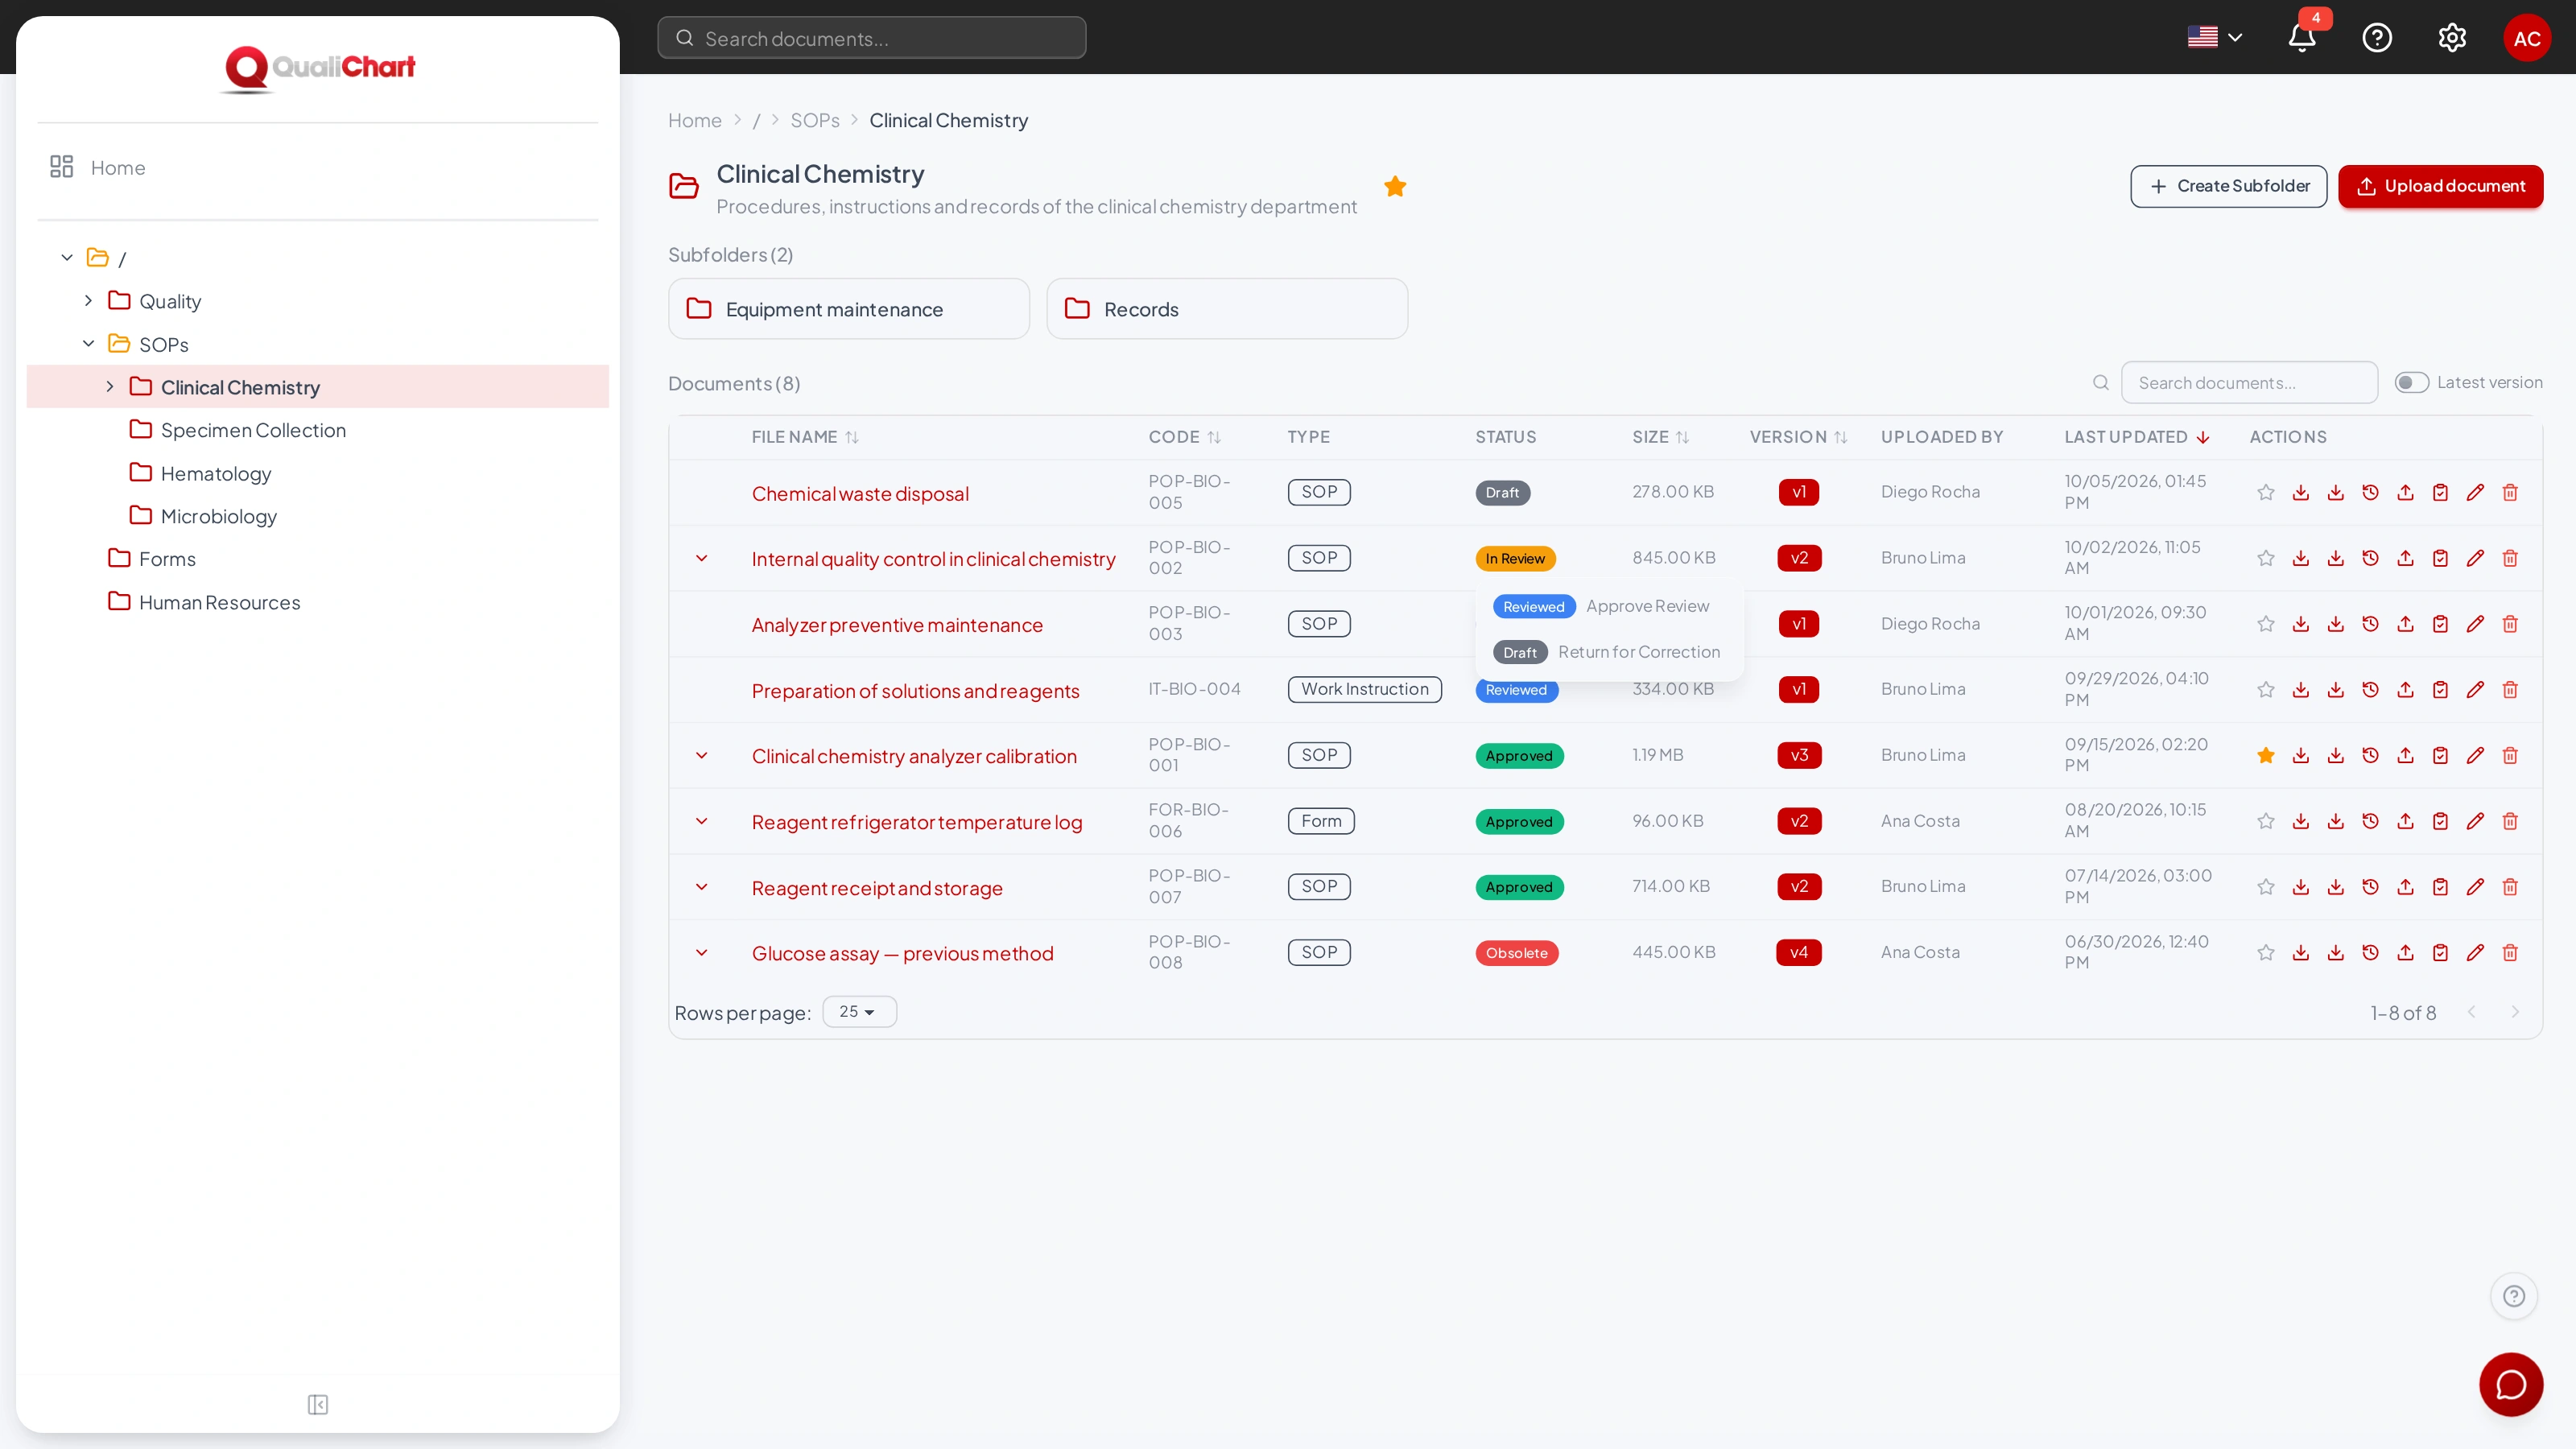
- In the folder, click the document status. The transitions you can perform from it are listed.
- Choose the transition. The confirmation shows the source and target statuses.
- Write a comment if you like, and click Confirm Transition.
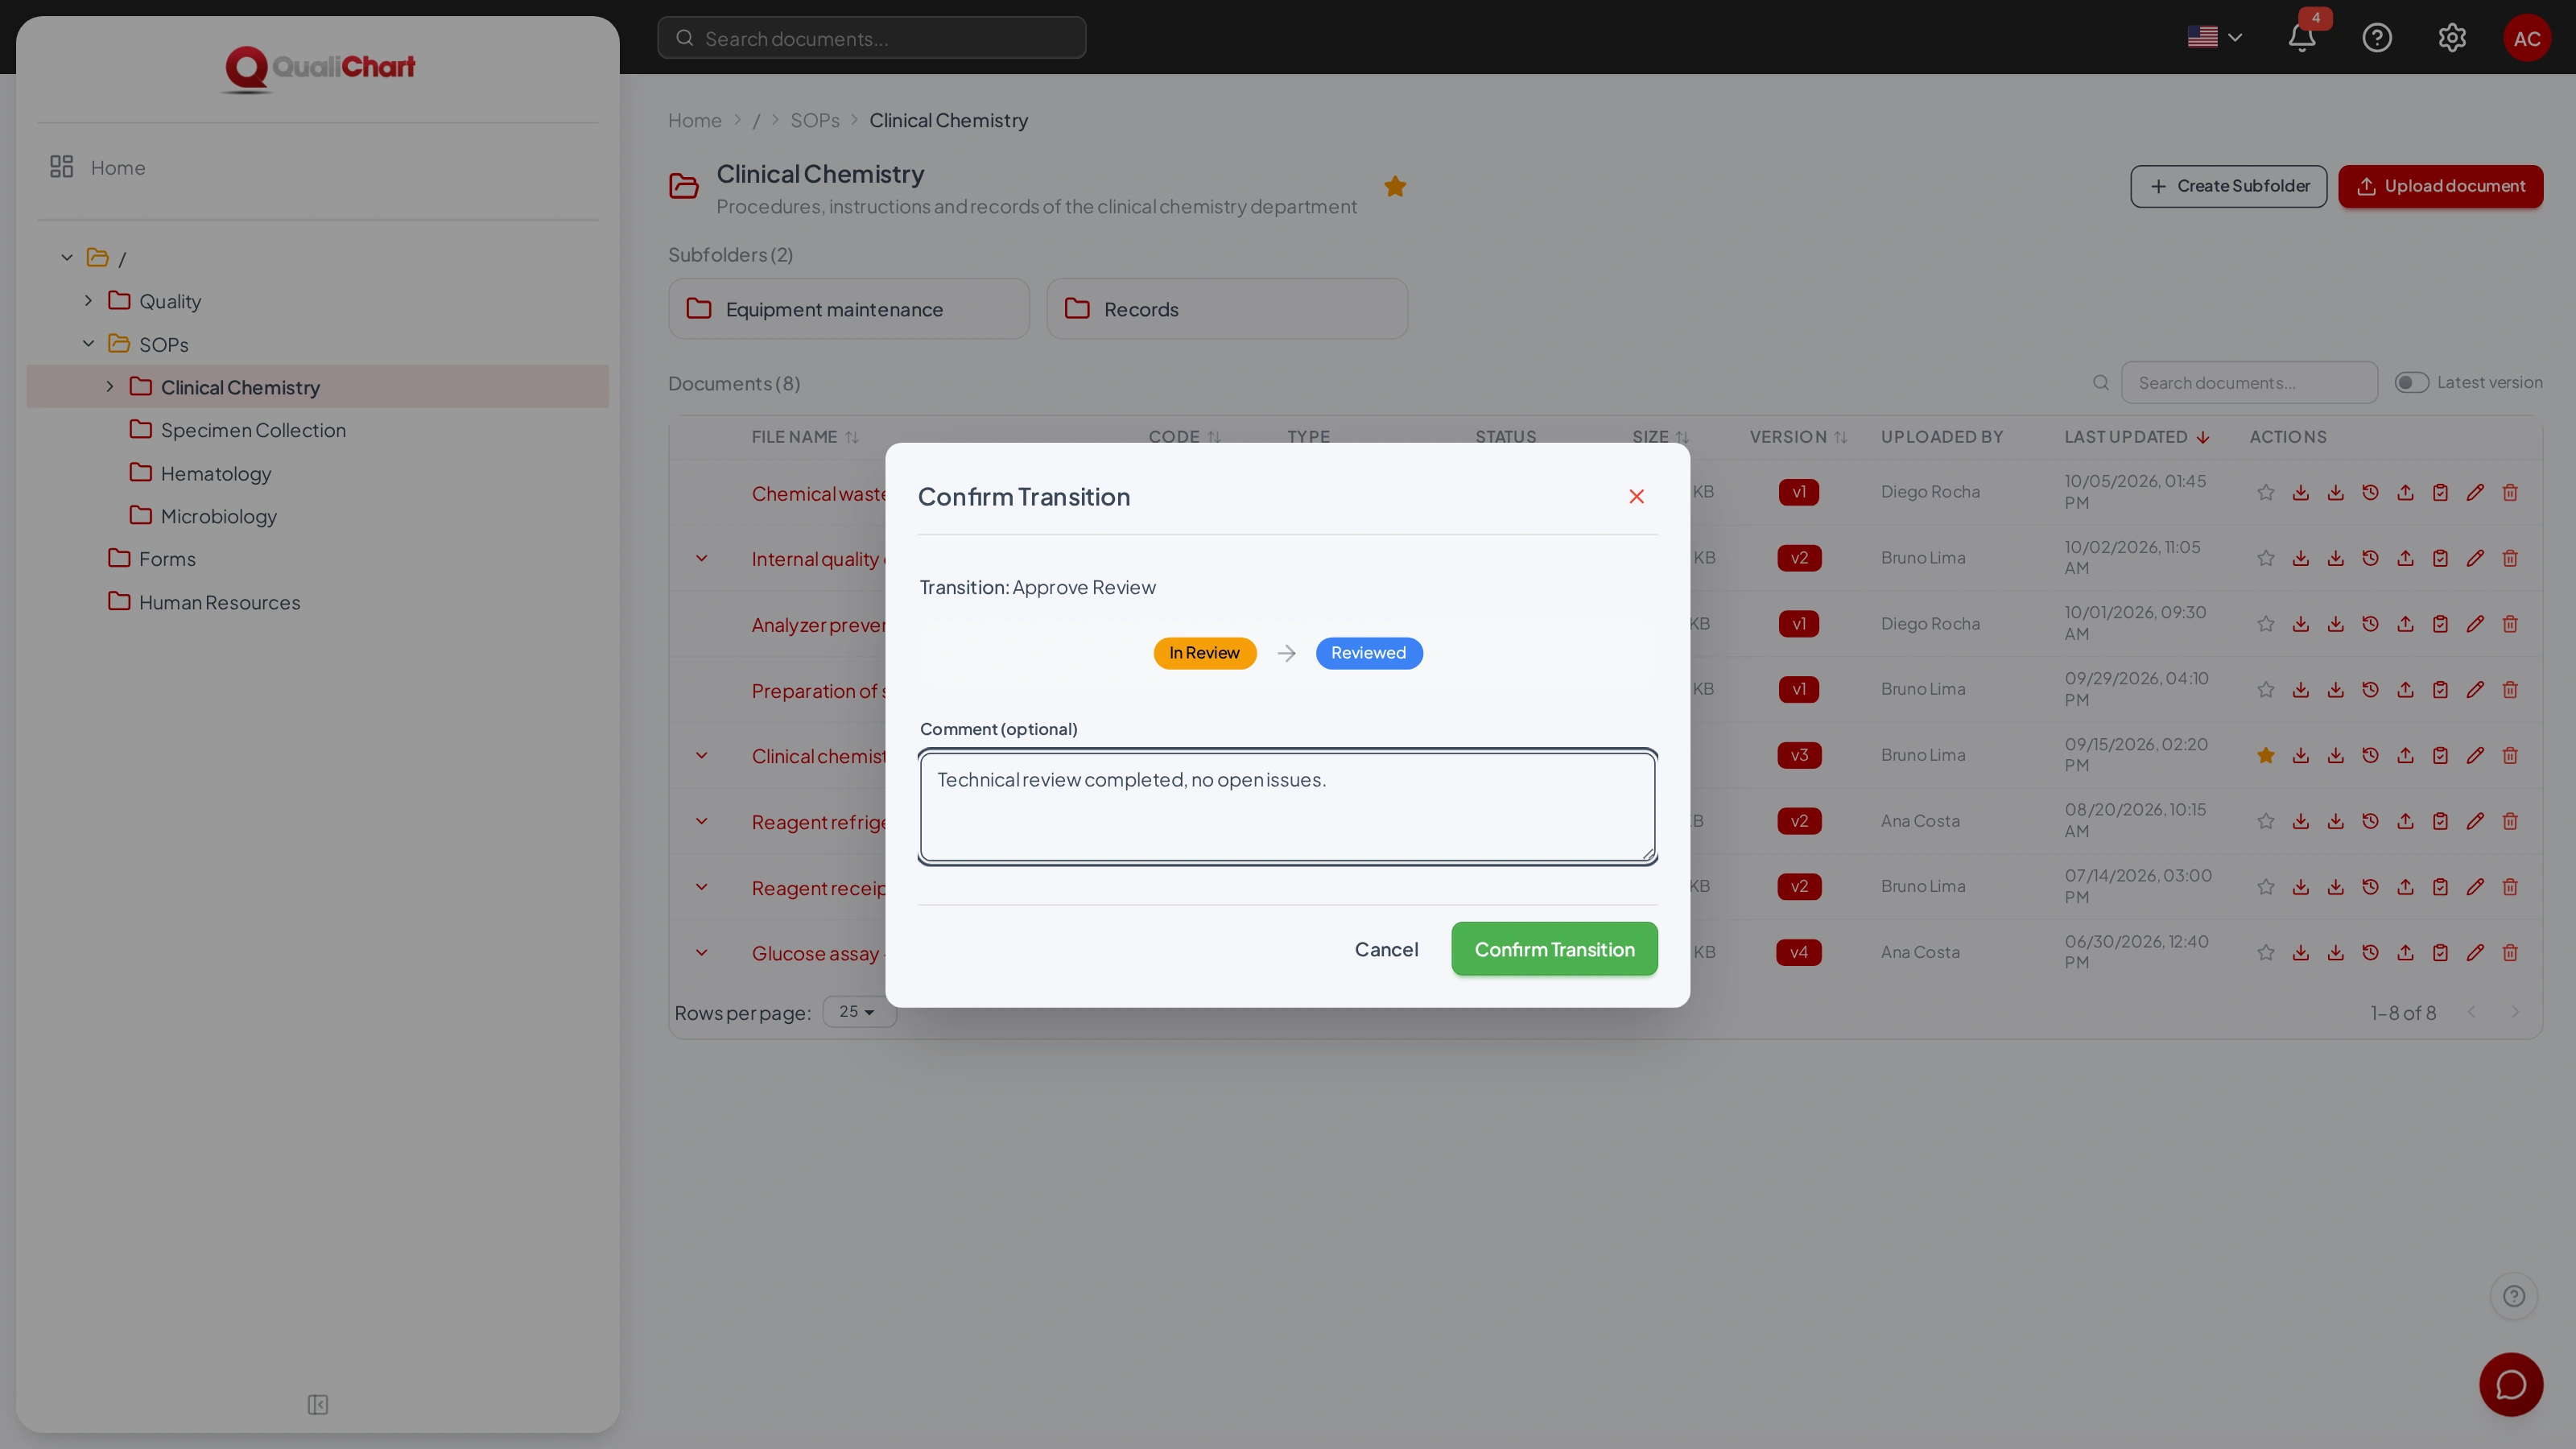
Only the transitions allowed for your groups appear; administrators see all of them. You also need the Edit right in the folder. Each transition is recorded in the version history with name, date, time and comment.
Distribution and validity
When the document reaches a status marked as distributed — Approved, in the default workflow — the version becomes the controlled copy: GED records the distribution date, calculates the next review by adding the type's validity period and indexes the content for search and the AI assistant.
If the previous version had required reading, the same people must now read the new version, and confirmation starts over (see Required reading).
When it leaves the distributed status — for example, to Obsolete — the version is no longer valid: the distribution date and the next review are cleared, and the content is removed from search and the assistant.
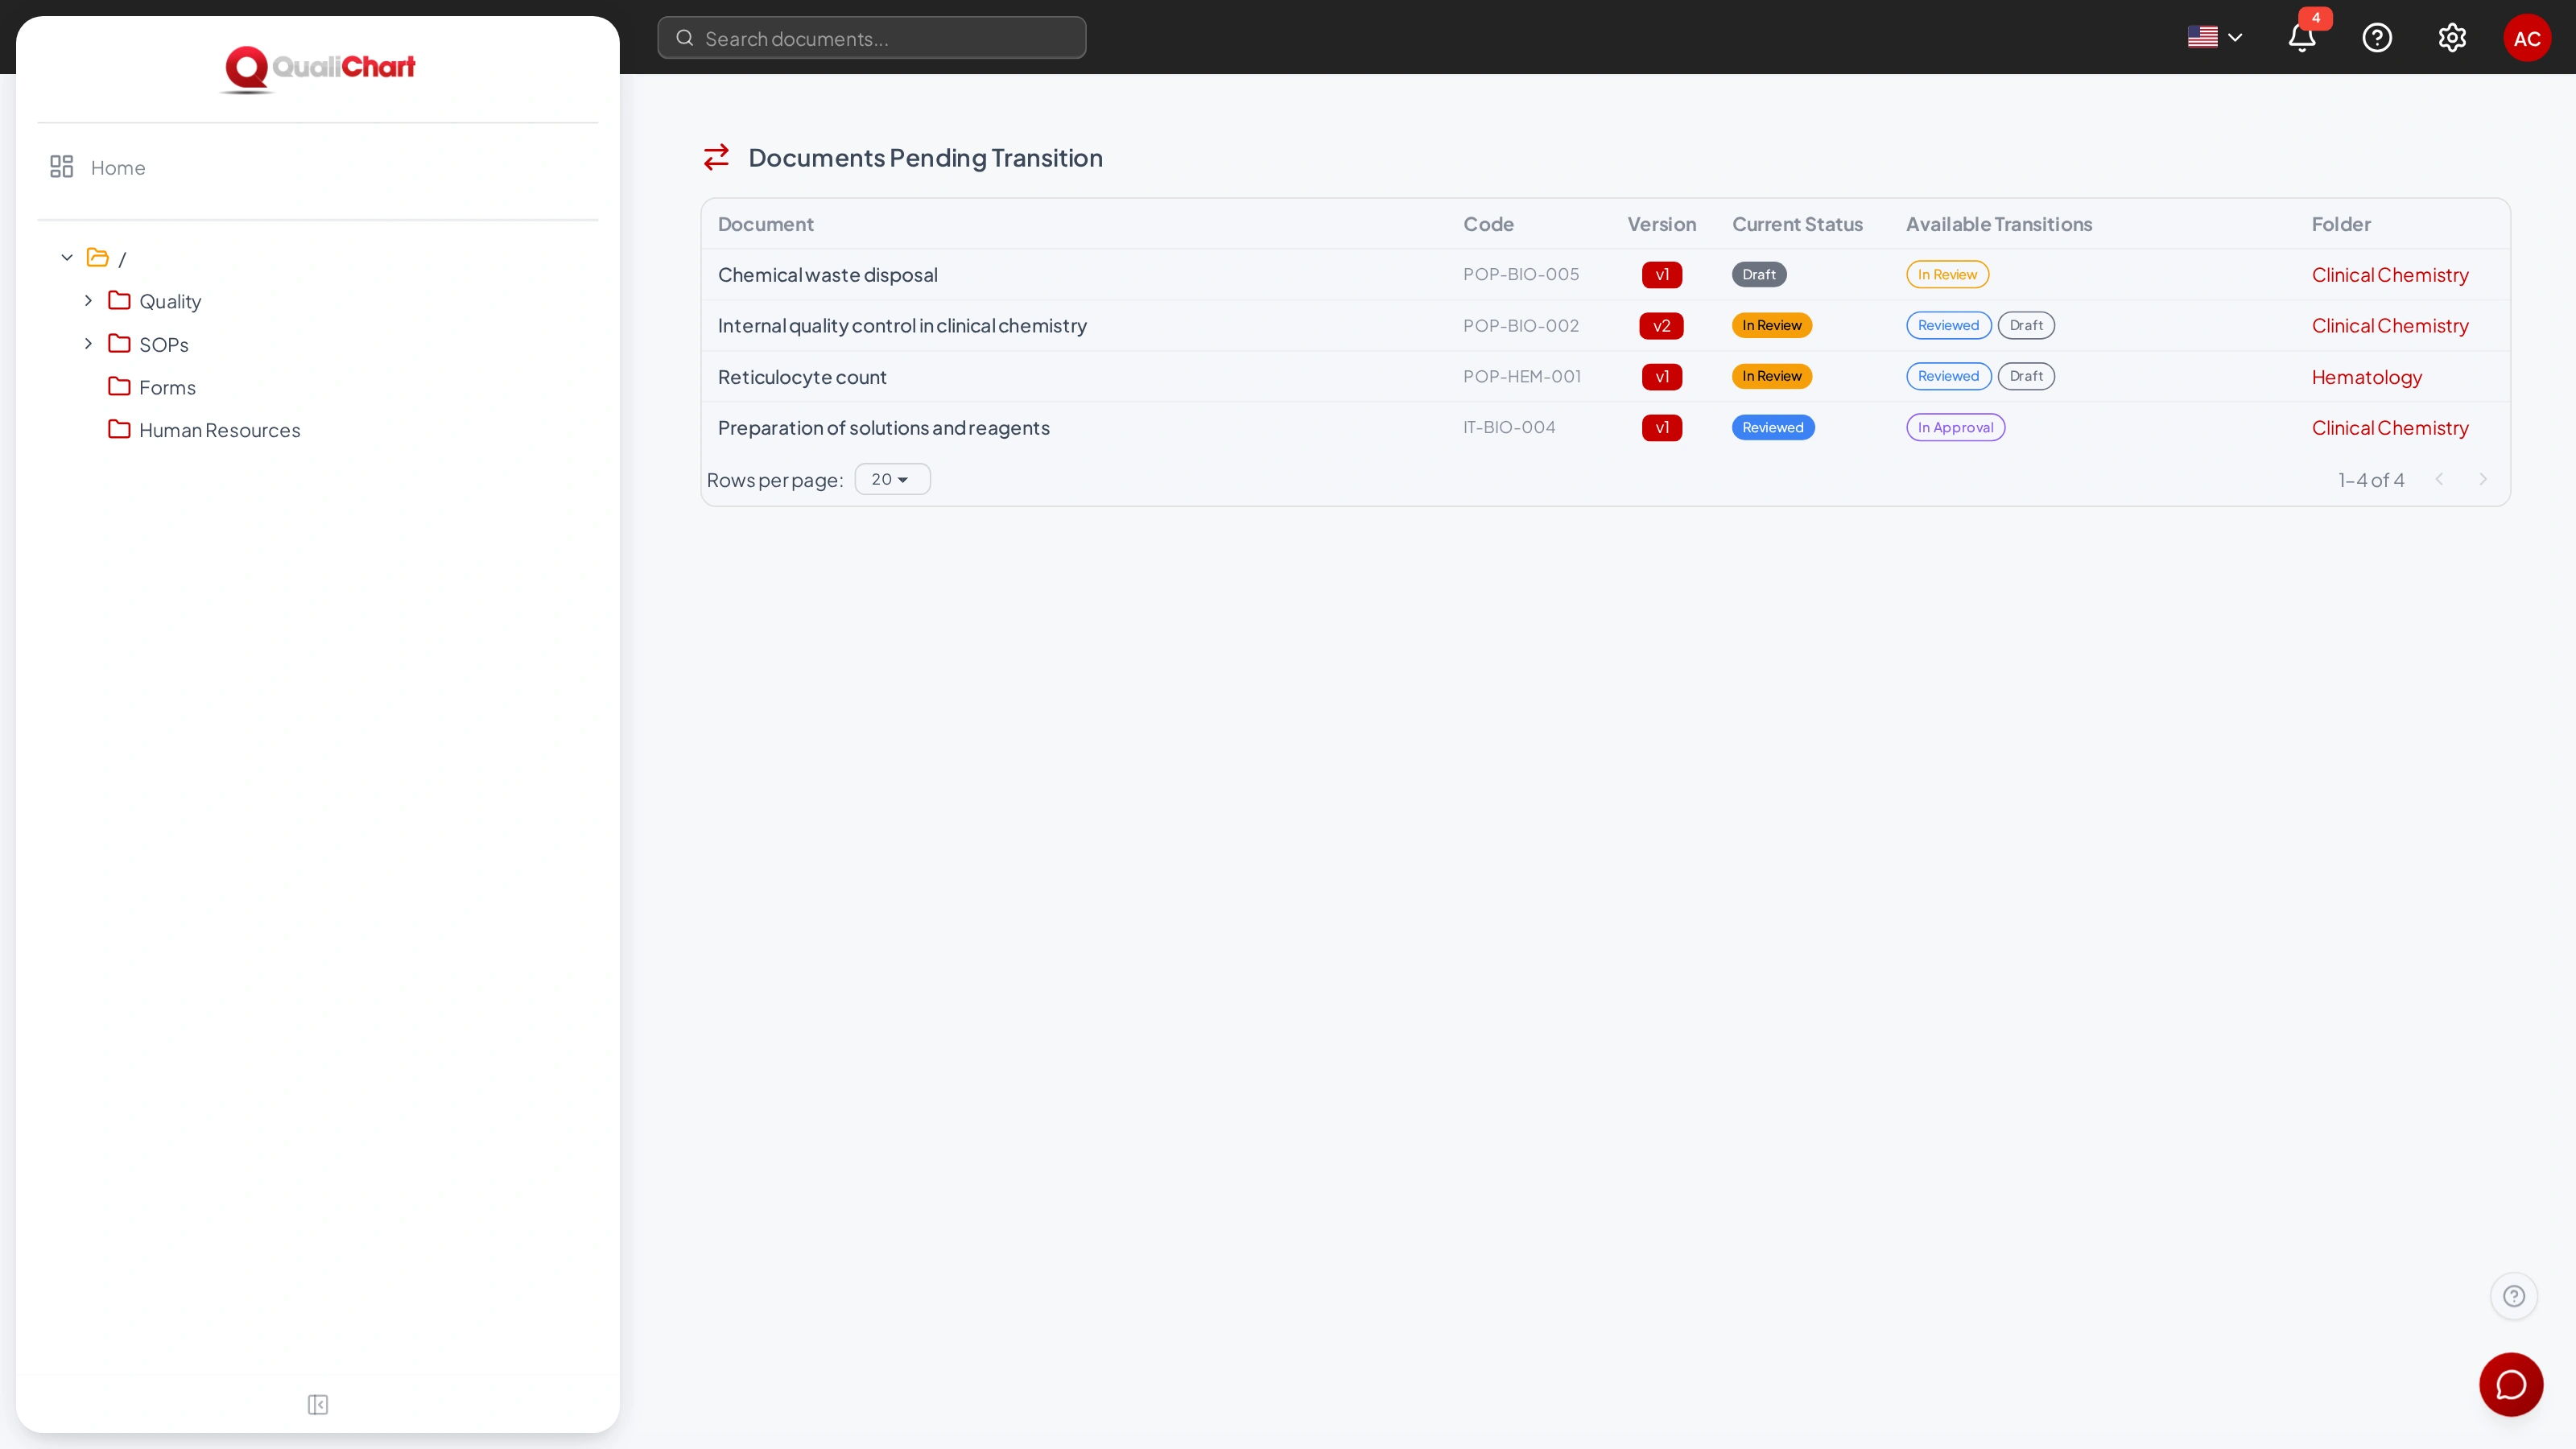
Pending approvals
The bell in the header shows how many documents are waiting for your action, that is, documents on which you can perform at least one transition. Click it to see the list, and click View all to open the full screen.
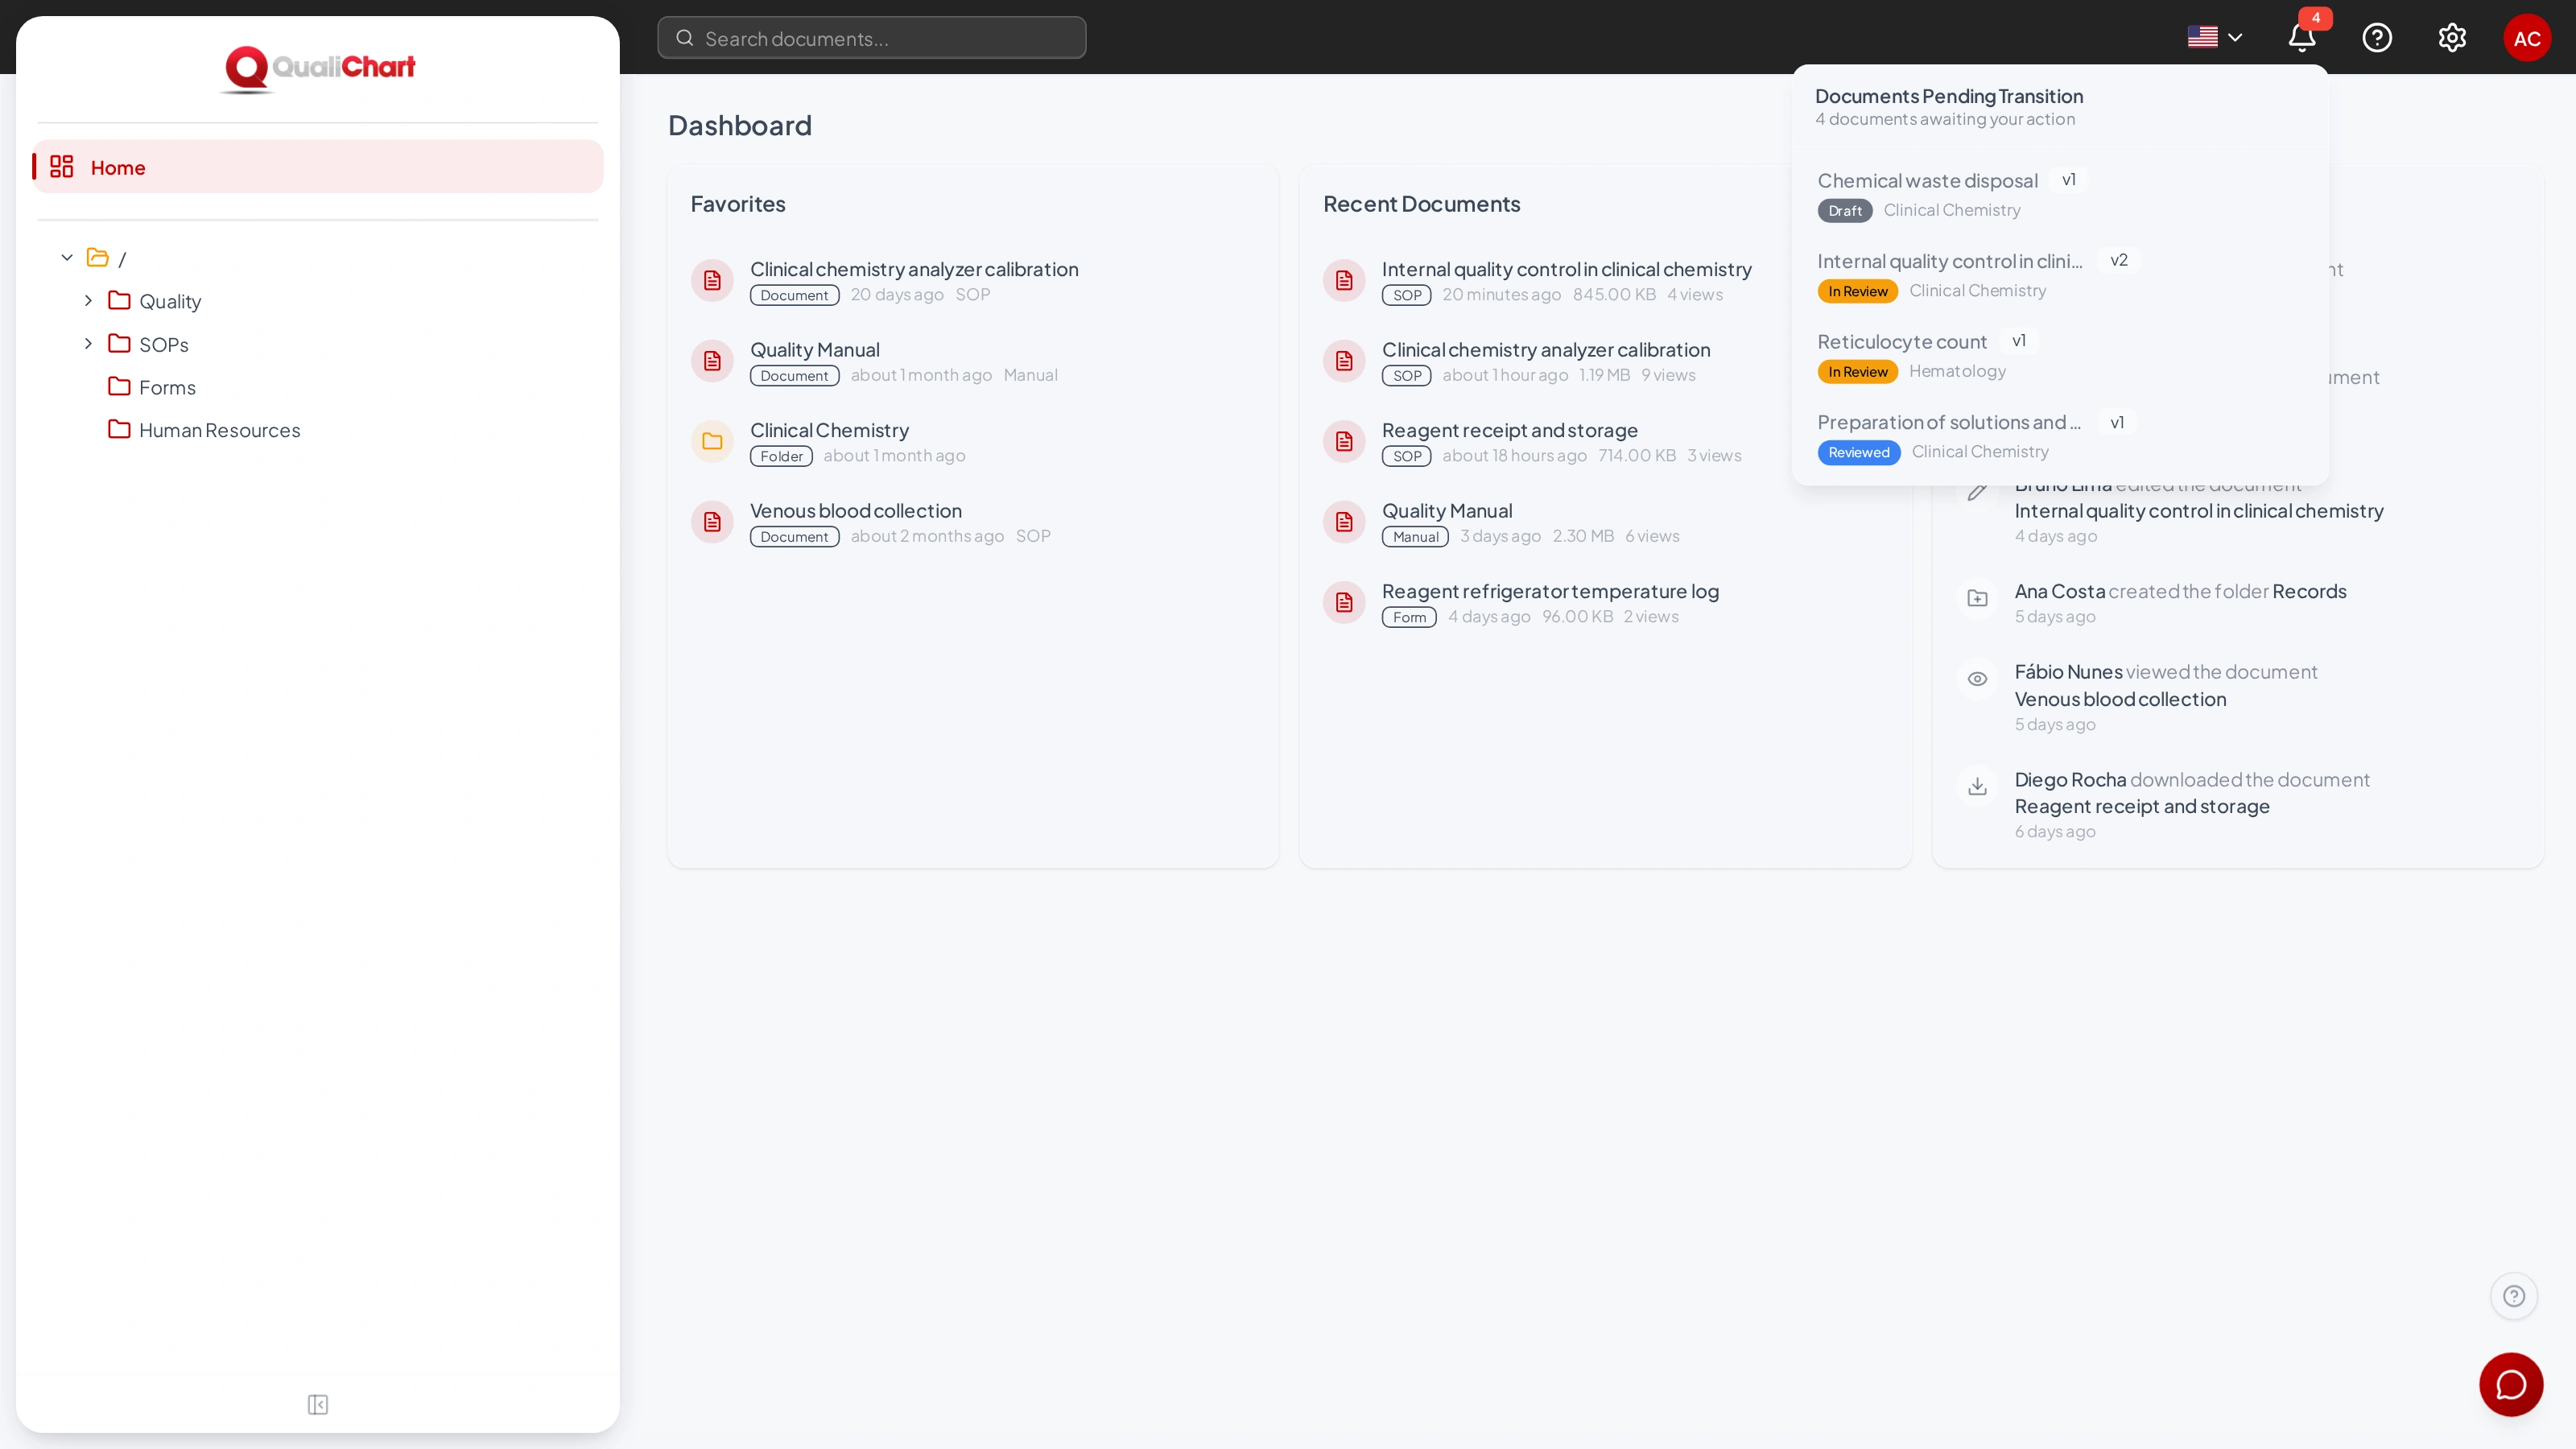
The Documents Pending Transition screen shows the document, code, version, current status, available transitions and folder. Click the folder to open the document and perform the transition.
Required reading
Required reading records who must read the controlled copy of a document and who has already confirmed reading it — for example, the technical staff after an SOP is distributed.
Assign the reading
- In the folder, click Required reading (clipboard icon) on the document row. The action appears for people with the Edit right in the folder.
- Check the distributed version and who has already confirmed.
- Choose People, Groups or both and click Assign reading. When you choose a group, all its members receive the reading.

Only active people who can open the folder are included; people without access are listed as not included. The reading applies to the distributed version: a document that has not been distributed yet shows a notice to distribute it first.
Confirm the reading
People with pending readings see the Pending readings panel on the Home screen, with the code, folder, version and who assigned it. Click Open controlled copy to download the document with its cover page and, after reading it, Confirm reading. The confirmation is recorded with date and time.
New versions
When a new version is distributed, the people who had to read the previous one automatically receive the reading of the new one, which shows as pending again. While the new version is under review, the confirmation of the version in force remains valid.
Search
The search bar in the header looks inside the content of documents. Type at least two letters and press Enter. GED compares the meaning of the text, not just the exact words: a search such as "how to store opened reagents" finds the part of the procedure that covers it, even if it is written in other words.
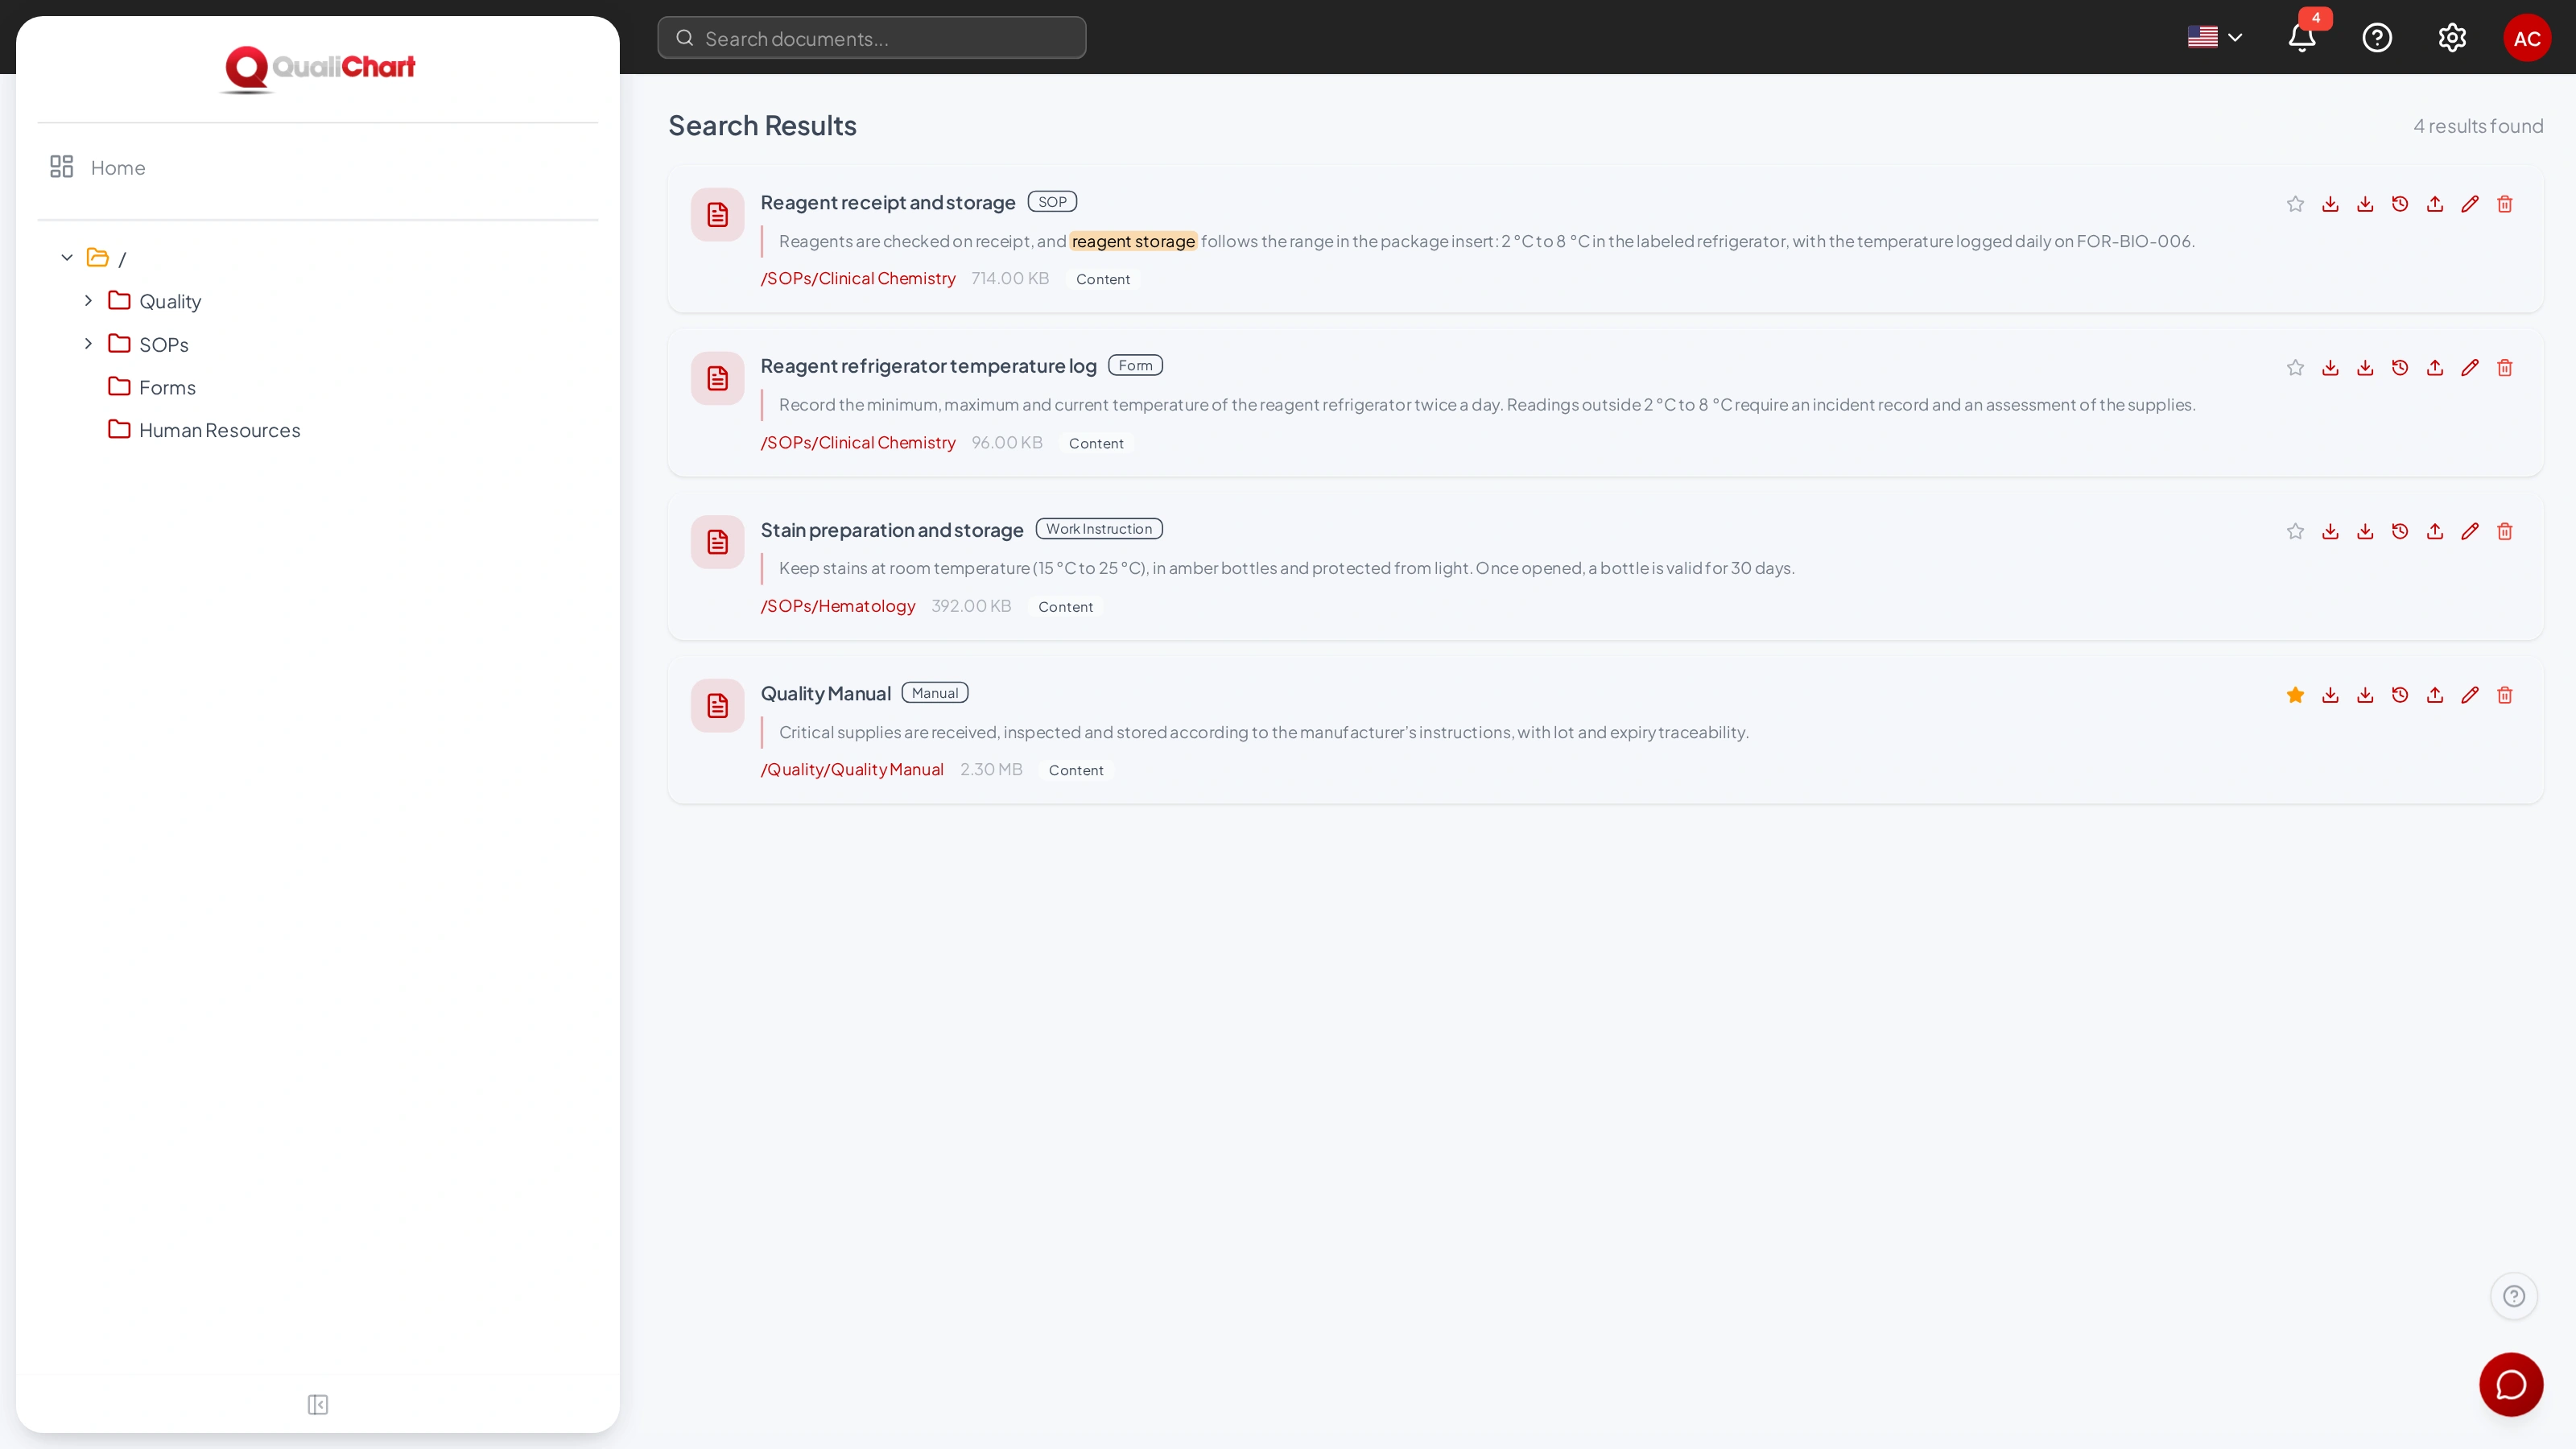
Each result shows the document name, its type, the excerpt most related to the search, with the terms highlighted, the folder — click it to open the folder — and the Content indicator. On the right are the document actions: favorite, download, download with cover page, history and, depending on your permissions, new version, edit and delete.
What is included in search
| Situation | Does it appear in search? |
|---|---|
| Document without a workflow, in a readable format | Yes, from the moment it is uploaded. |
| Document with a workflow, distributed version | Yes. While a new version goes through the workflow, the previous distributed version keeps appearing. |
| Document with a workflow not yet distributed (Draft, In Review…) | No. |
| Obsolete document, or one that left the distributed status | No. |
| Images and scanned PDFs without text | No: there is no text to read. |
| Folders and versions you cannot access | Never. |
AI assistant
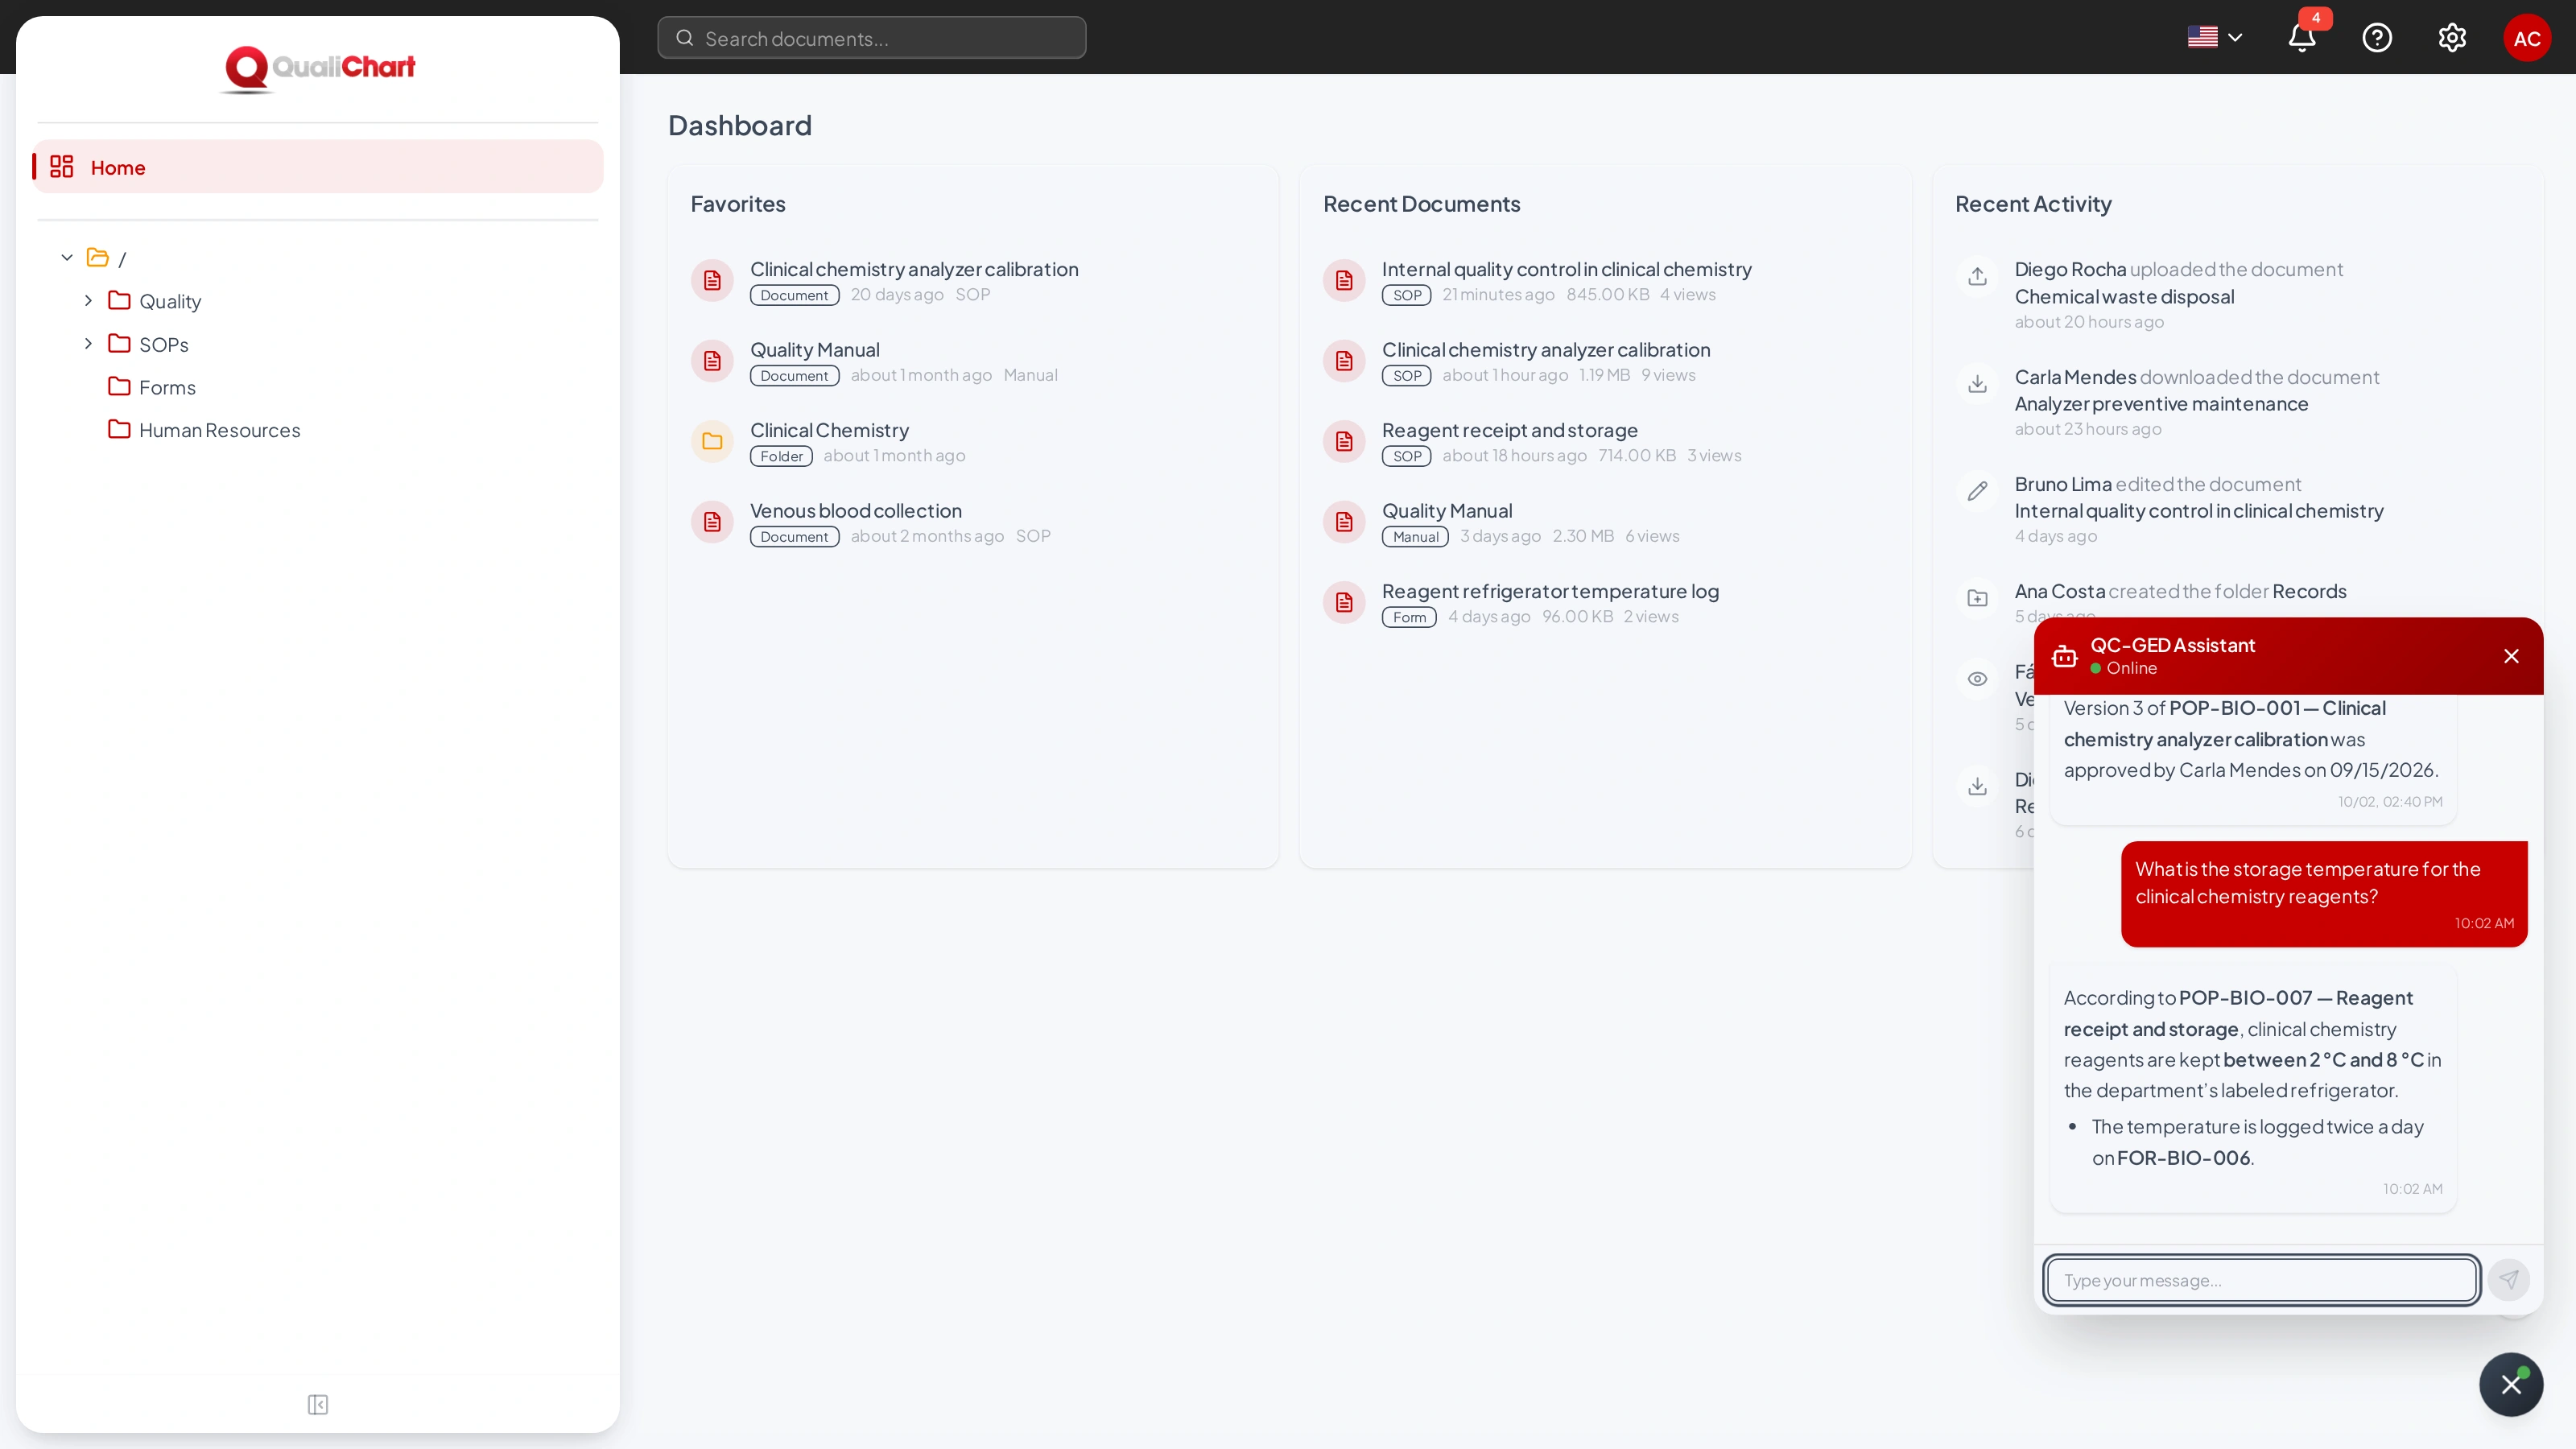
The round button in the bottom-right corner opens the QC-GED Assistant, a chat that answers questions about the laboratory's documents. It shows Online when it is ready.
- Click the assistant button.
- Type your question — for example, "What is the storage temperature for the clinical chemistry reagents?" — and press Enter.
- The assistant searches the indexed documents in the folders you can access and answers only based on the excerpts it finds.
| Behavior | Details |
|---|---|
| Source of answers | Only the indexed content (see What is included in search) of the folders you can access. |
| No document on the subject | The assistant tells you it found no indexed documents on the topic, instead of making up an answer. |
| Conversation | Follow-up questions, such as "and for hematology?", take the previous messages into account. Ask "which document is this in?" to find the source. |
| Language | Answers come in the language selected in GED, even when the document is in another language. |
| General figures | Ask, for example, how many documents are indexed. |
| History | Conversations are saved. When you reopen the chat, previous messages appear; scroll up to see older ones. |
| Connection | If the status shows Offline or Error, close the chat and open it again. |
Settings
The gear in the header and the Settings screen give access to Document Types, Document Workflows, User Groups, Users and Reports. People with the View audit log permission also see Audit log (see Audit log).
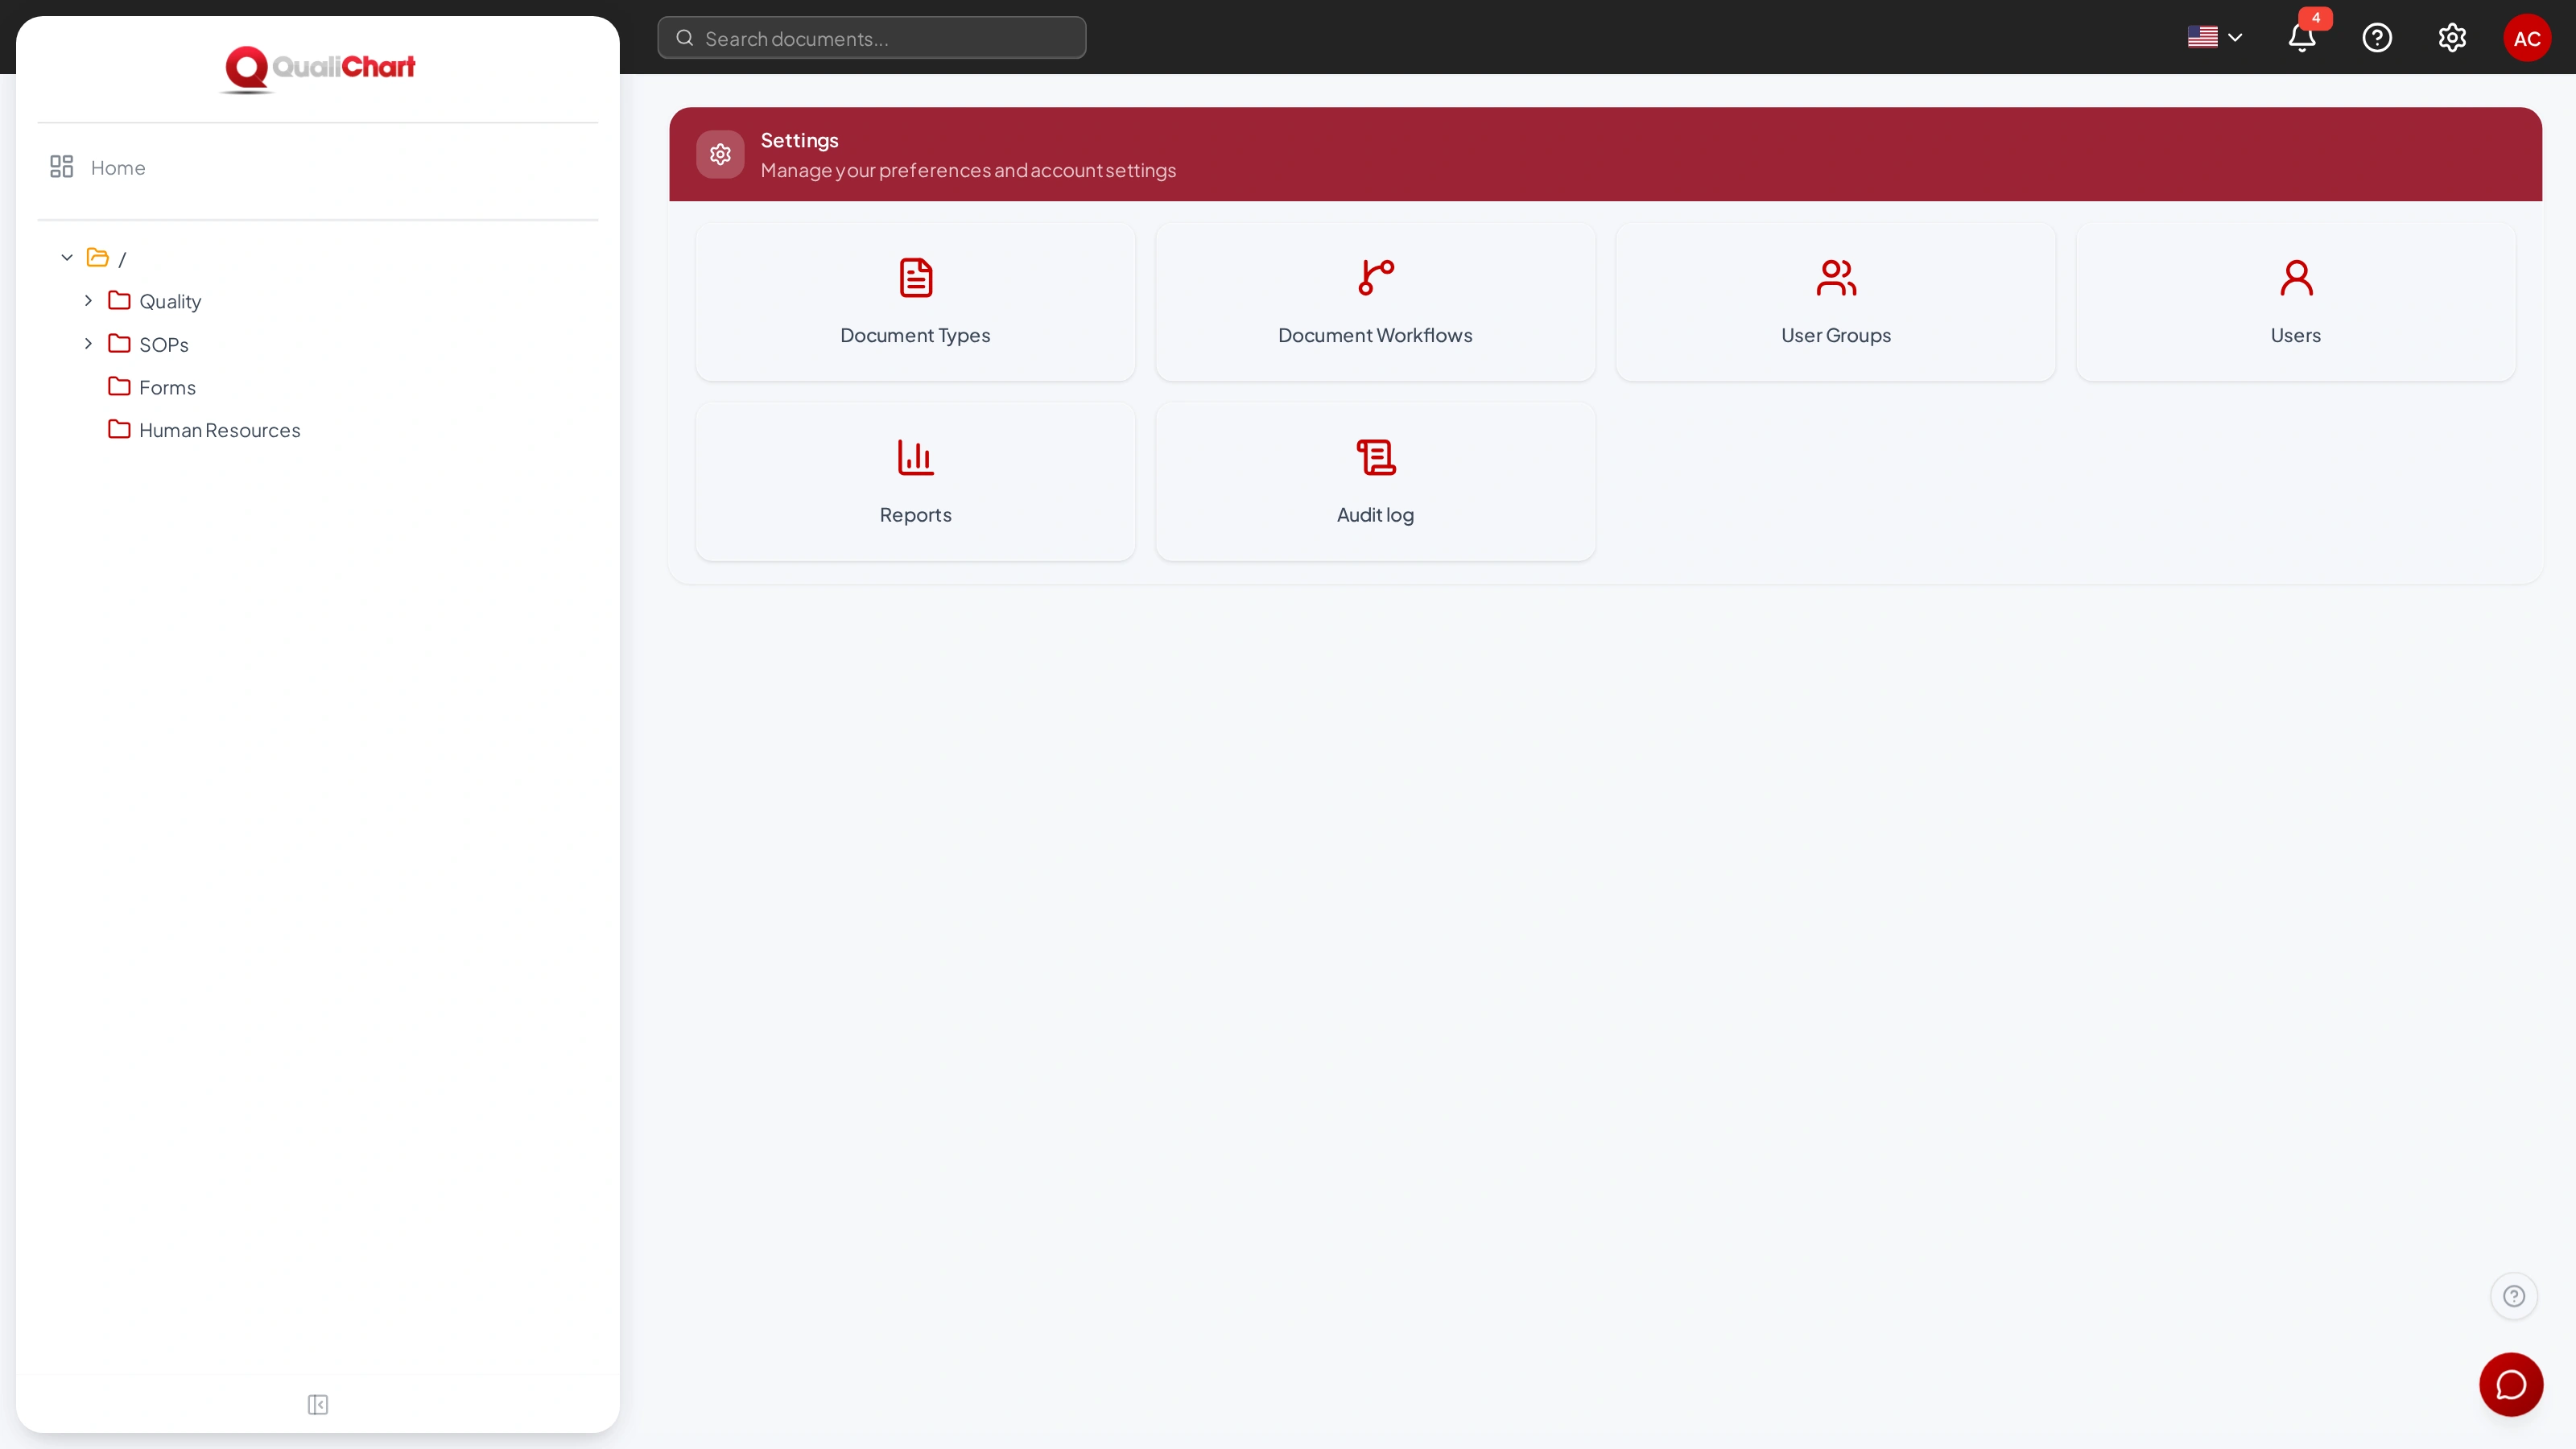
| Area | View | Create, edit and delete |
|---|---|---|
| Document Types | Everyone | Manage folders |
| Document Workflows | Everyone | Manage folders |
| User Groups | Everyone | Manage groups and permissions |
| Users | Manage users | Manage users |
| Reports | Everyone, with the documents in the folders each person can access | — |
| Audit log | View audit log | — (entries cannot be changed) |
Recommended order for setting up GED
- Groups: create the groups that will review, approve and access documents — for example, Quality Assurance, Technical Reviewers and Approvers.
- Workflow: review the default workflow or create one from the template, choosing the groups for each transition.
- Document types: link the workflow and the validity period.
- Folders: create the structure and the permissions by group.
- Users: grant your team access and add each person to the groups.
User groups
Groups bring together people with the same role. They are used in two places: in folder permissions (who reads, creates, edits and deletes) and in workflow transitions (who reviews and approves).
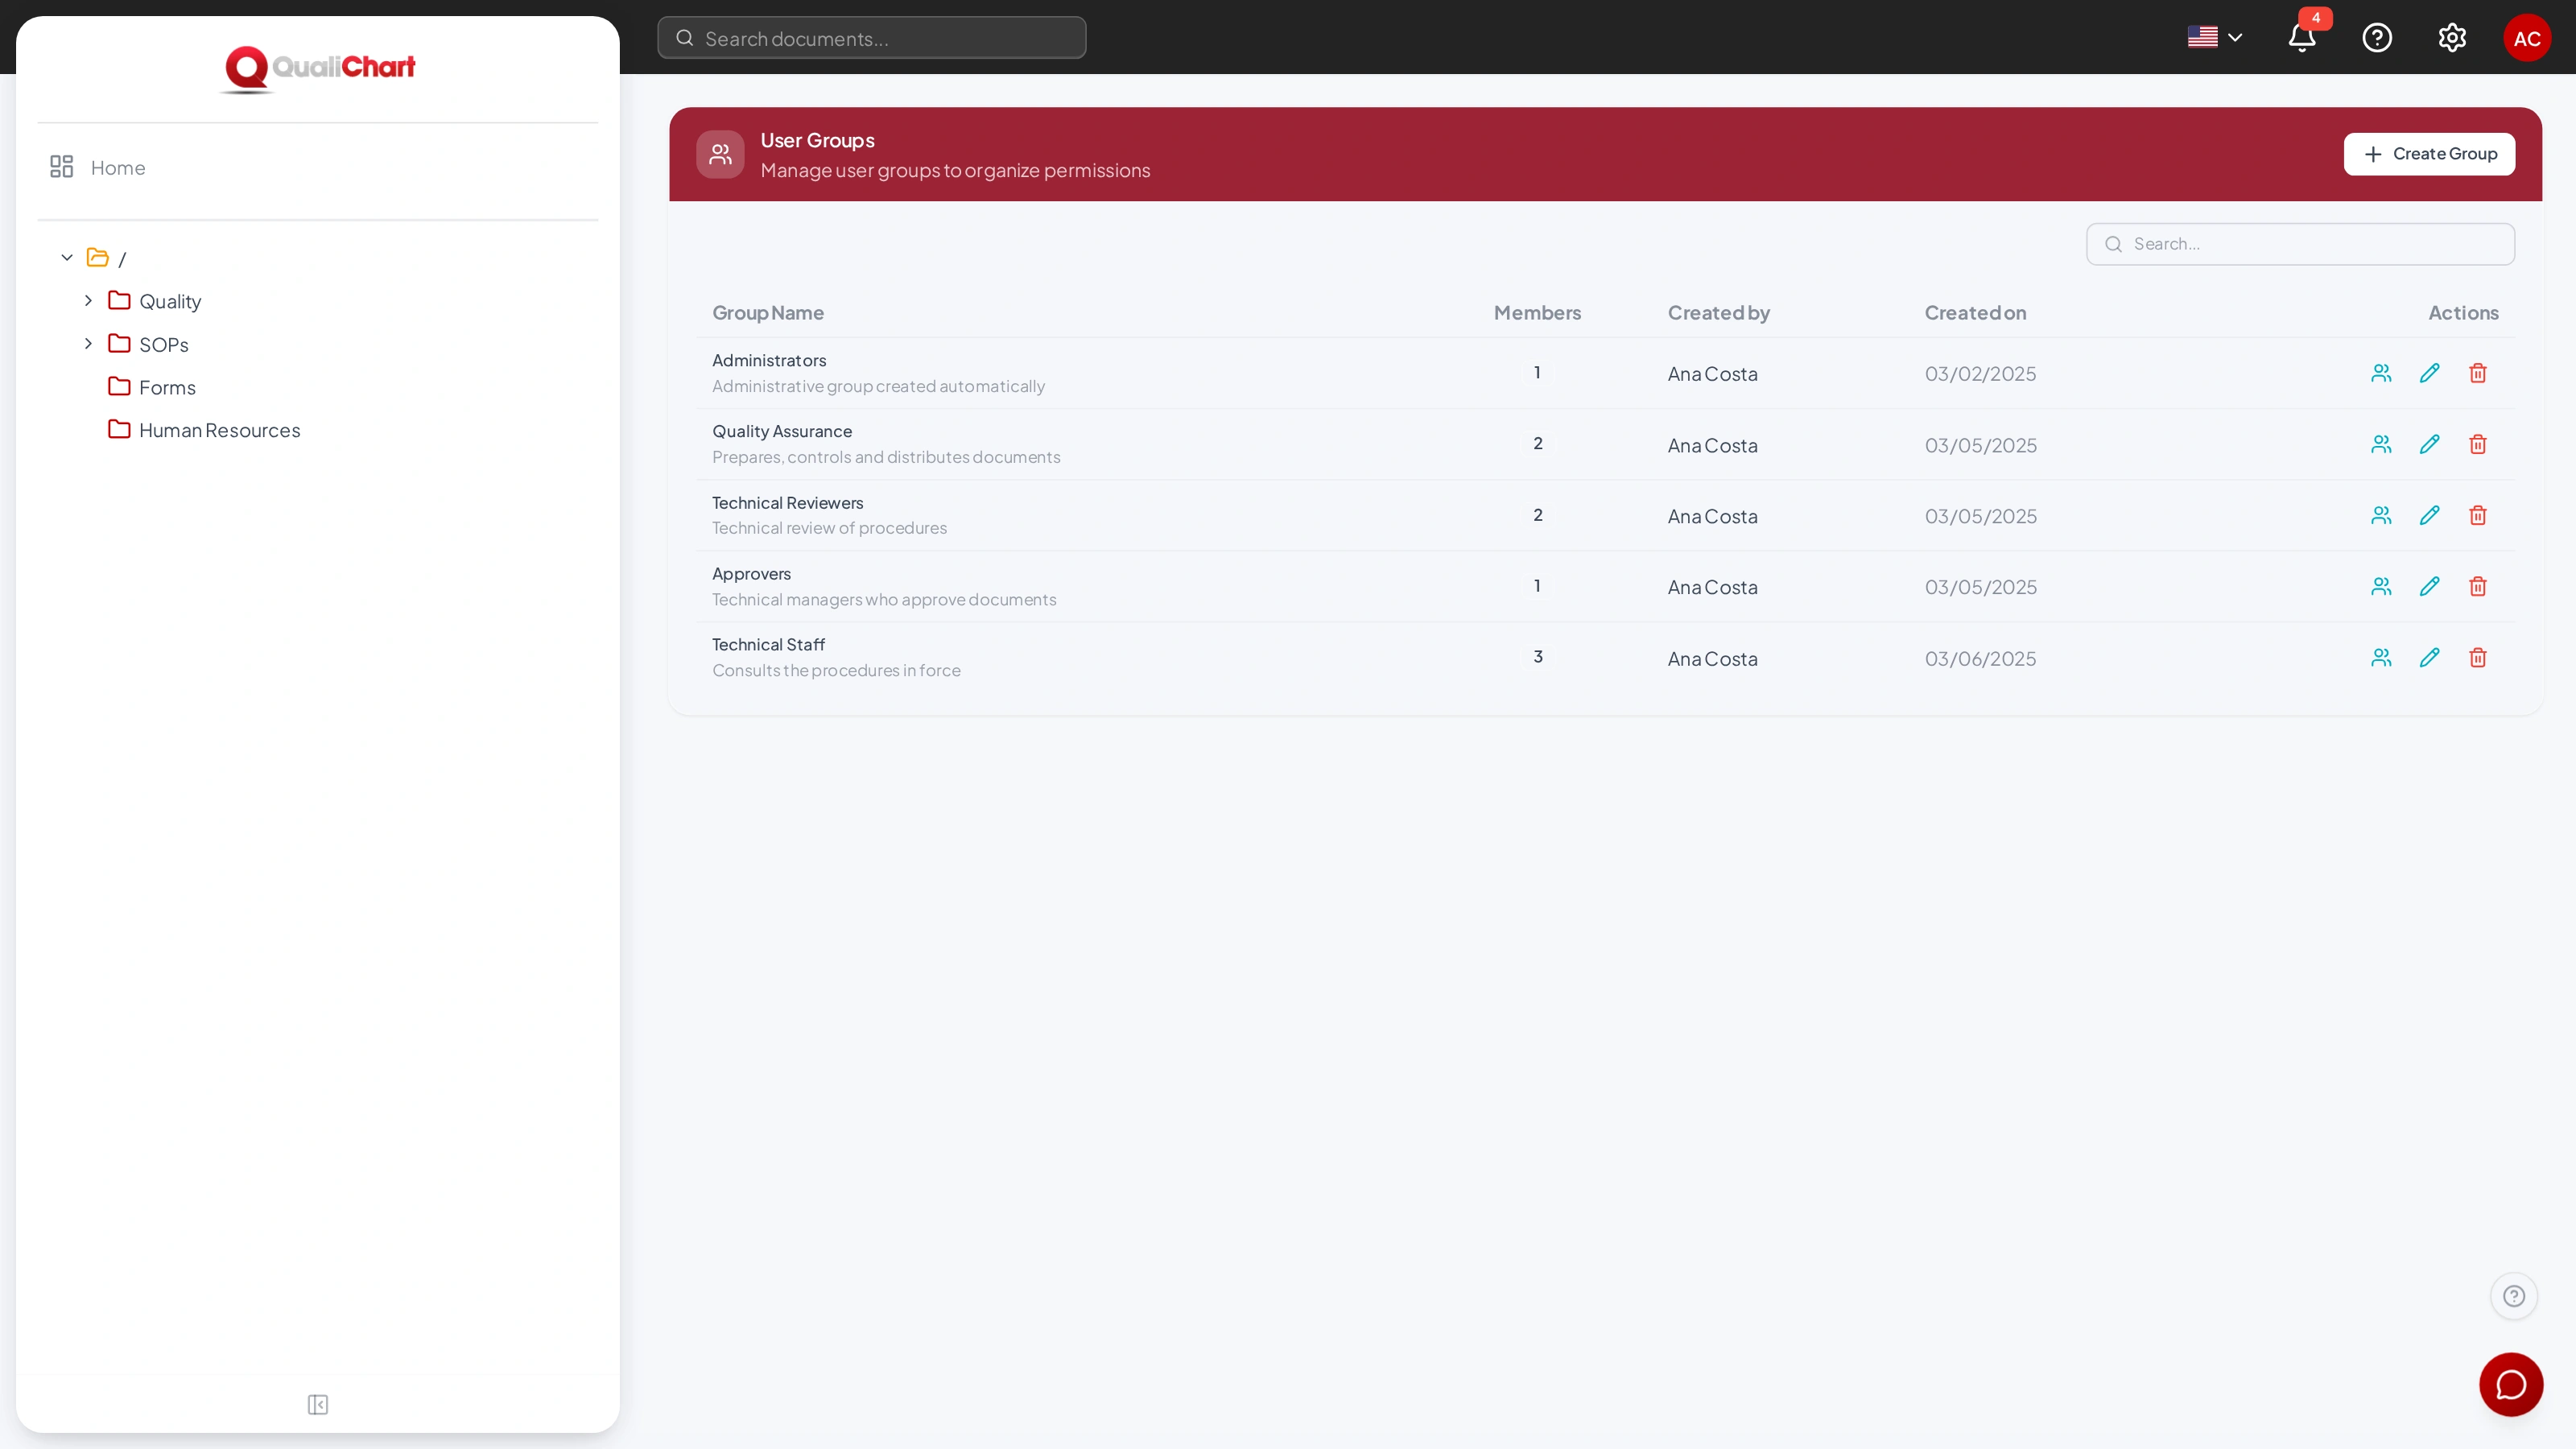
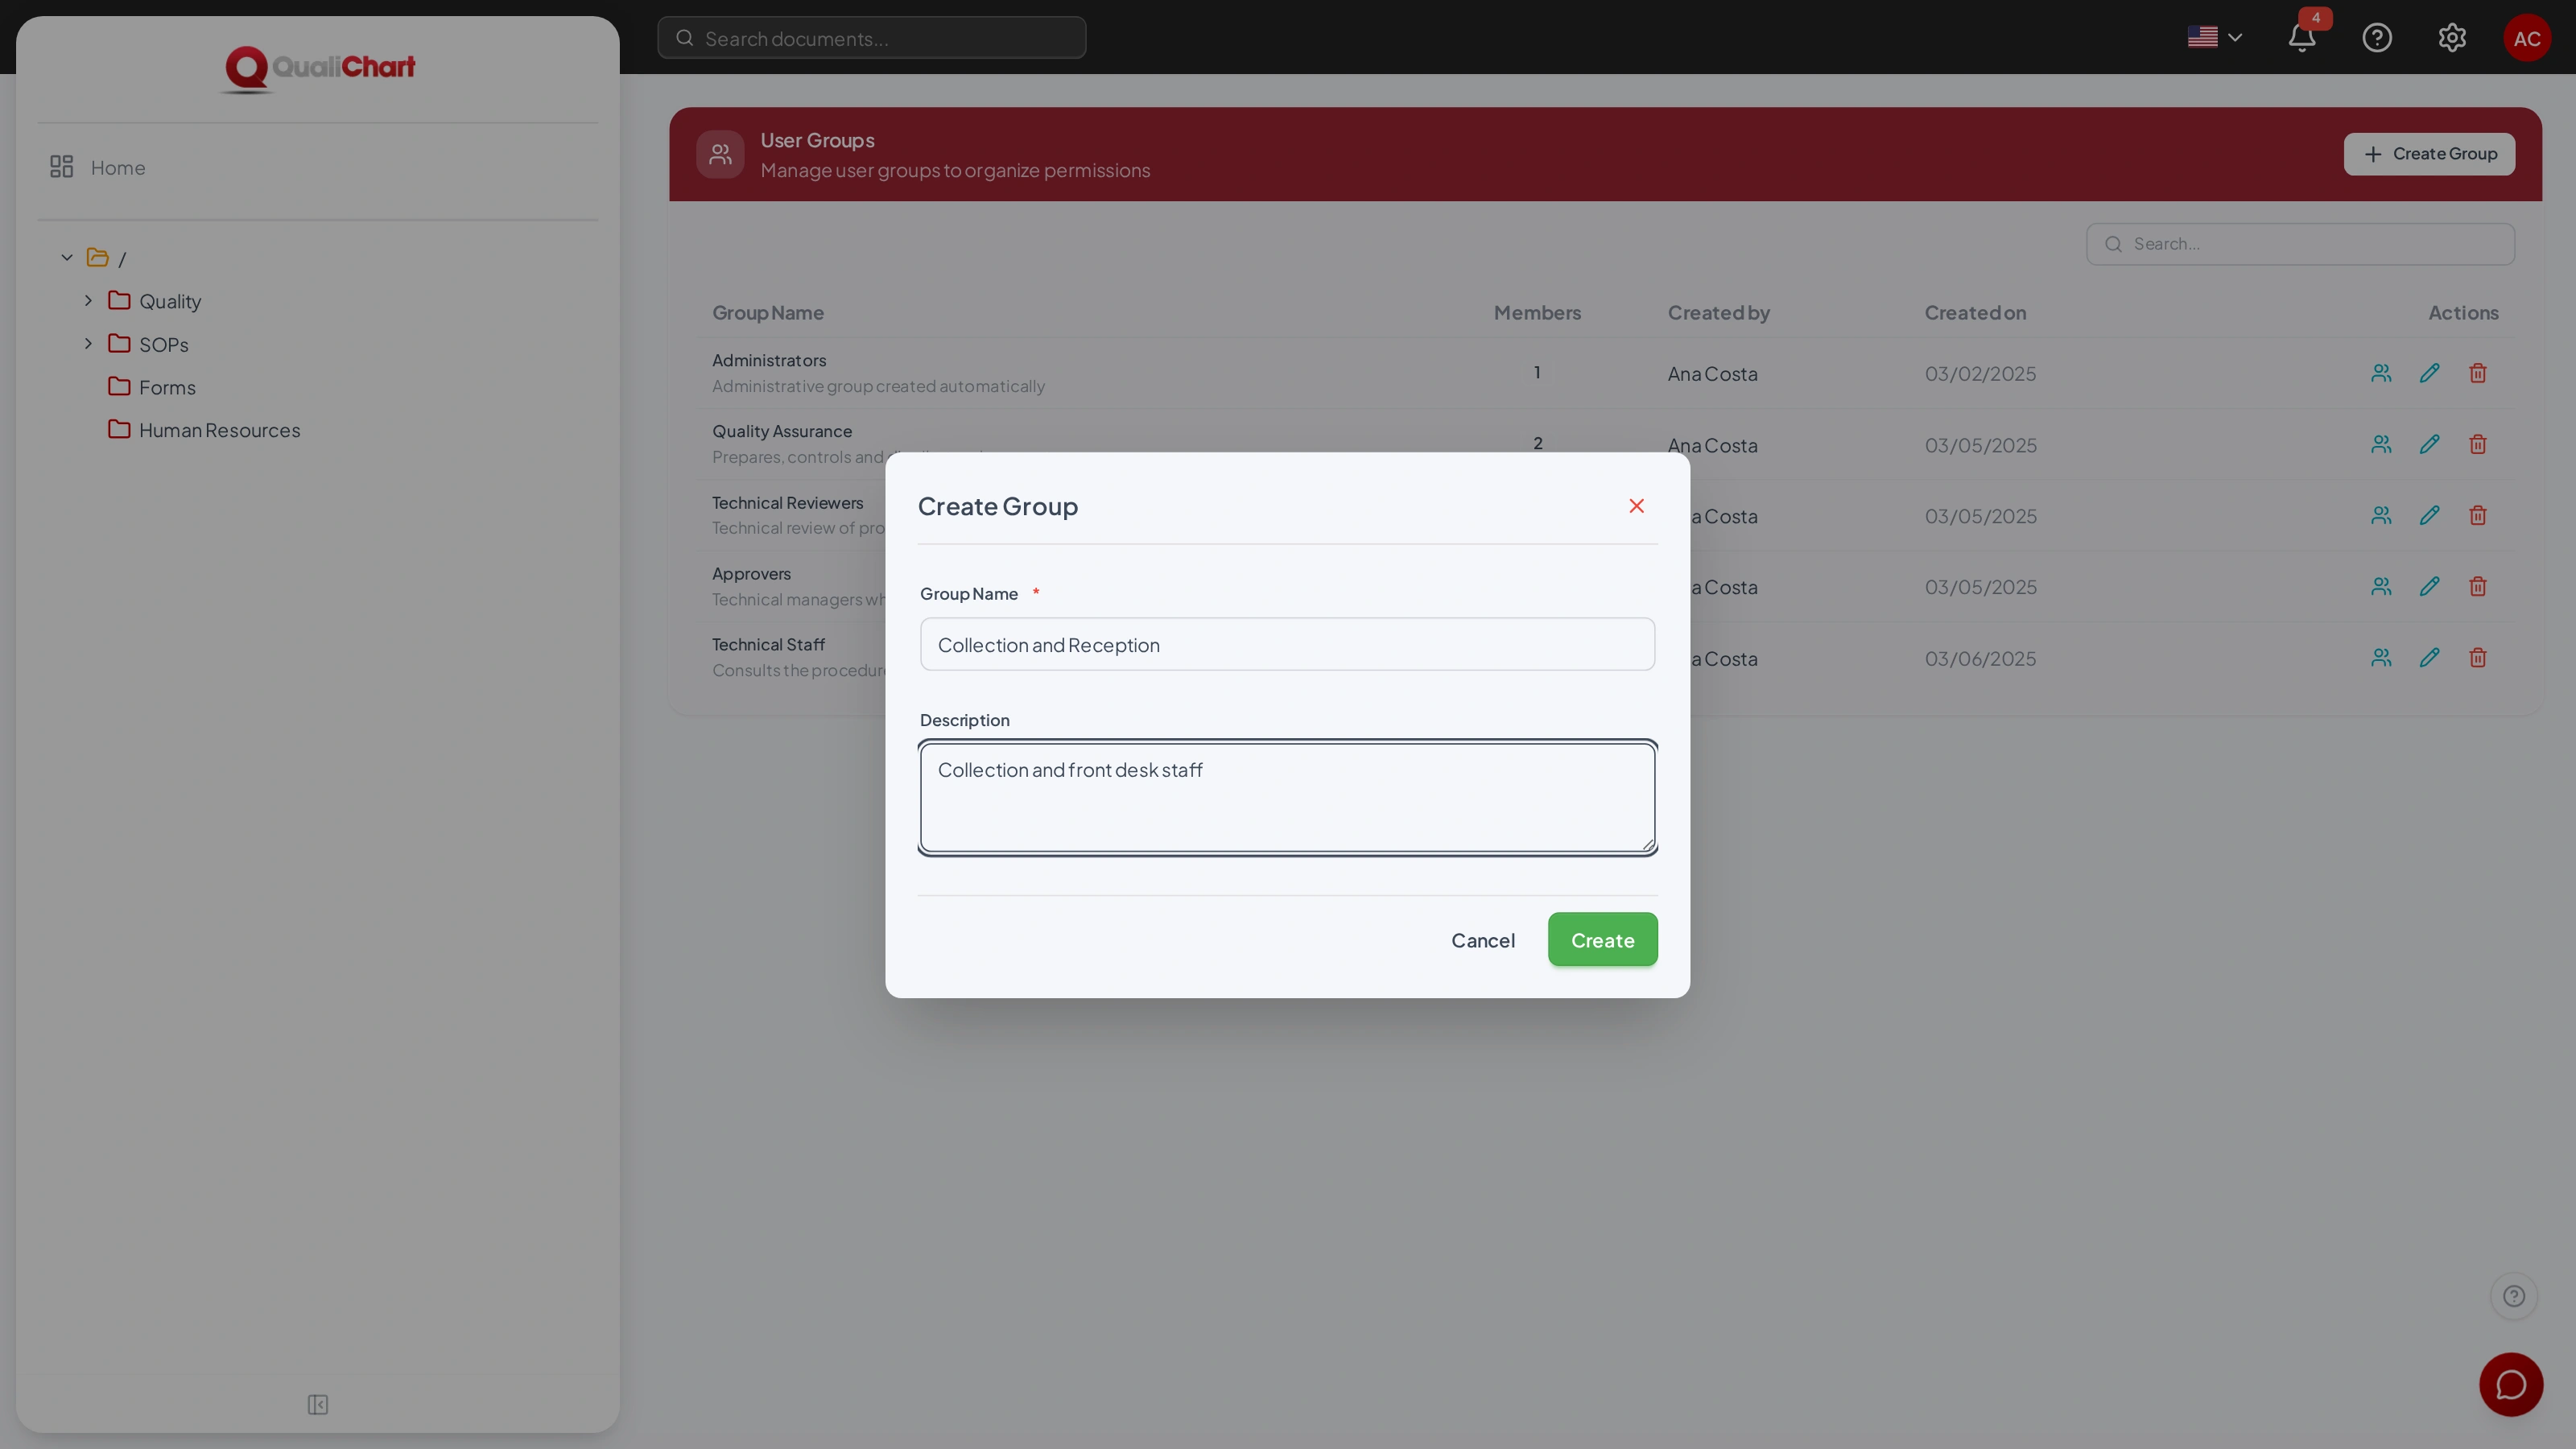
- In User Groups, click Create Group.
- Enter the name and a description.
- Click Create.
- Add people to the group by editing each user, in the Groups field (see Users).
The table shows the number of members, who created the group and when. View members opens the user list filtered by the group. Use the pencil to edit and the trash can to delete. Creating, editing and deleting groups requires the Manage groups and permissions permission.
Document workflows
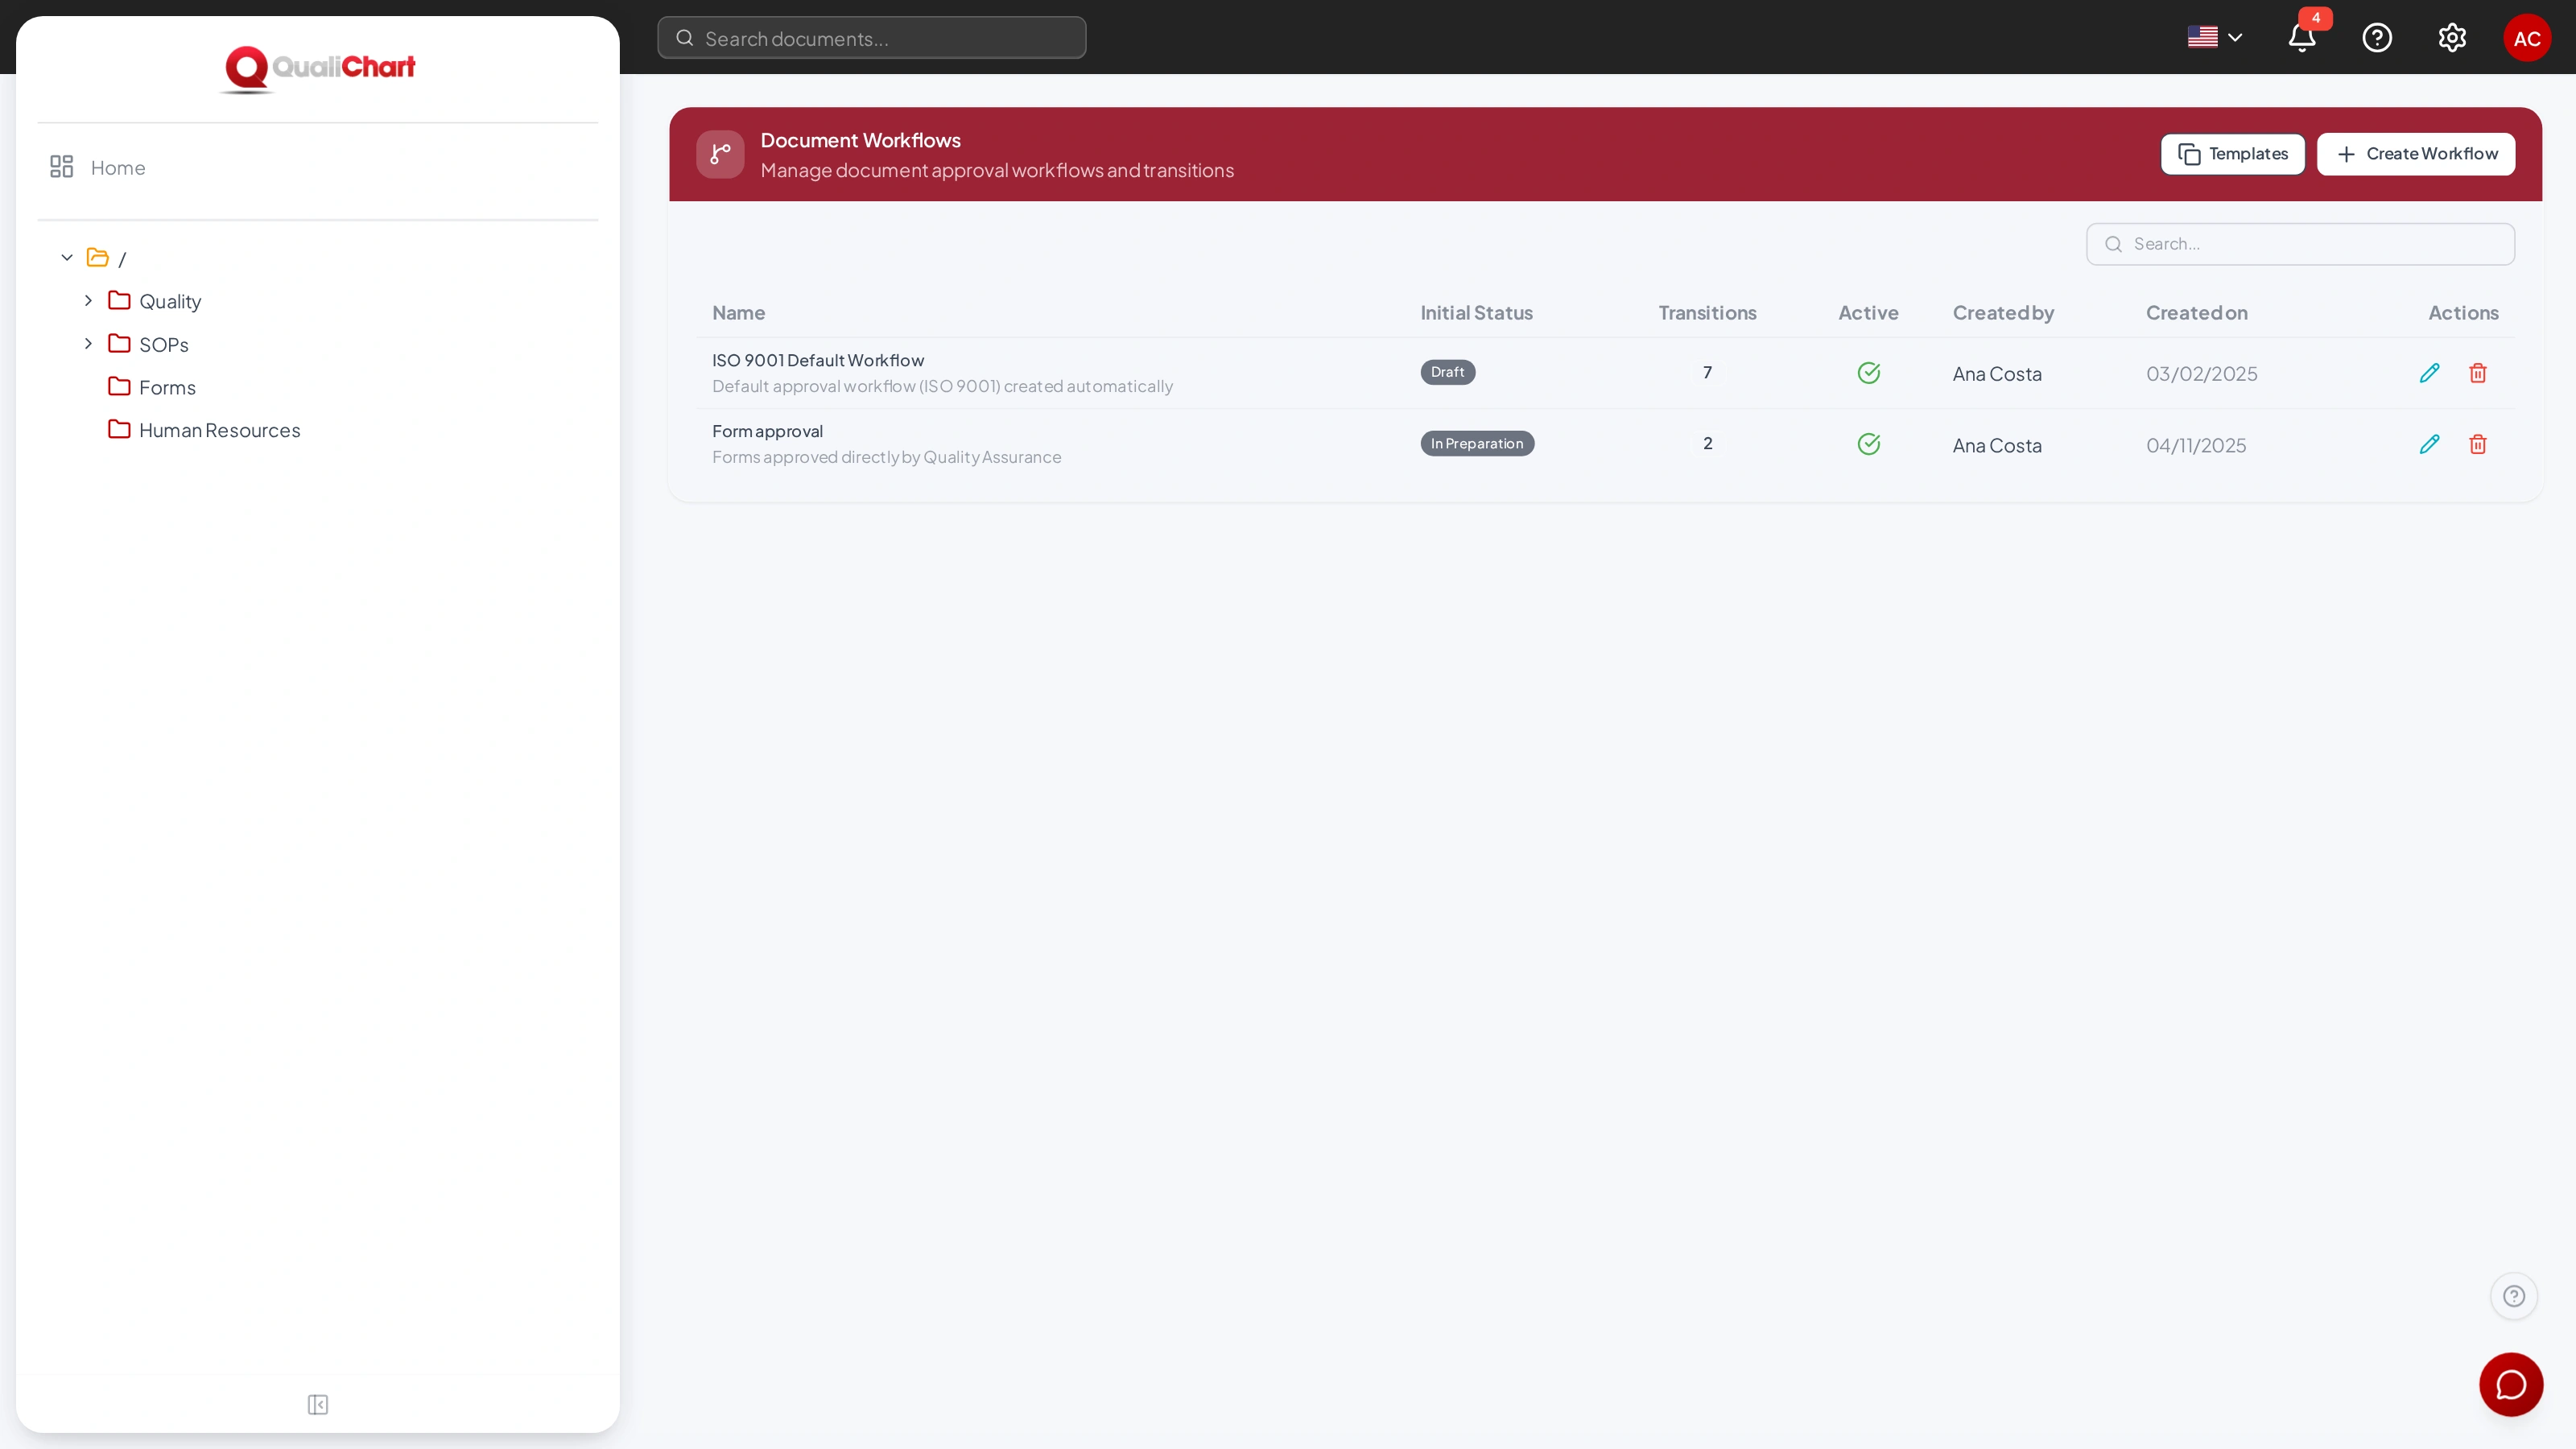
A workflow defines the statuses a document goes through and the transitions between them, with the groups that can perform each one. The laboratory starts with the ISO 9001 Default Workflow, created on the first sign-in.
Create from the template
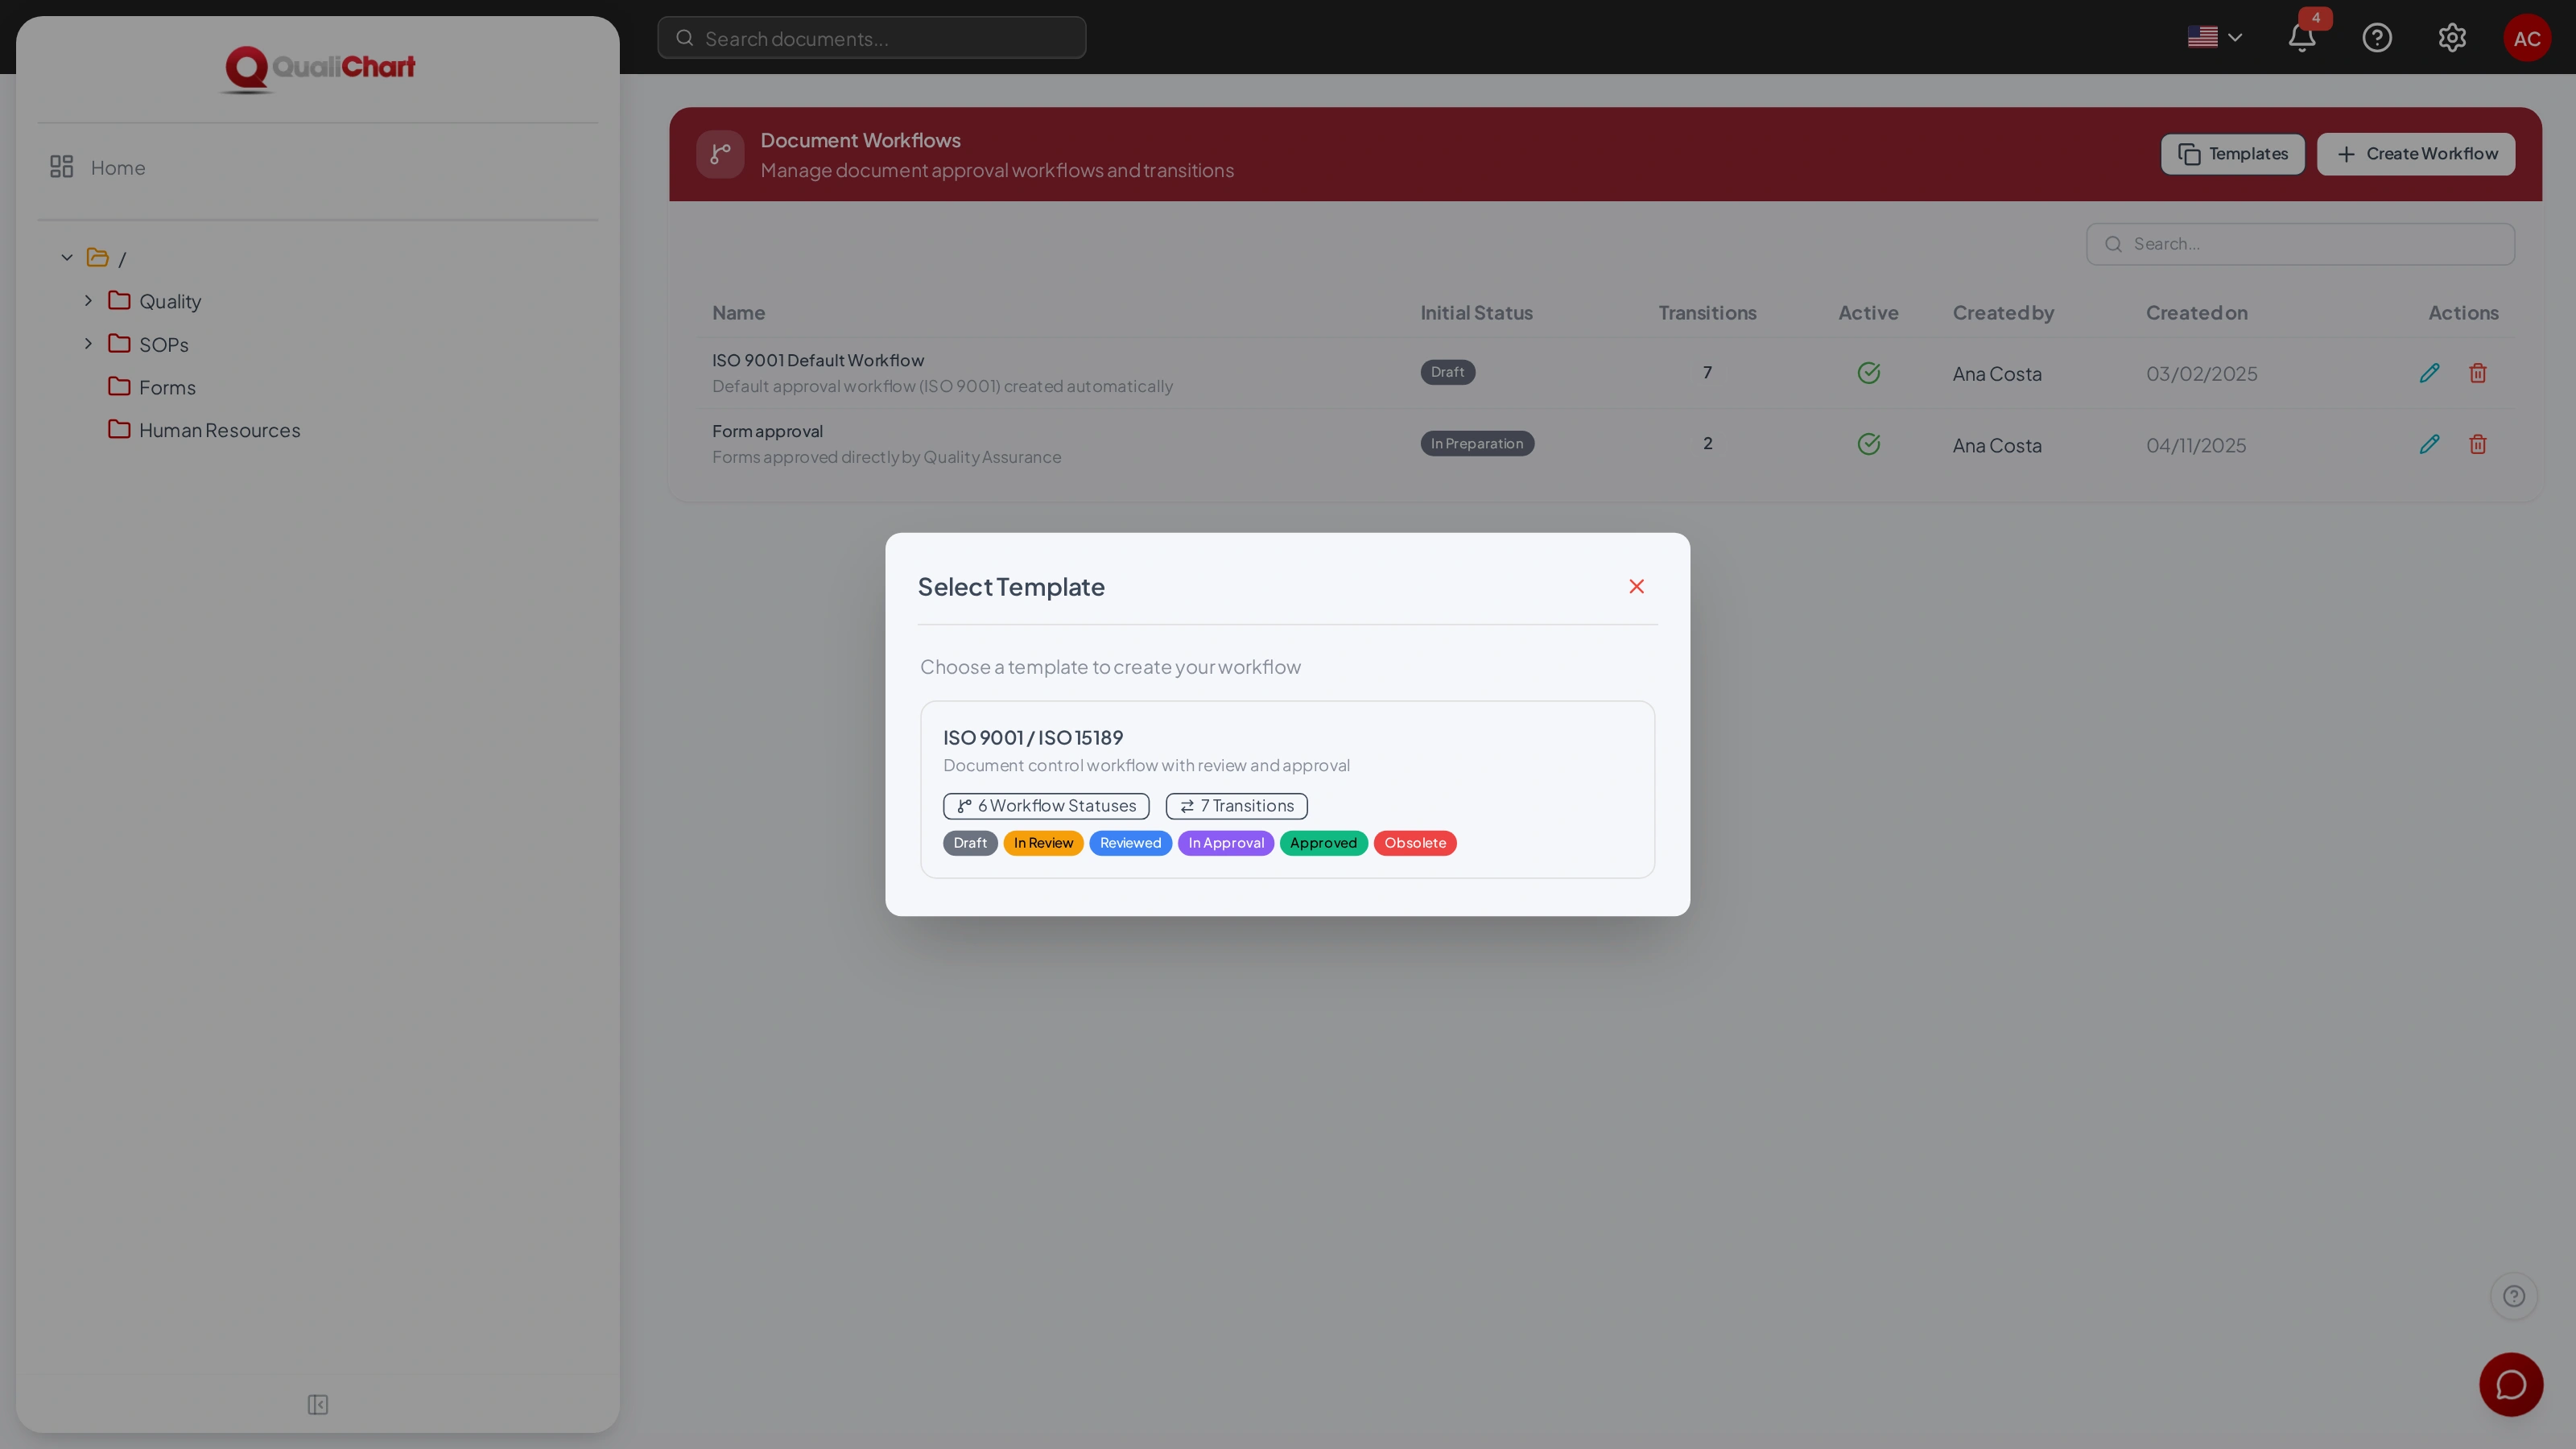
Click Templates and choose ISO 9001 / ISO 15189: the form comes filled in with six statuses — Draft, In Review, Reviewed, In Approval, Approved and Obsolete — and seven transitions, with "Reviewed by" and "Approved by" on the cover page. All that is left is to choose the groups for each transition. To start from scratch, use Create Workflow.
Build the workflow
| Part | How to fill it in |
|---|---|
| Basic Information | Name, description and Active. Only active workflows can be chosen in document types. |
| Workflow Statuses | Add each status with a name and a color; click a status name to edit it. Check Distributed on the status that makes the version current (controlled copy). |
| Initial Status | The status of every new document and of each new version uploaded. |
| Transitions | For each transition: source status, target status, action name (optional), allowed groups (at least one) and, if applicable, Show on cover page with the Cover page label, such as "Reviewed by". |
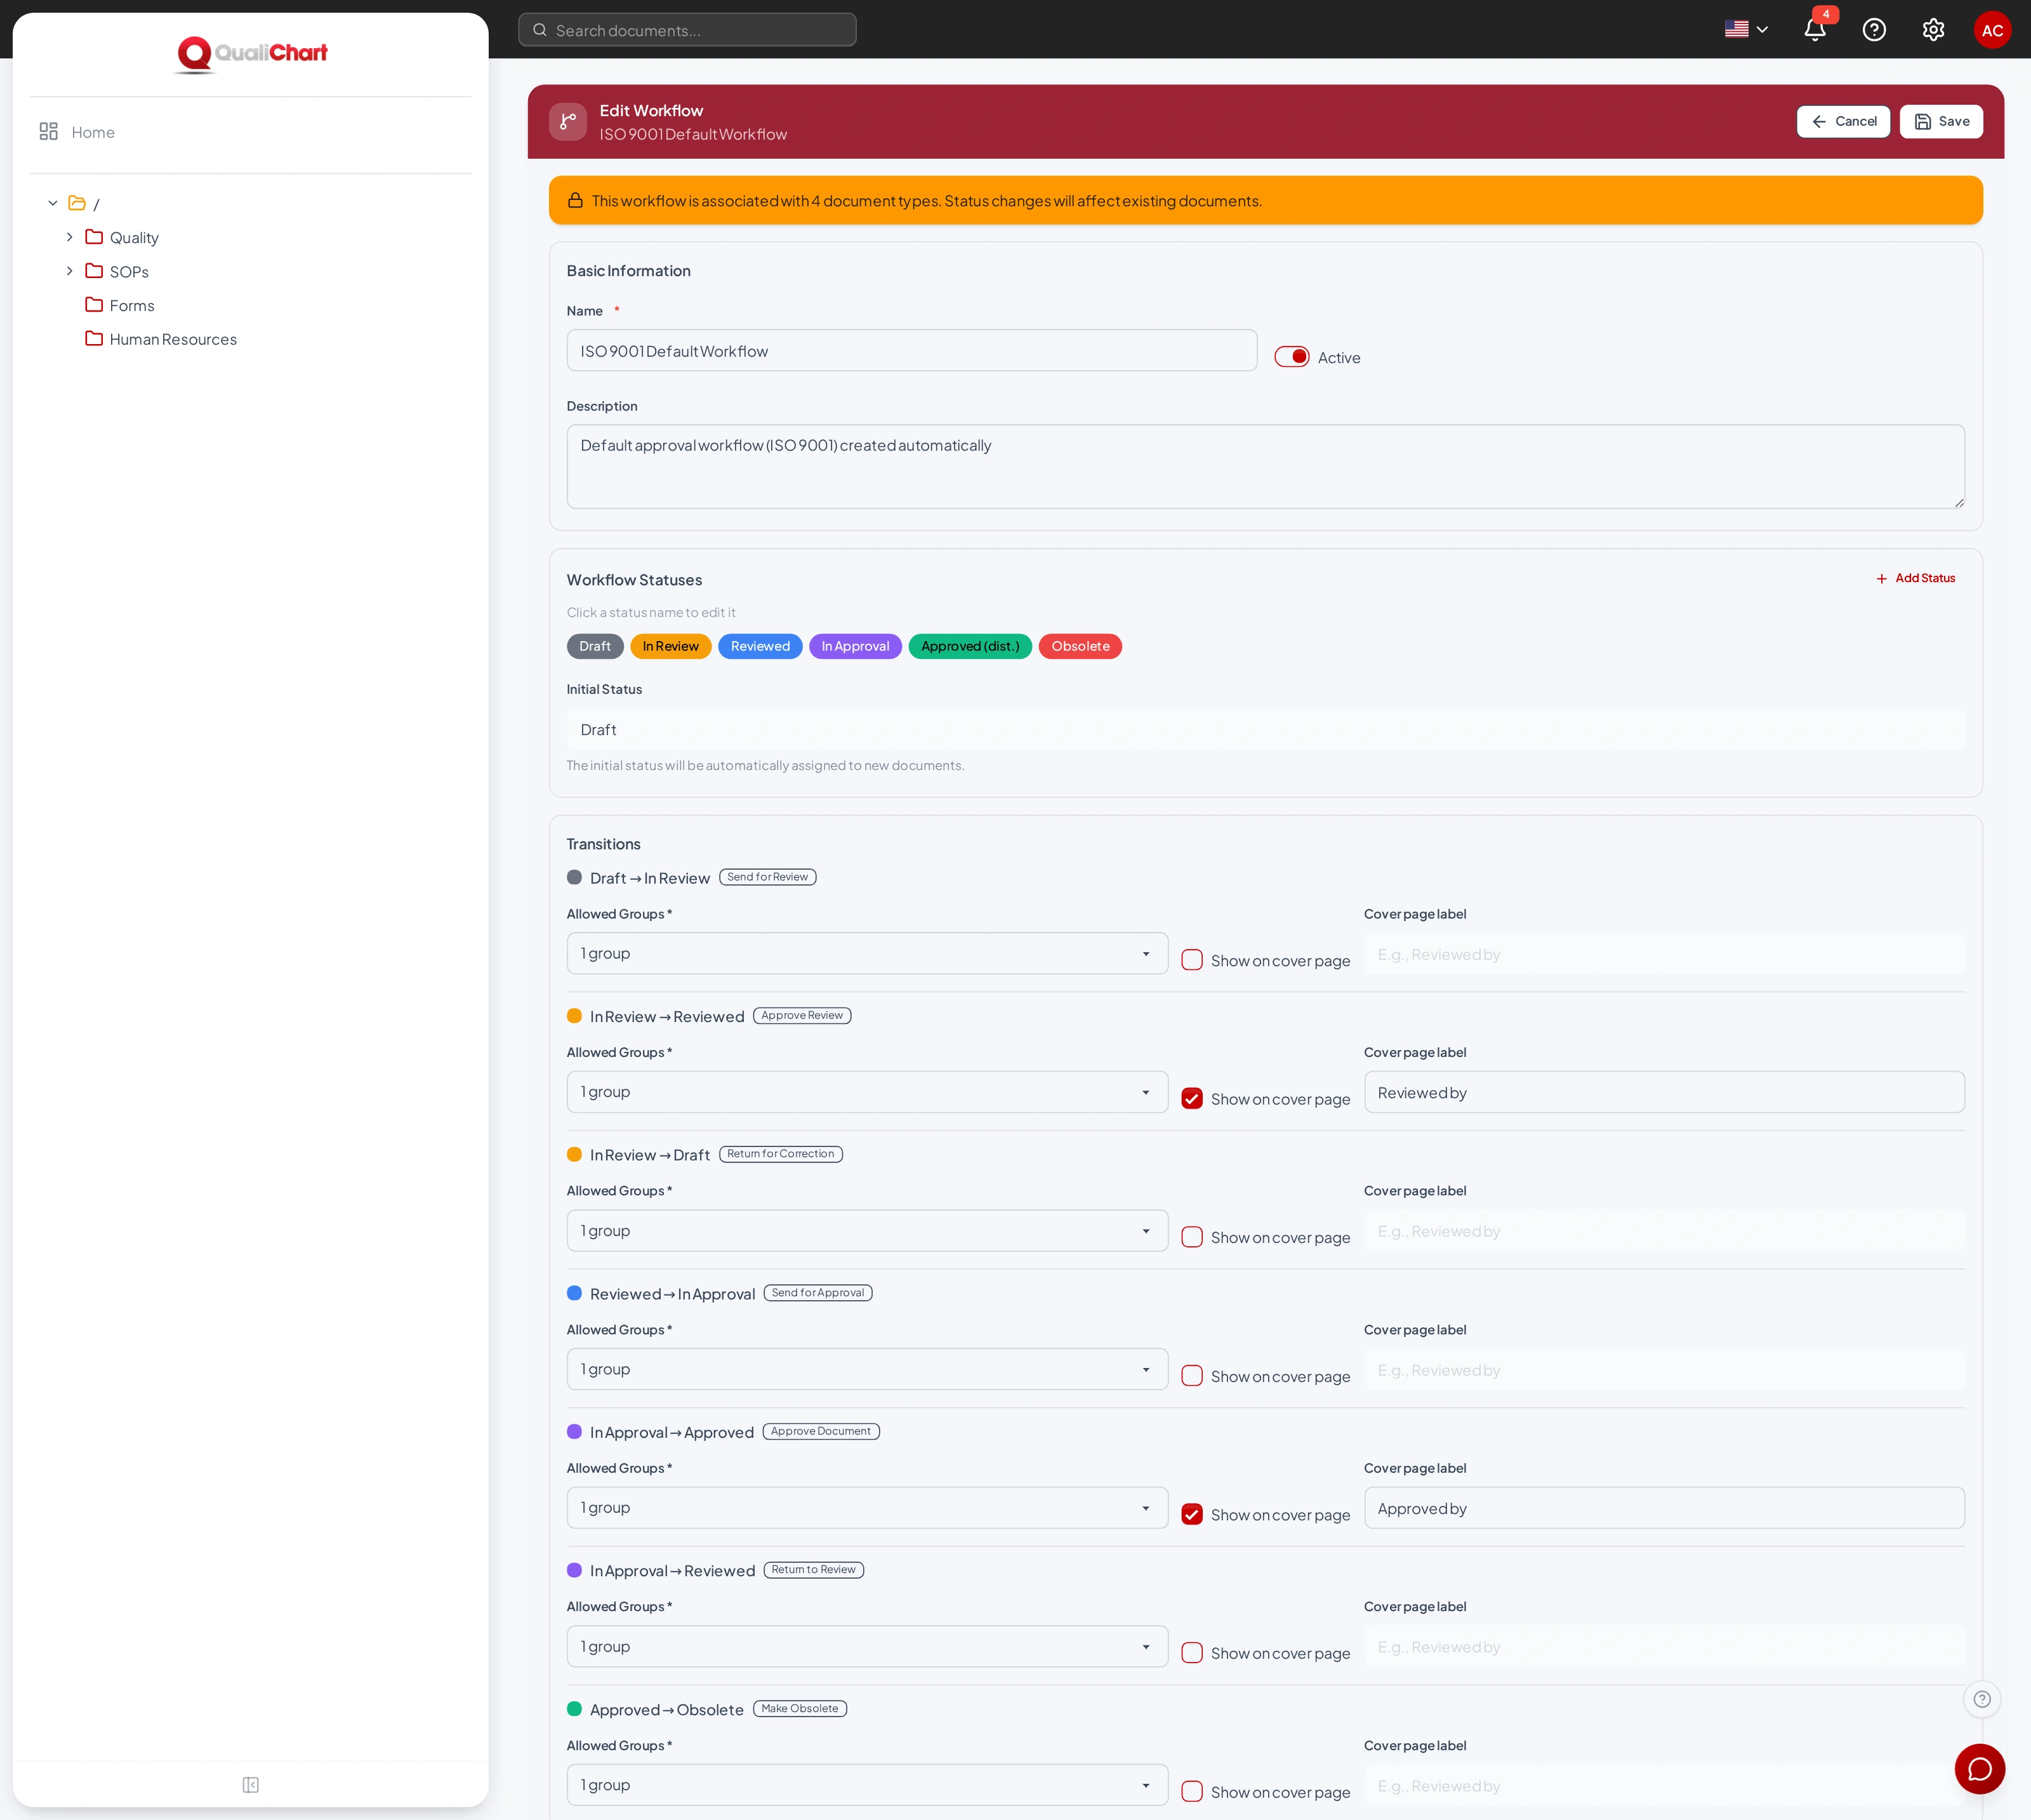
The workflow needs at least one status and one transition; status names must be unique; a transition cannot connect a status to itself; and each transition needs at least one group.
Workflow in use
When the workflow is linked to a document type, the screen shows a warning and protects existing documents: the initial status and the transition structure — which status leads to which — cannot change, and a status used by documents cannot be removed. You can still rename statuses and change their colors (GED asks for confirmation and updates the documents that use that status), change transition names and groups, and adjust the cover page settings.
Creating, editing and deleting workflows requires the Manage folders permission.
Back to contentsDocument types
The type classifies the document — SOP, Work Instruction, Manual, Form… — and defines two rules: the approval workflow and the validity period.
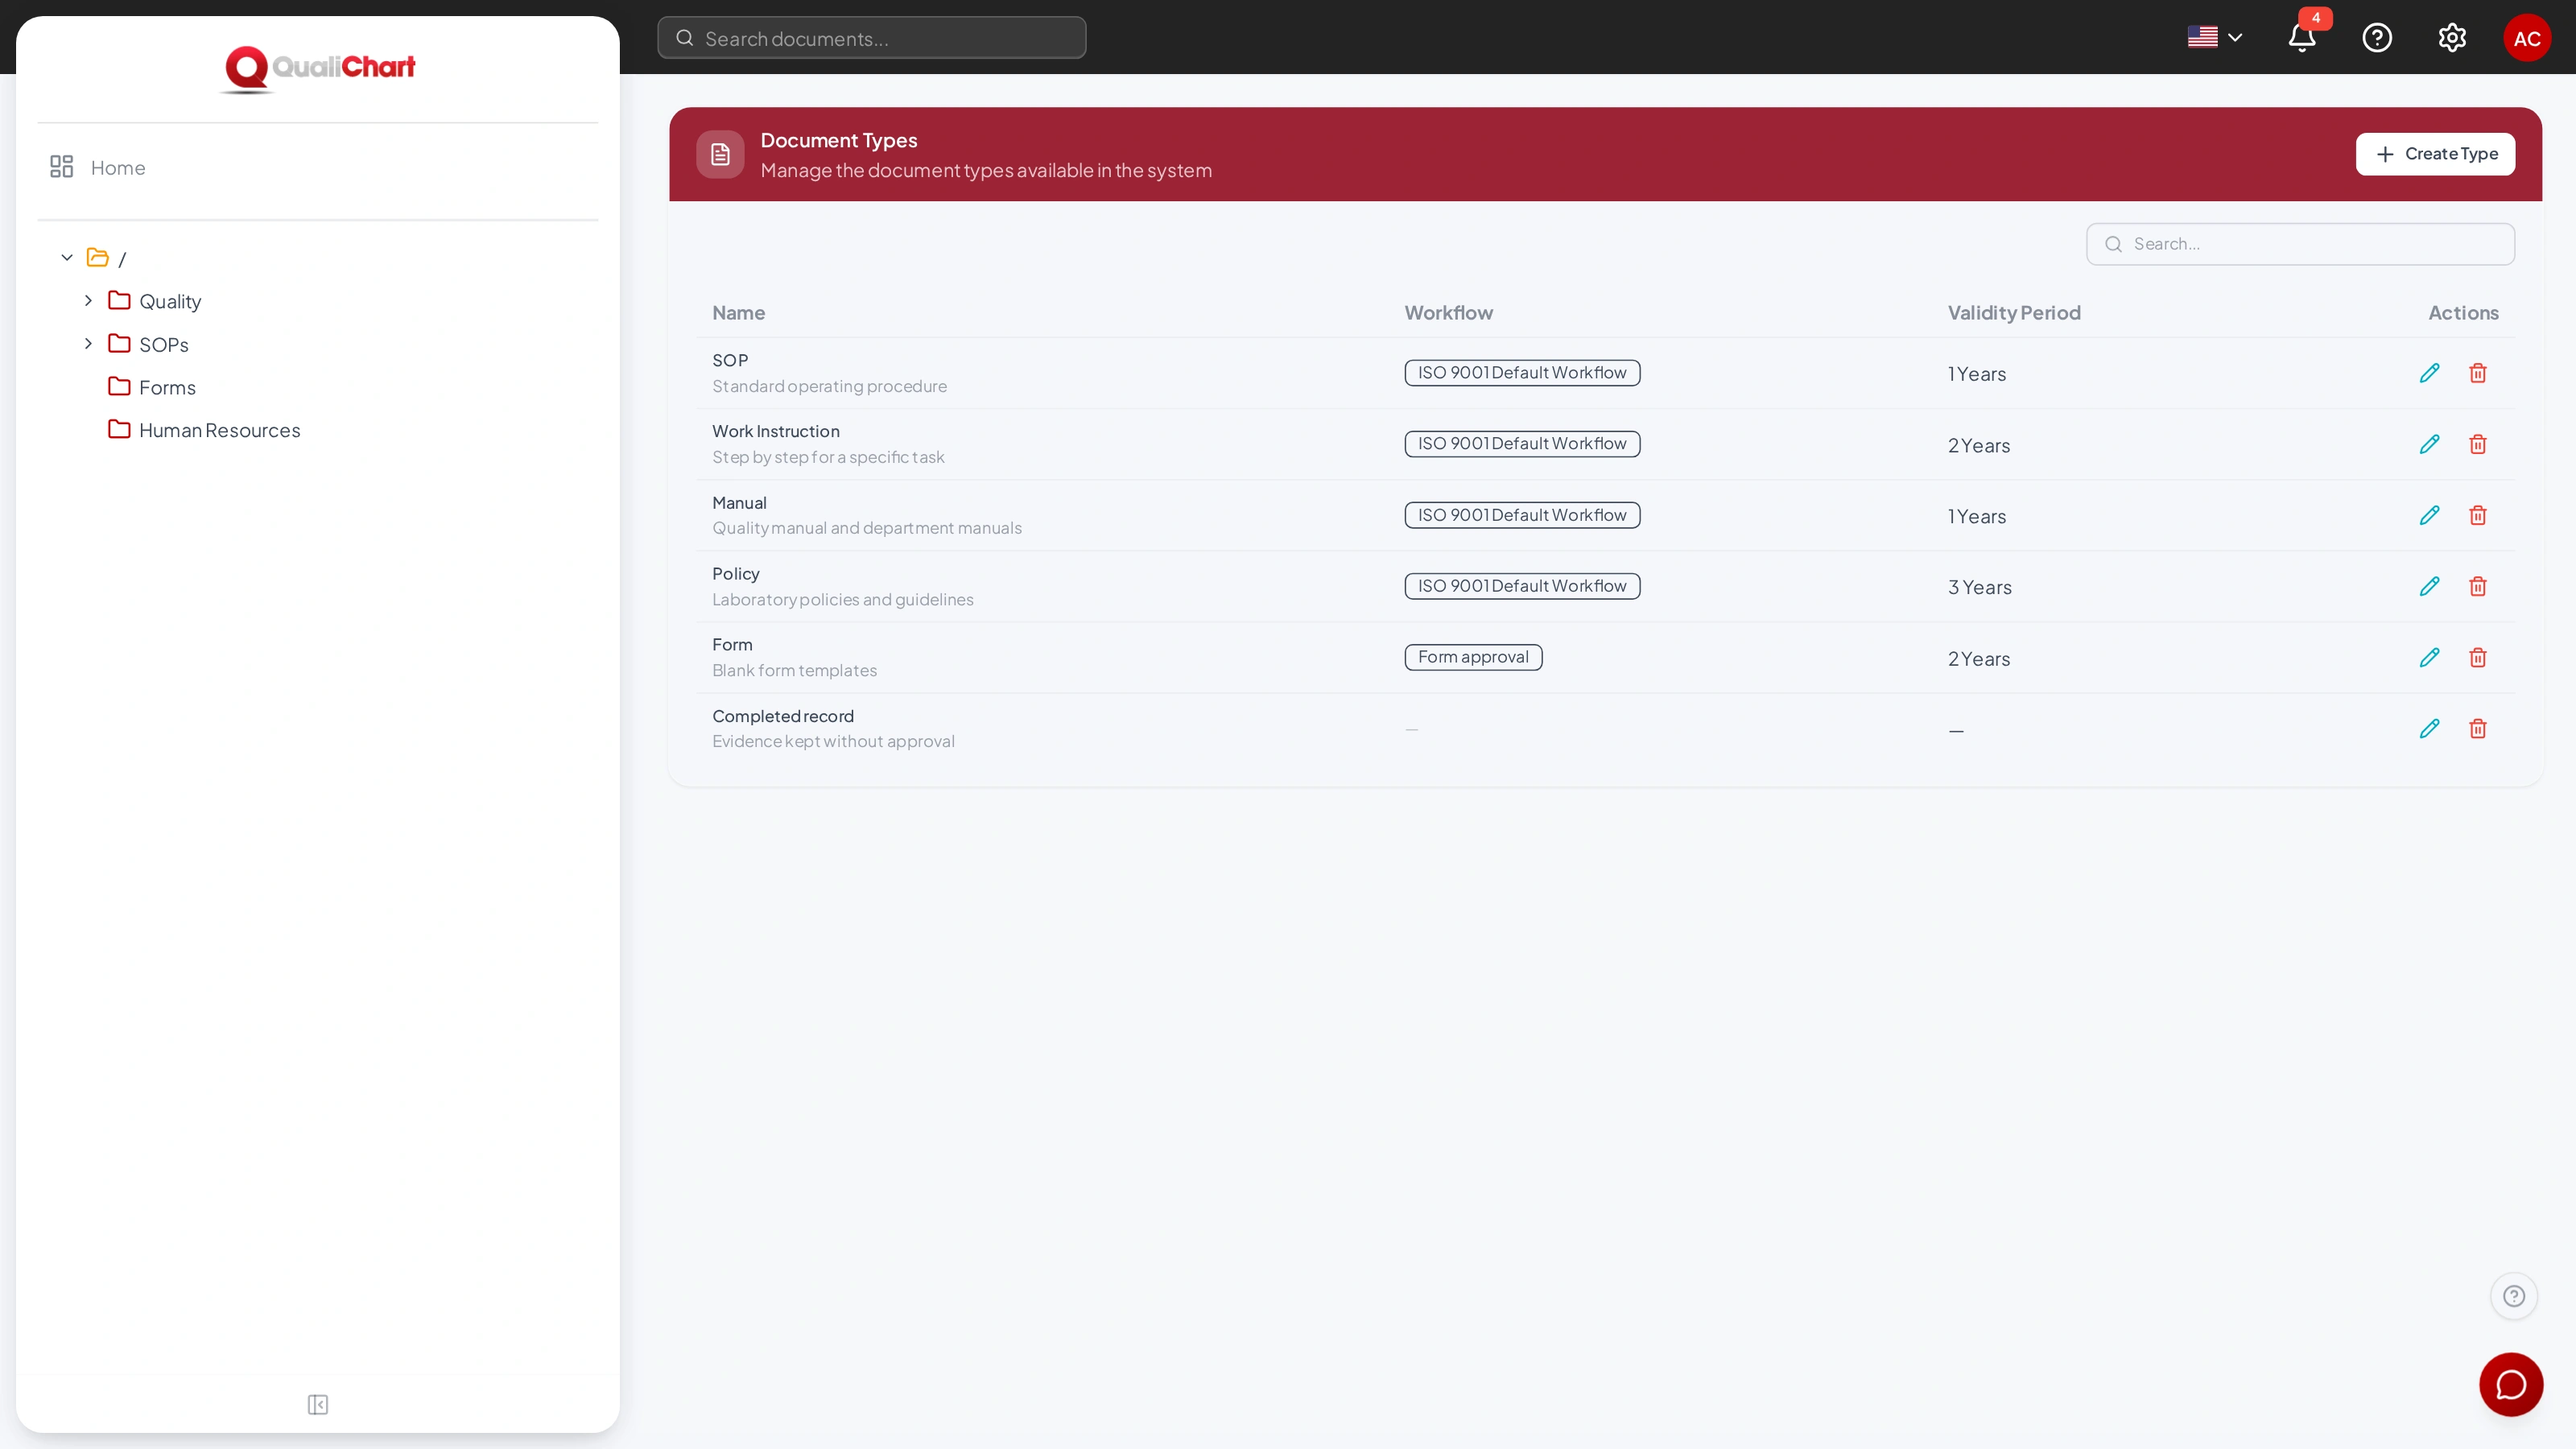
- Click Create Type.
- Enter the name and a description.
- Choose the Workflow. Without a workflow, documents of this type have no status or approval.
- In Validity Period, enter the value and the unit: days, months or years.
- Click Create.
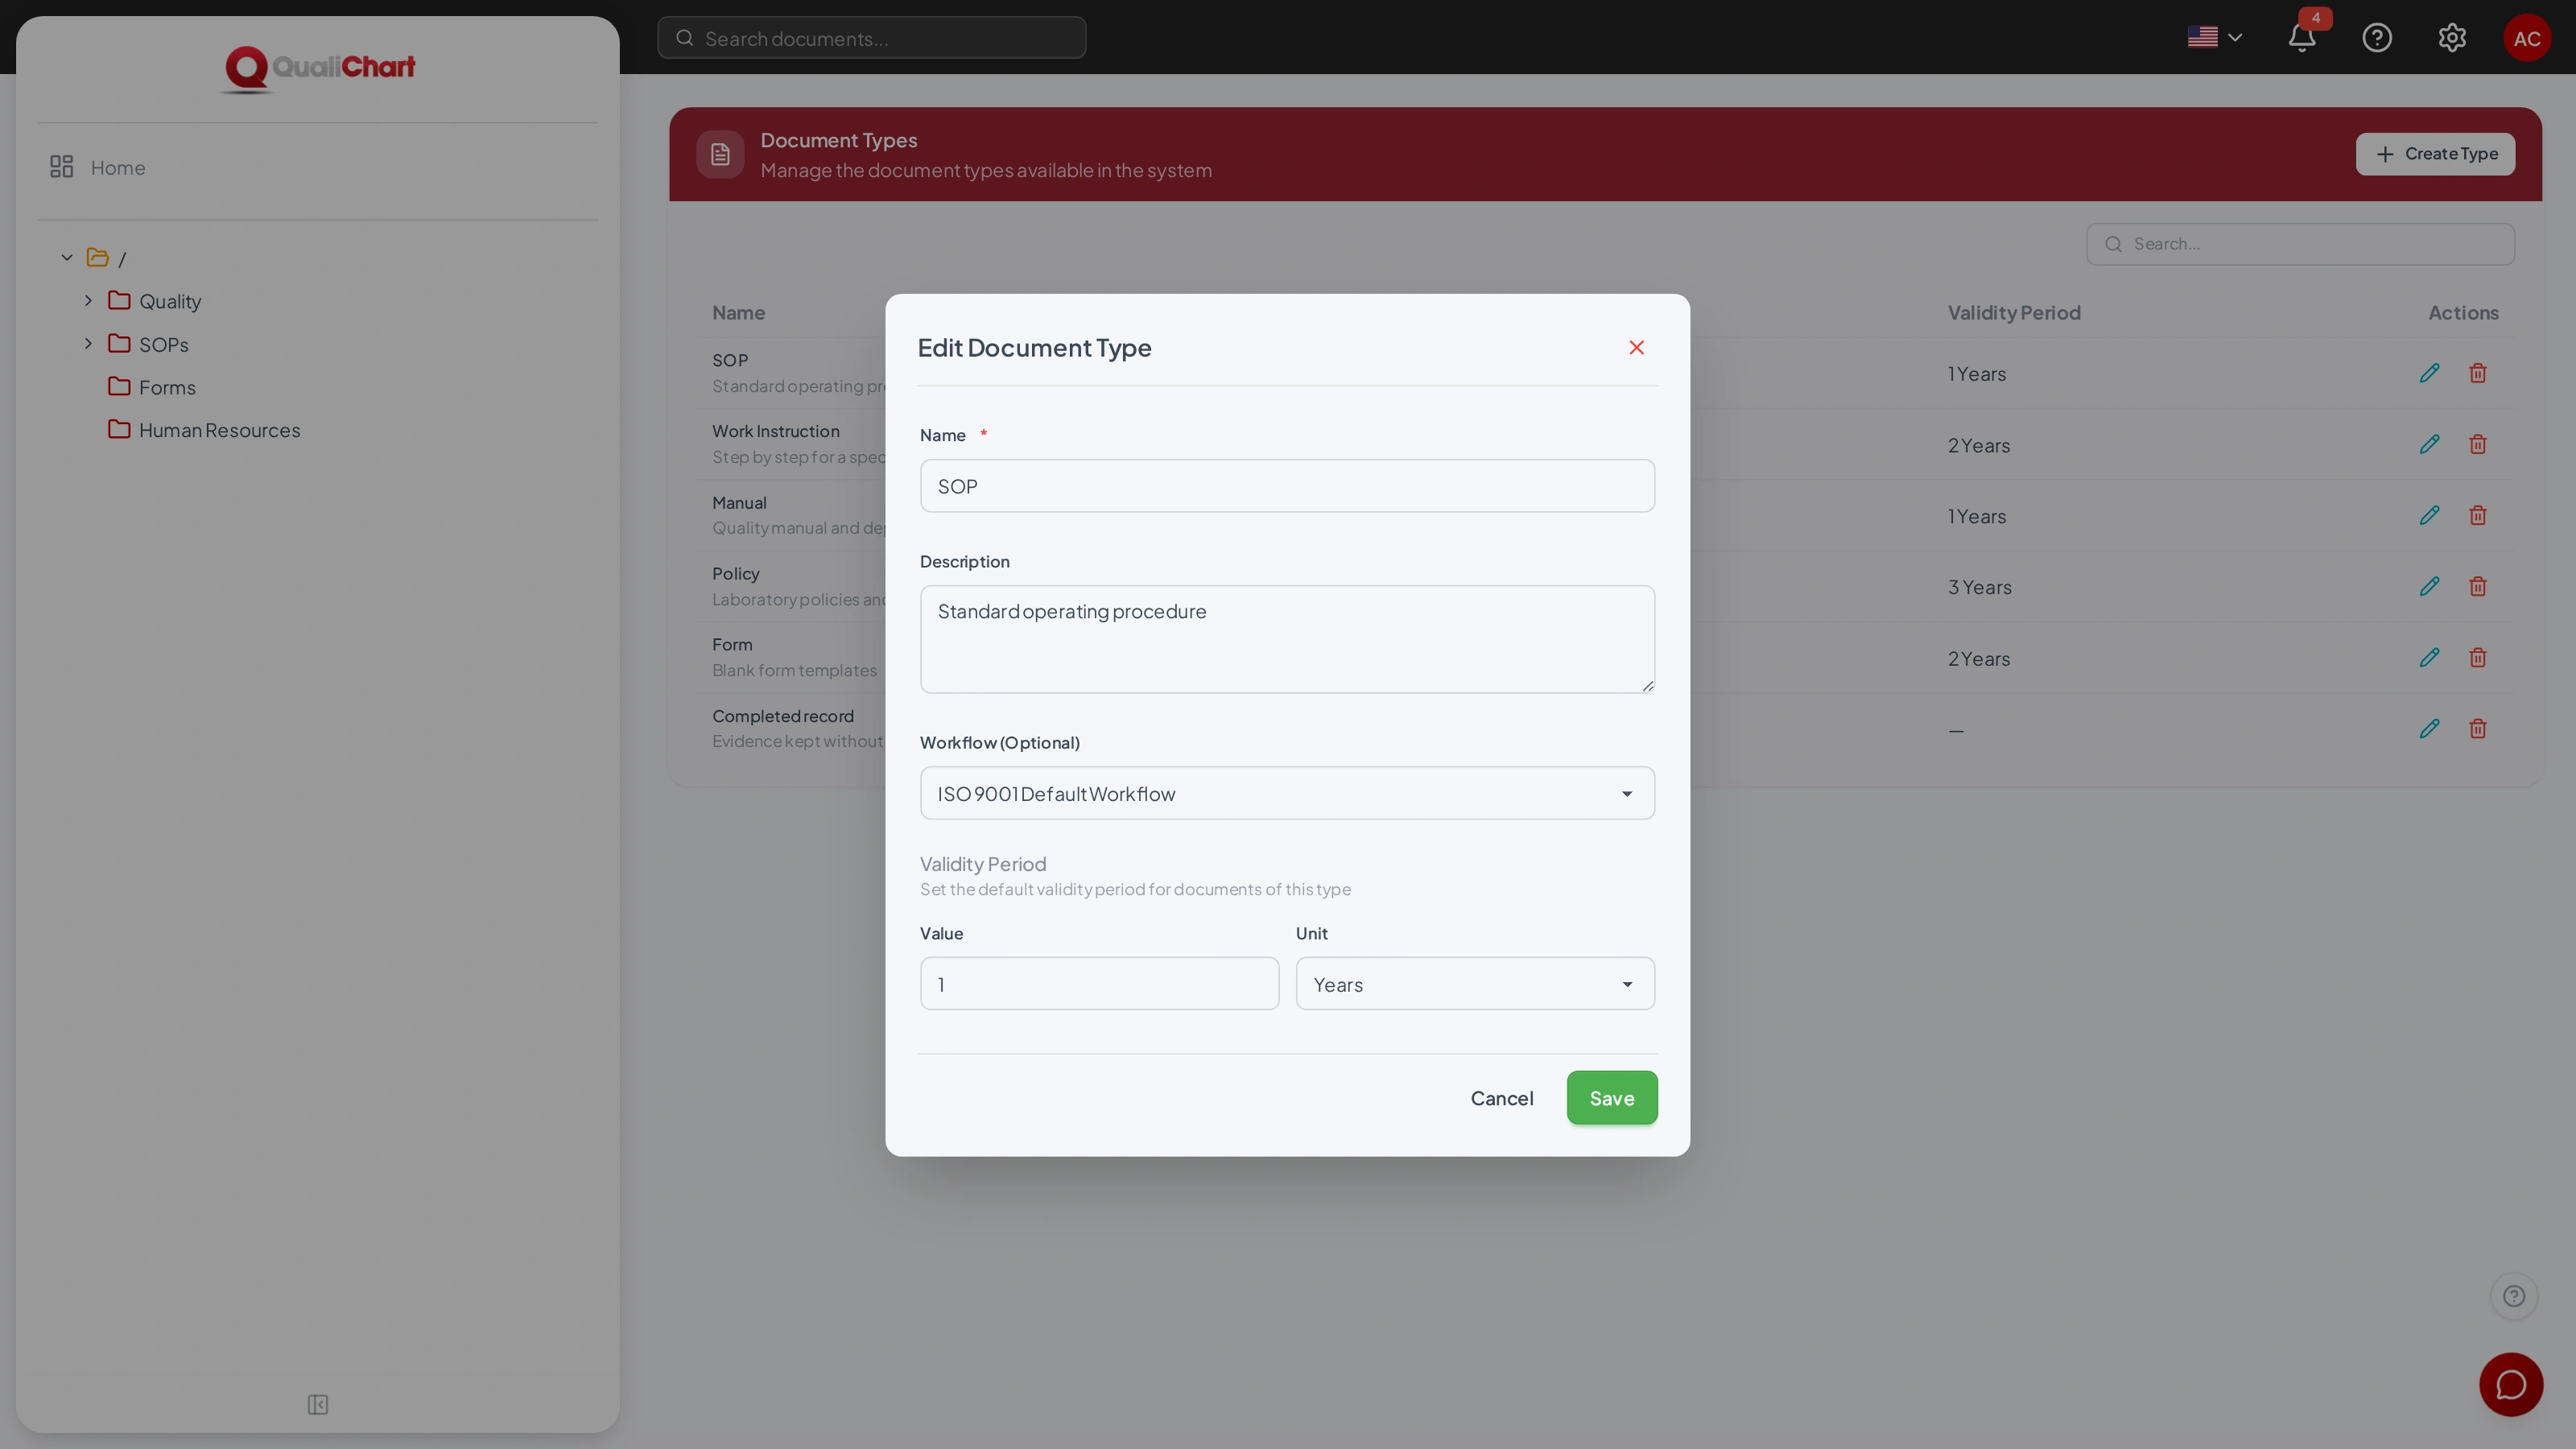
The next review of each document is calculated when the version is distributed: distribution date + validity period. Changing a type's validity period applies to future distributions. Deleting a type does not affect existing documents, and type names must be unique.
Creating, editing and deleting types requires the Manage folders permission.
Back to contentsFolder permissions
Each folder defines who can access it. The options are under Access Permissions when you create or edit the folder.
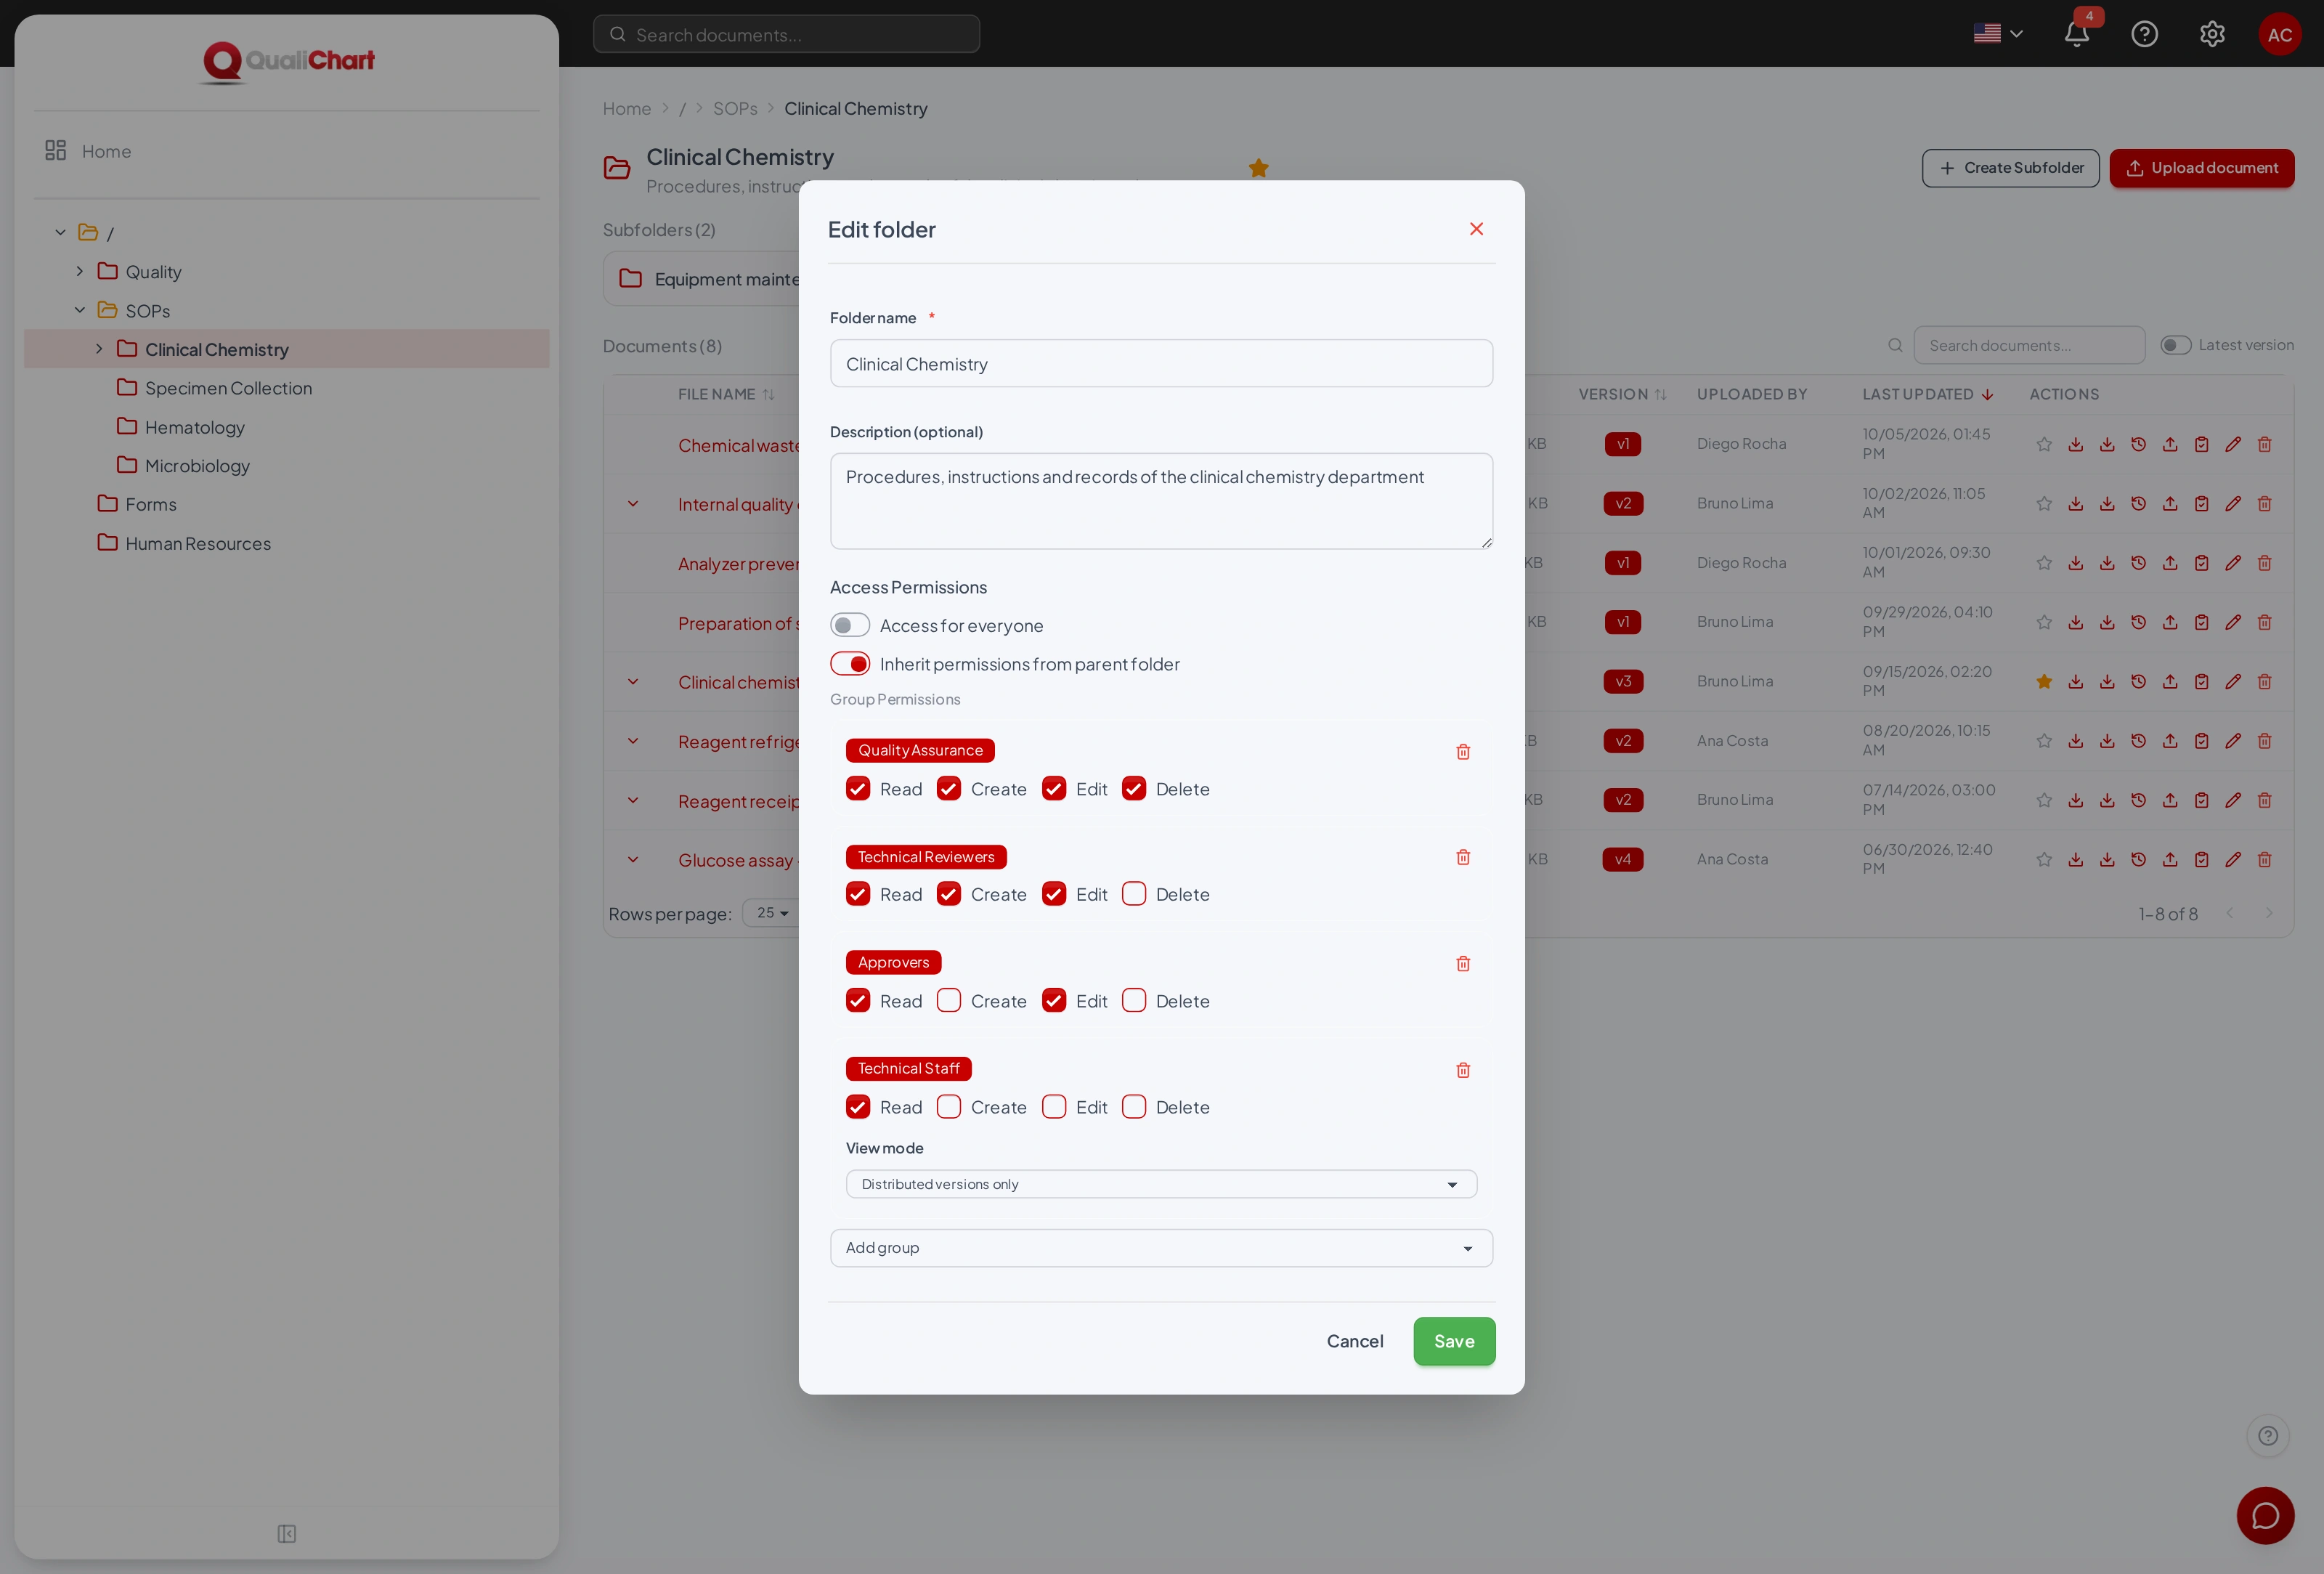
| Option | Effect |
|---|---|
| Access for everyone | When on, everyone in the laboratory has all rights in the folder: read, create, edit and delete. This is the default for new folders. |
| Group Permissions | Turn off Access for everyone and use Add group. Only the listed groups can access the folder. |
| Read | View the folder and its documents and download them. |
| Create | Upload documents and create subfolders in the folder. |
| Edit | Edit document details, upload new versions, perform transitions and change the folder and its permissions. |
| Delete | Delete documents and the folder. |
| Inherit permissions from parent folder | Adds the parent folder's rules to this folder's rules. If the parent folder has access for everyone, so does this one. When the same group appears in both, this folder's rule applies. |
| View mode | For groups with Read only: All versions or Distributed versions only, which shows only the current controlled copy and hides documents not yet distributed. |
People who belong to more than one group get the combined rights; if at least one of their groups sees all versions, they see all versions. Administrators have all rights in all folders. Folders that none of your groups can access are hidden from you.
Examples
| Need | Setting |
|---|---|
| Procedures the whole team consults, but only Quality changes | Quality Assurance: Read, Create, Edit and Delete. Technical Staff: Read, with Distributed versions only. |
| Reviewers and approvers who move documents through the workflow | Edit right in the folder for the groups used in the transitions. |
| Folder restricted to one area, such as Human Resources | Only that area's group, without inheriting permissions from the parent folder. |
Users
The Users screen lists the laboratory staff who have access to GED, with their role, groups and status. Filter by name or email, Status (Active, Inactive or Awaiting access), Role and Group. Viewing and changing users requires the Manage users permission.
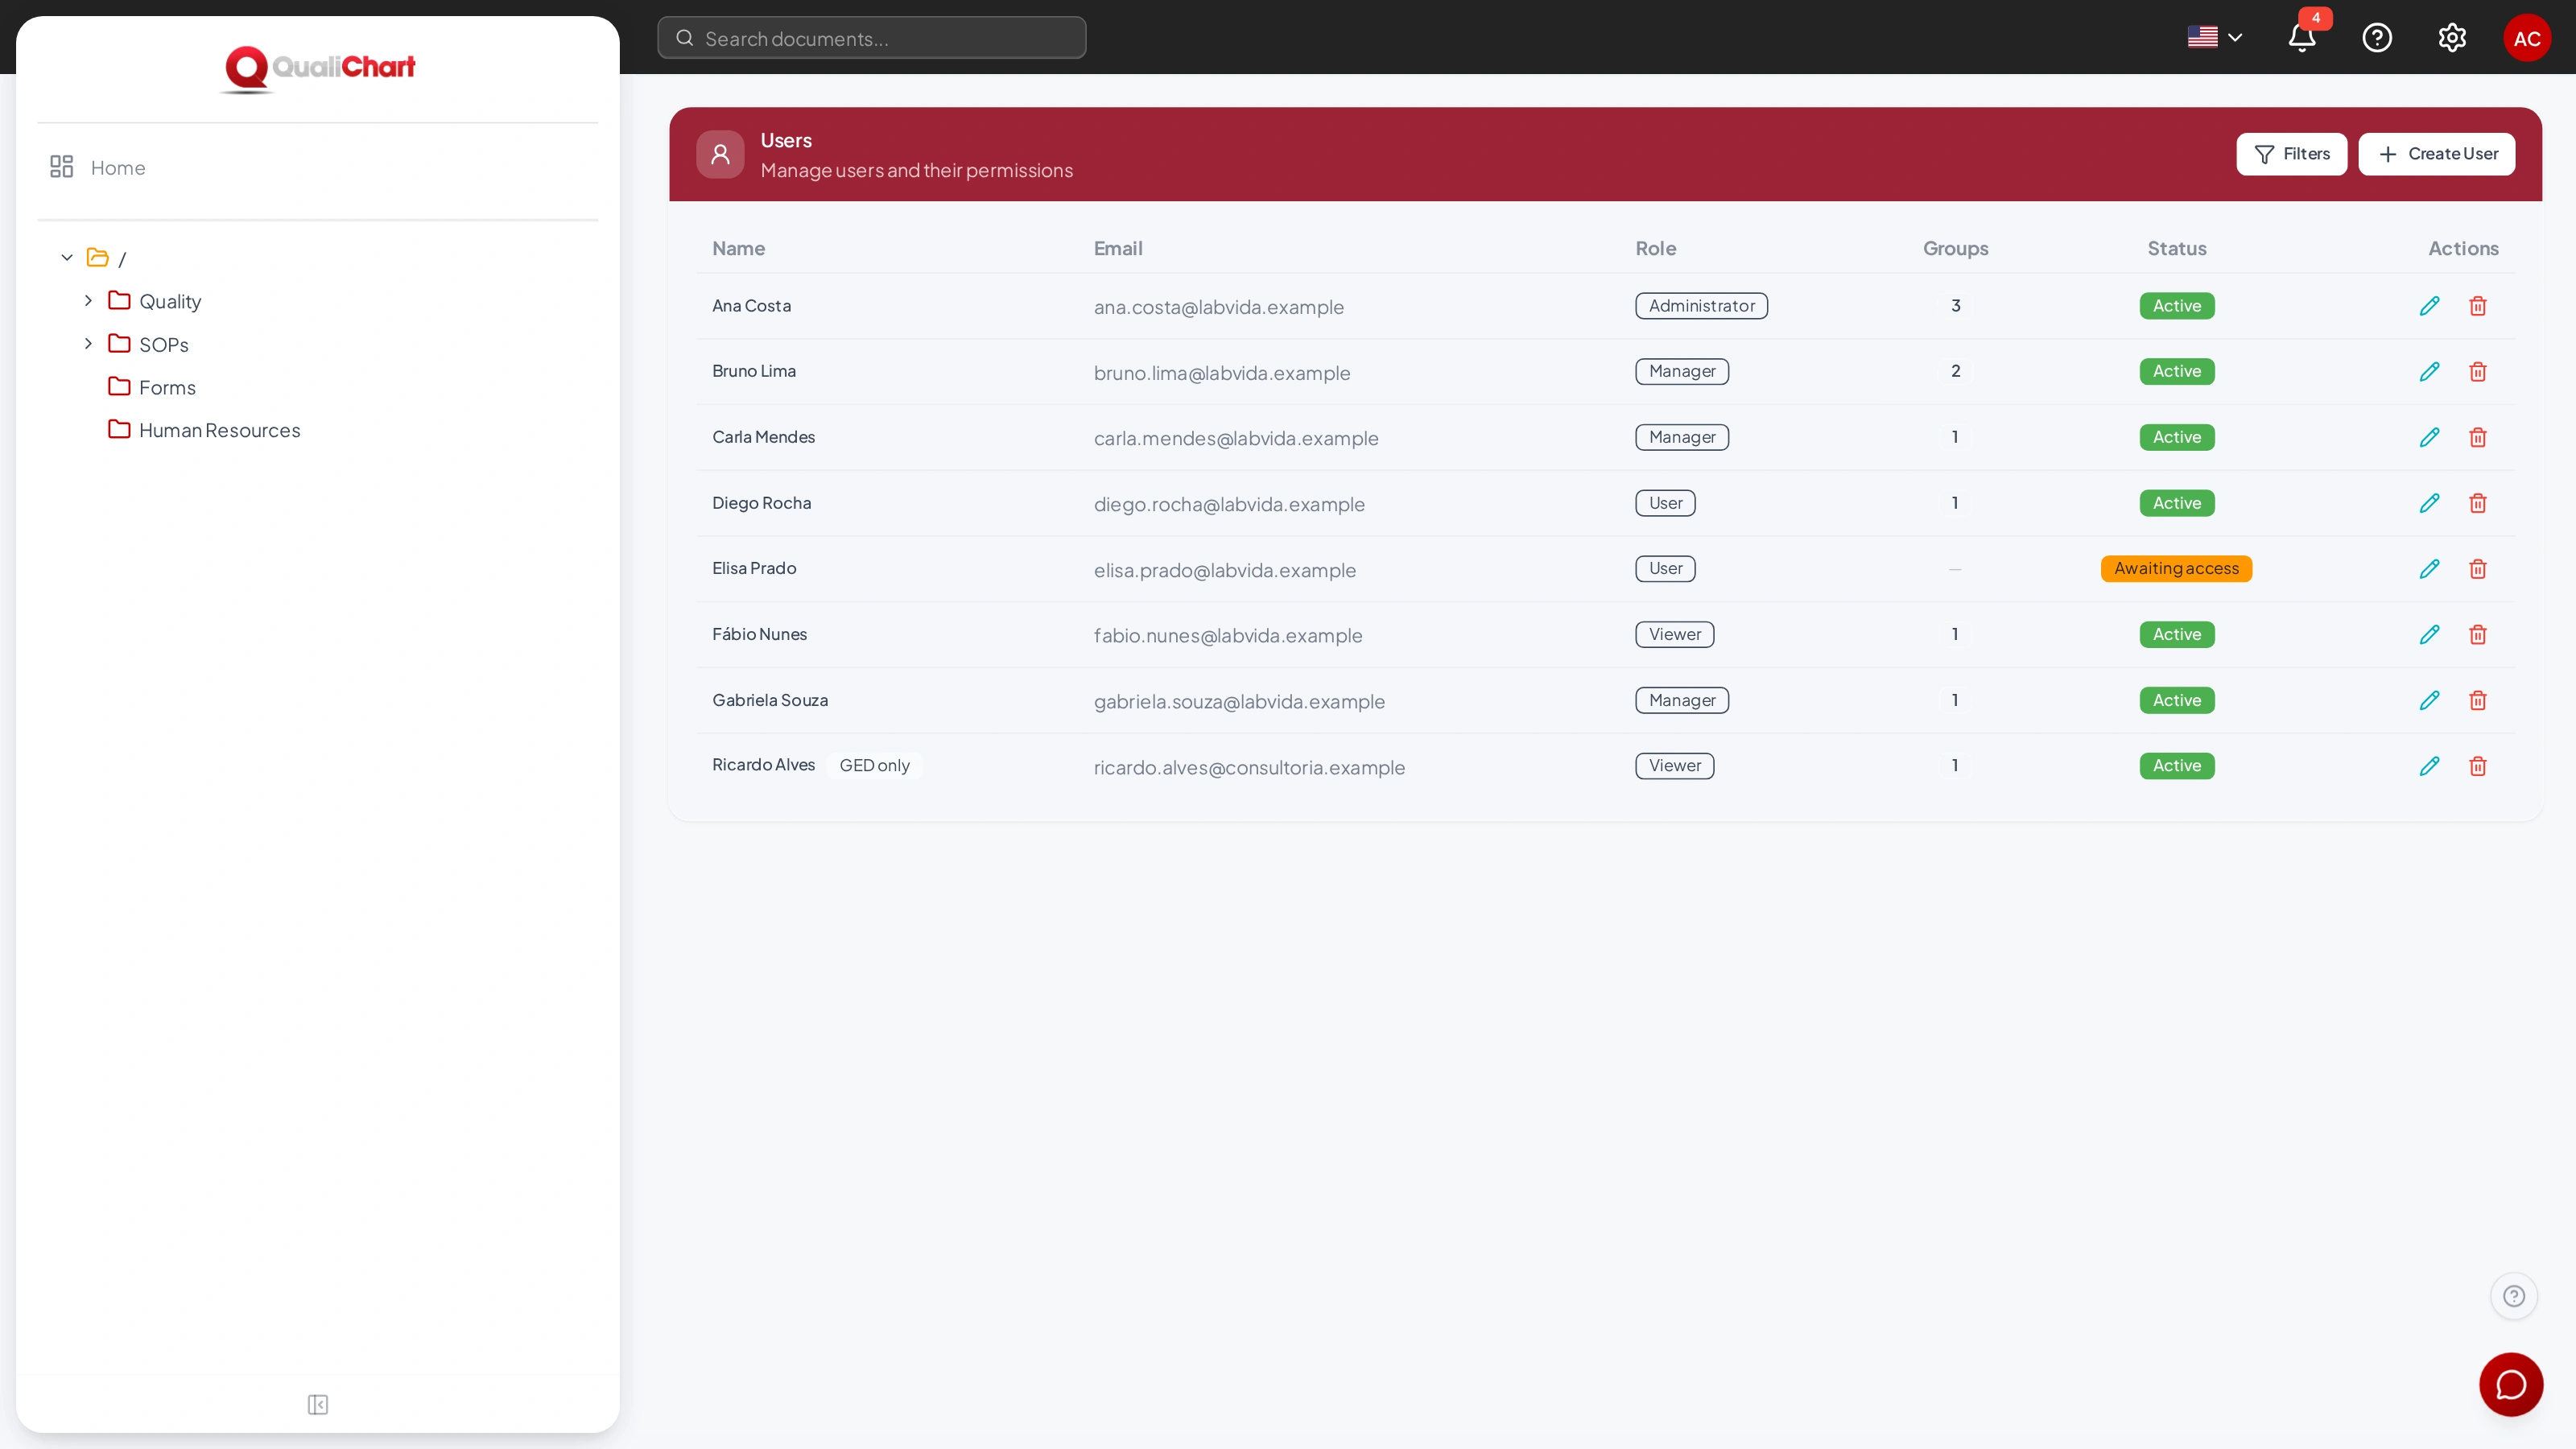
Grant access to people who are waiting
Laboratory staff who sign in to GED for the first time appear as Awaiting access. Open the edit form, set the role, permissions and groups, and click Grant access to GED.
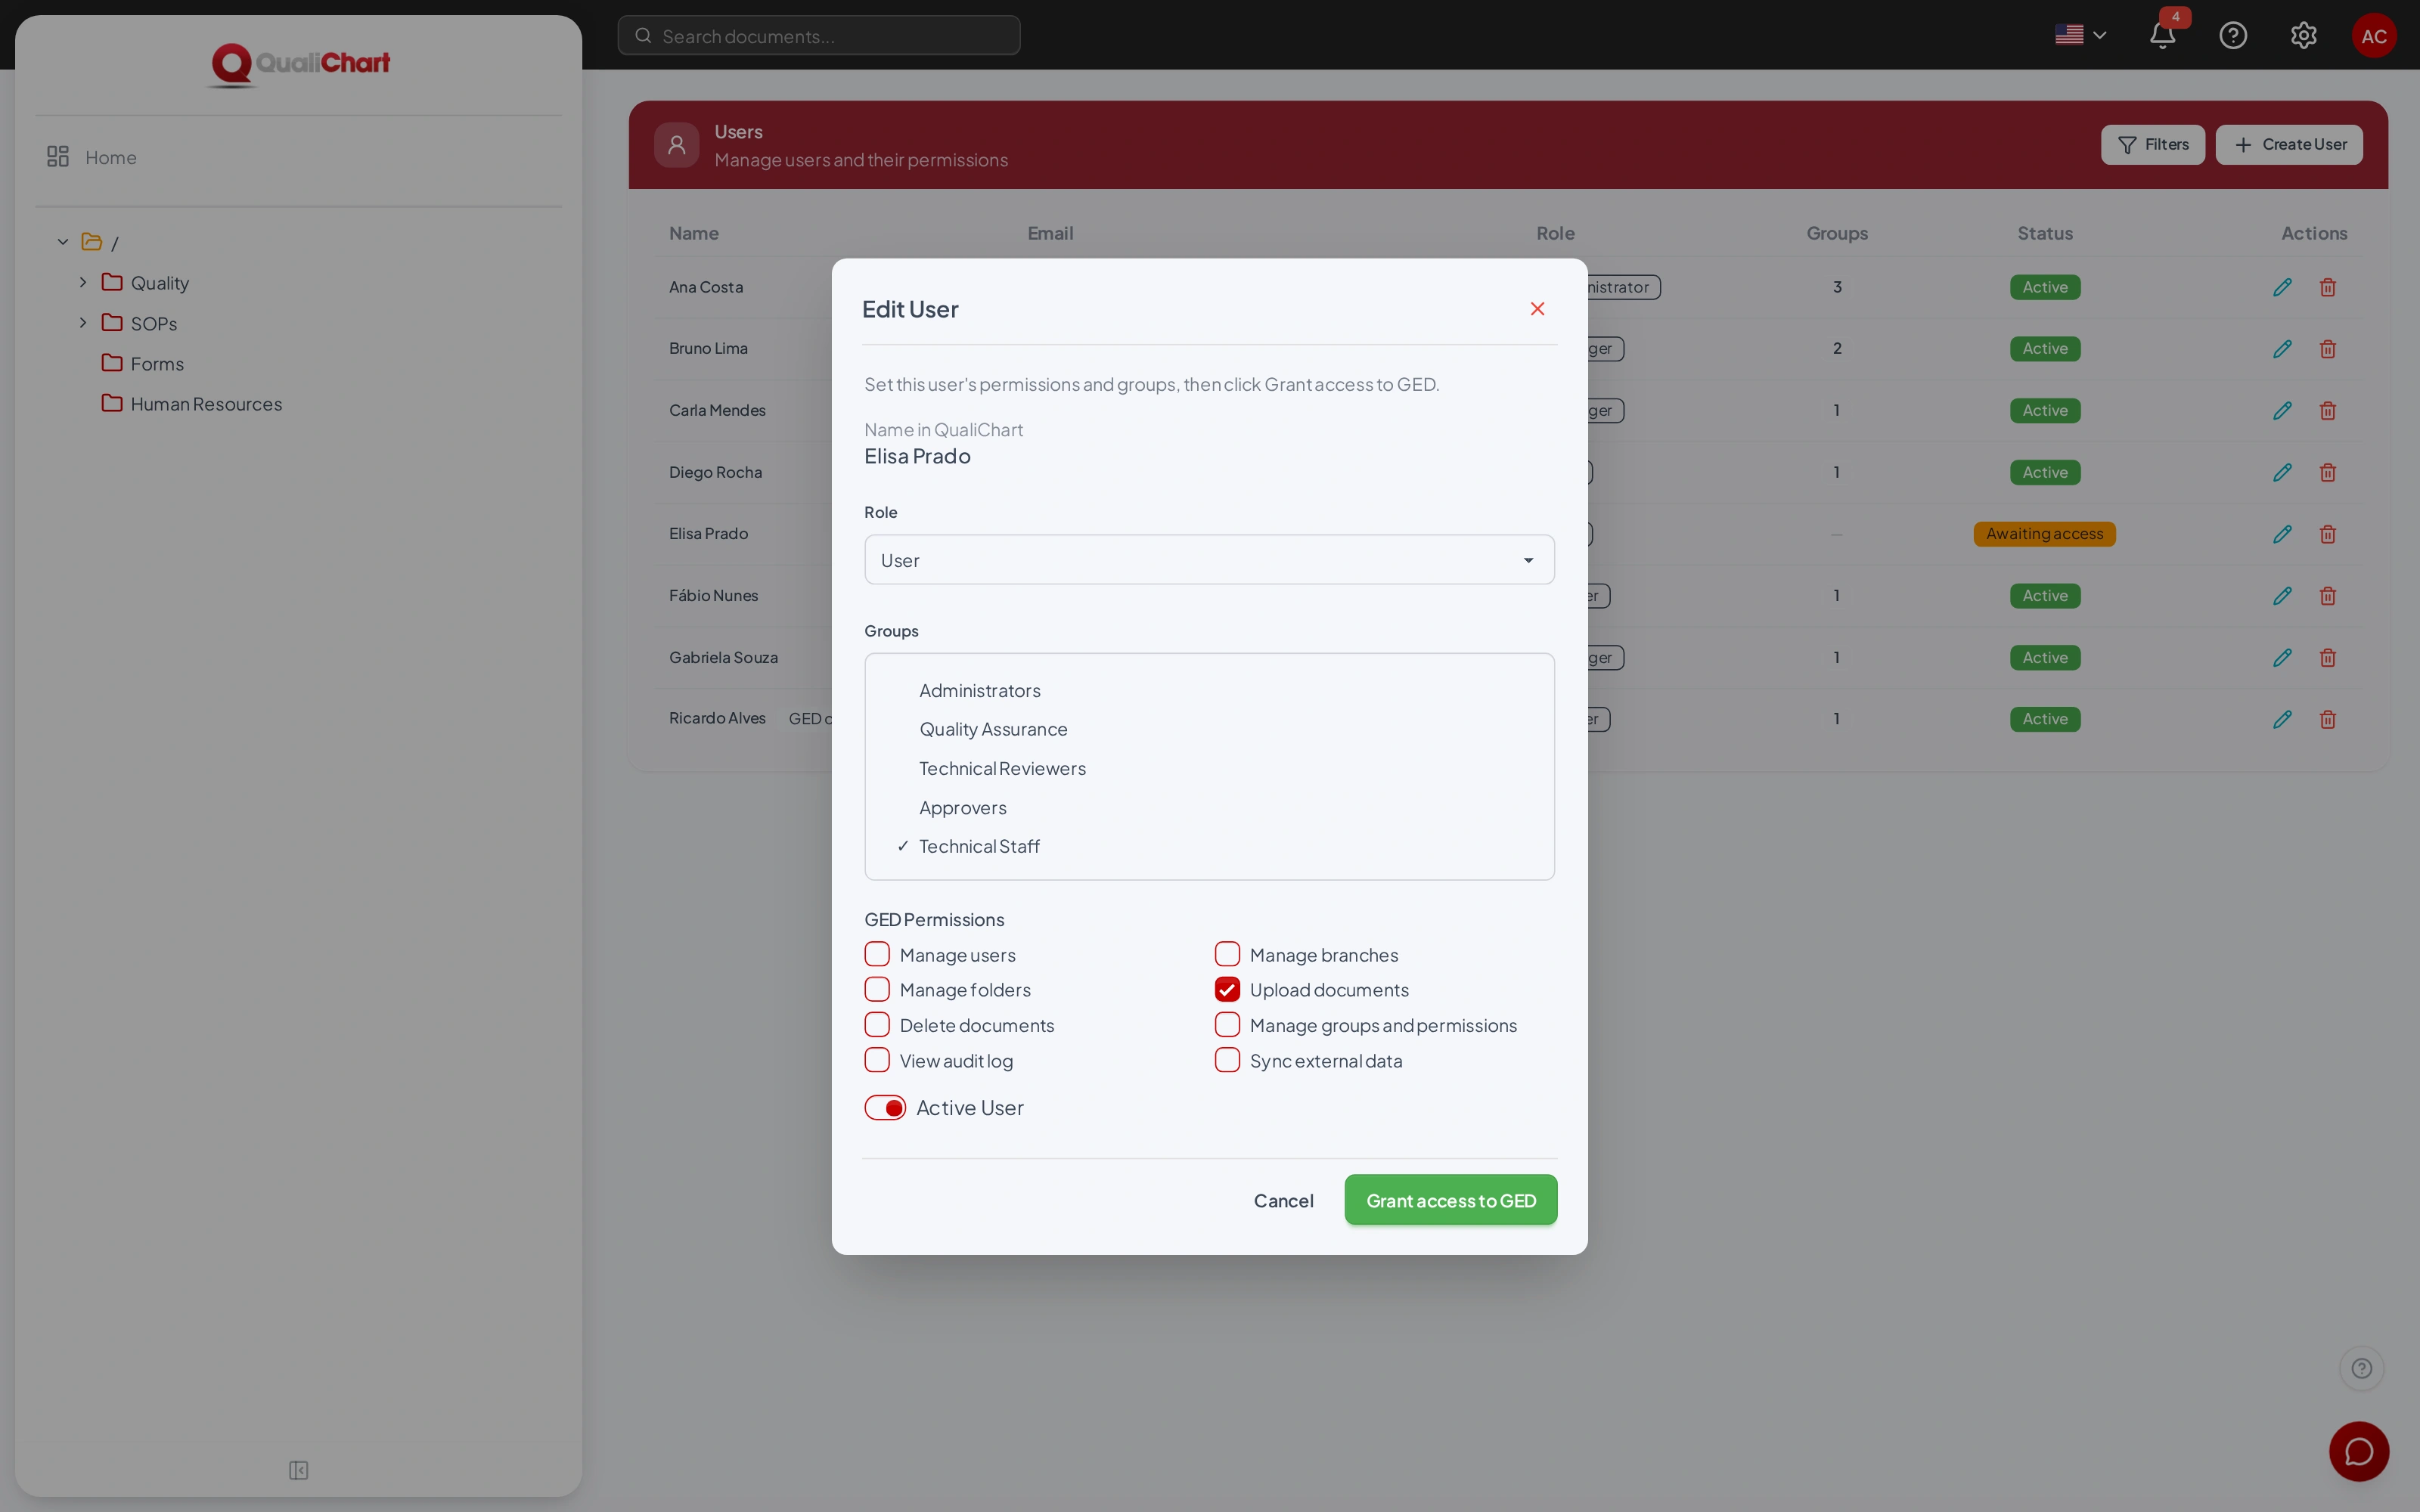
Give access to someone from QualiChart
- Click Create User and enter the email.
- GED looks up the account in QualiChart. If the person is active in the laboratory, the window shows their name and explains that only GED access and permissions will be granted — they keep using the same password.
- Set the role, groups and permissions, and click Grant access to GED.
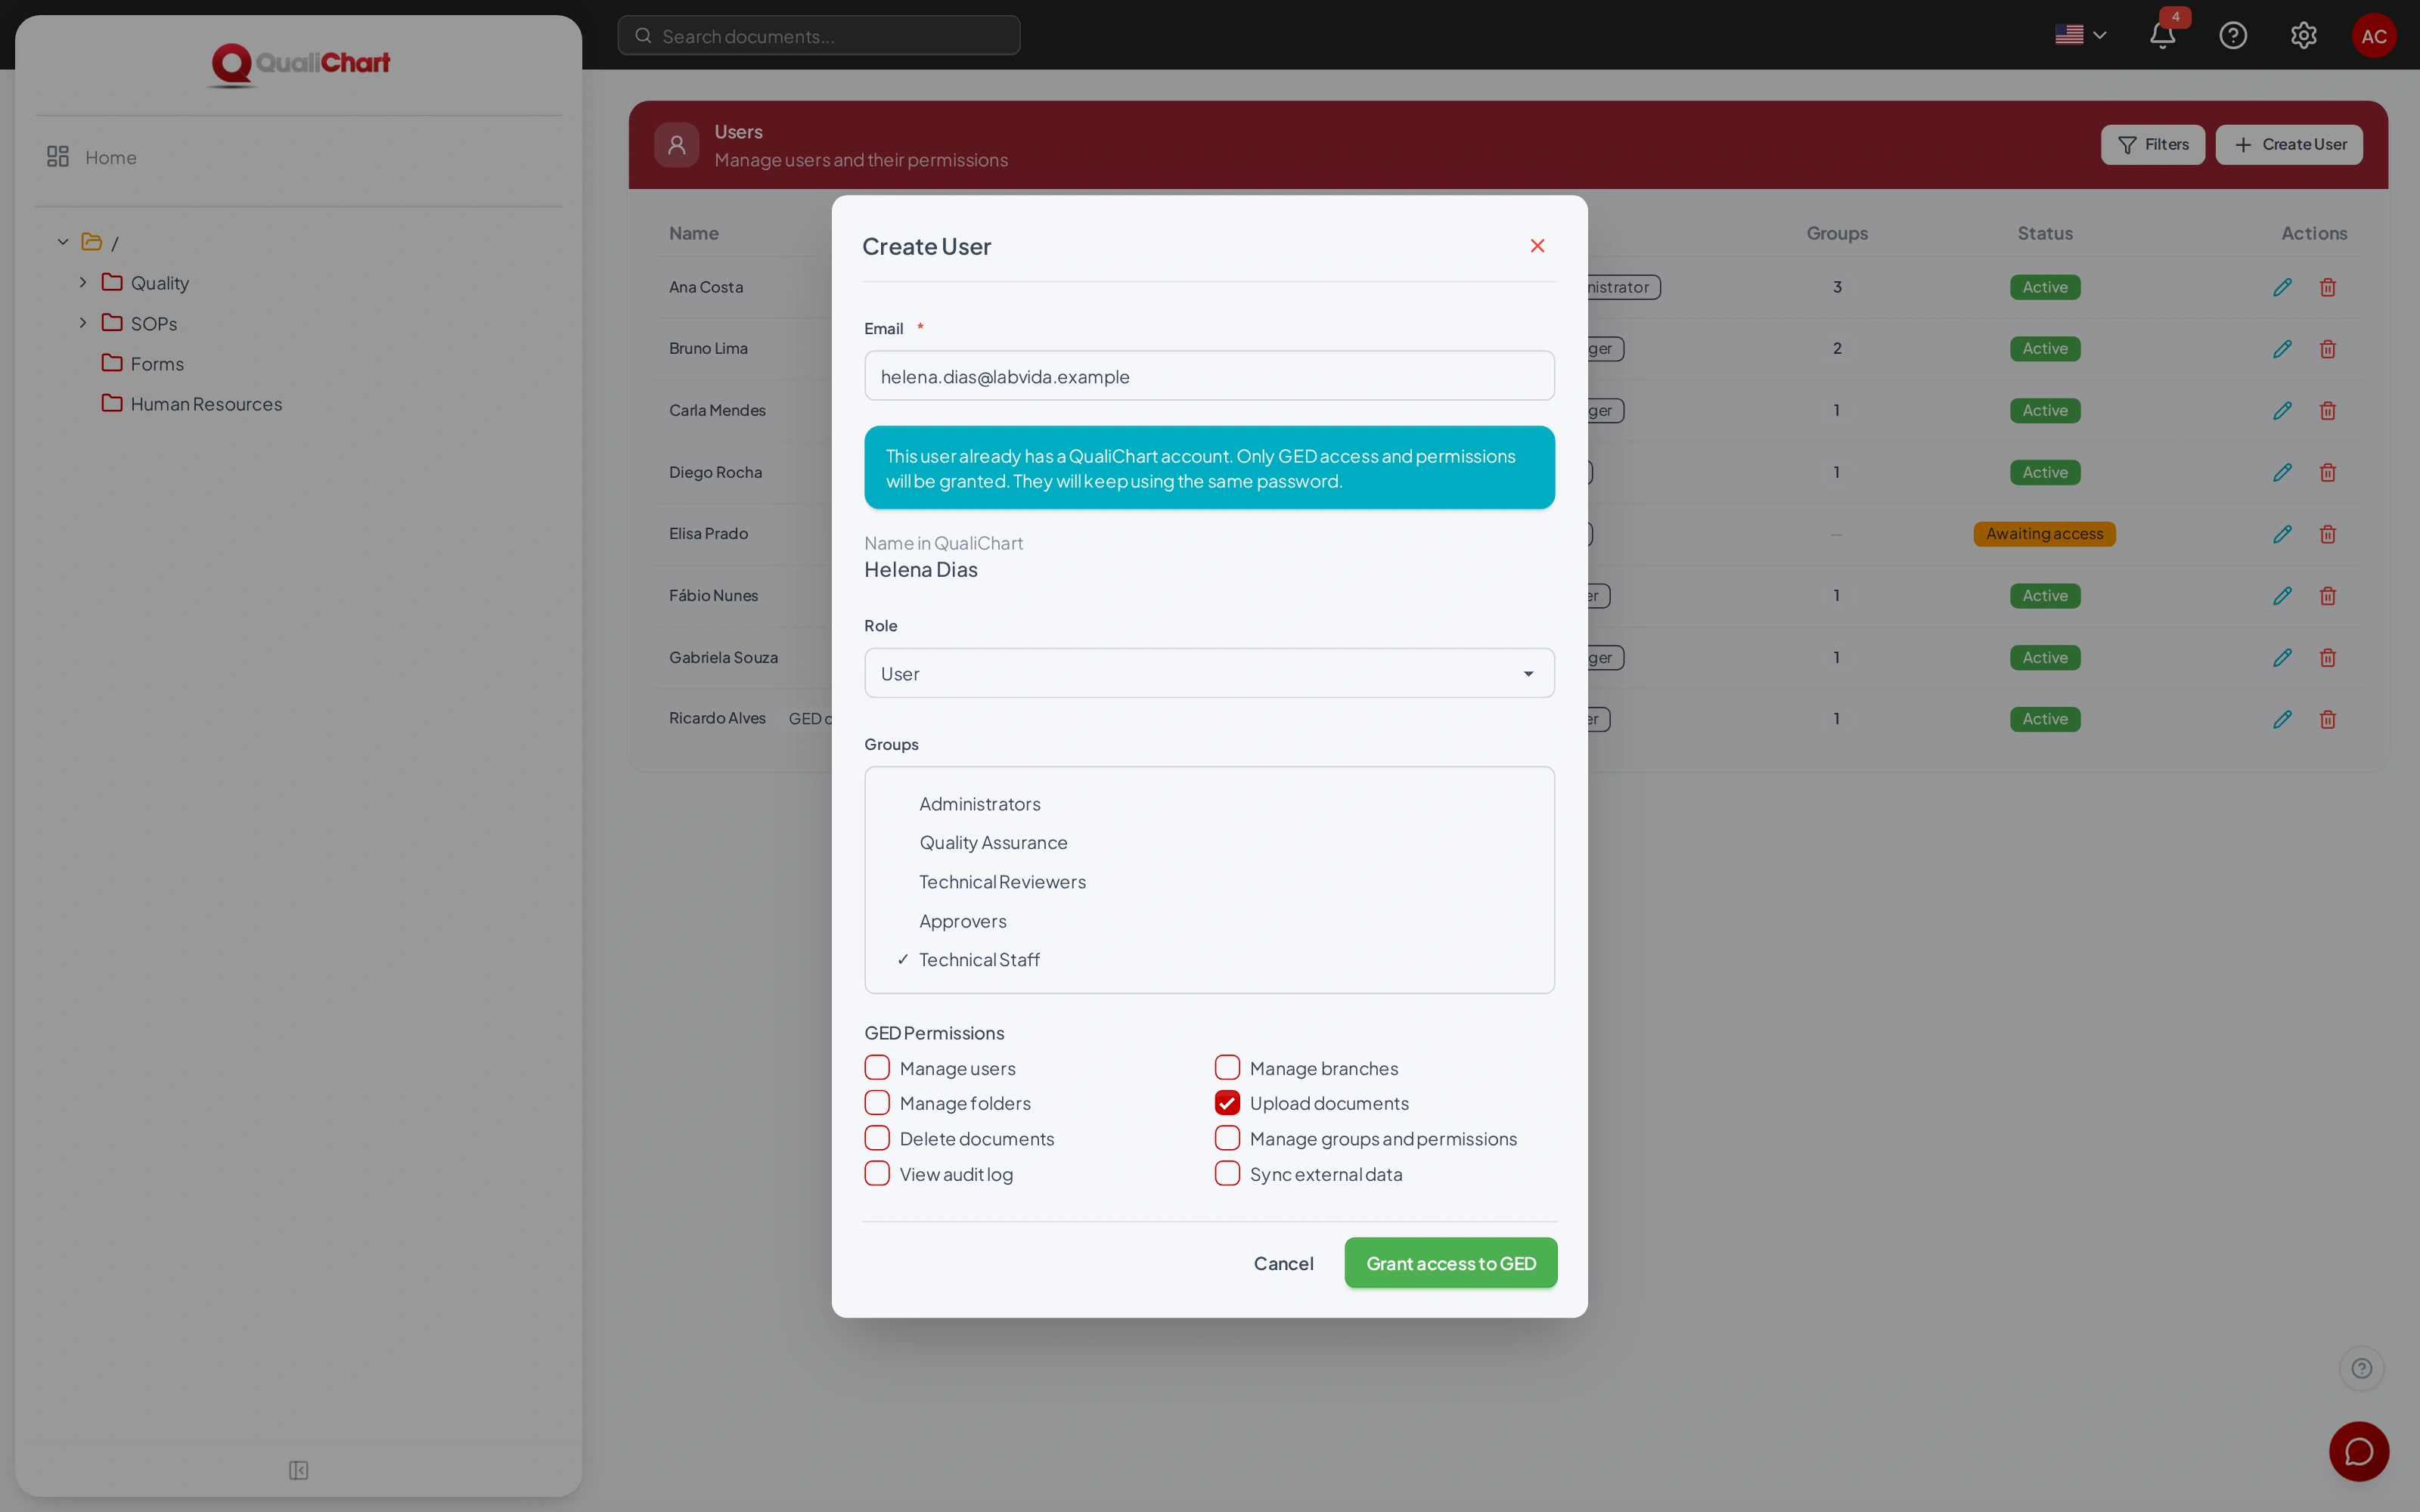
If the email is already registered in GED, edit the person from the list. If the activation warning appears, they need to sign in to QualiChart once before access can be granted.
Create a GED-only account
If the email is not in QualiChart, the window warns that a GED-only account will be created. Enter the Full Name, role, groups and permissions and, if you wish, a Temporary Password that meets the requirements shown. Give the temporary password to the person: at first sign-in, they set a permanent password. Without a temporary password, the person sets the password with Forgot your password? on the sign-in screen. In the list, these accounts show the GED only badge.
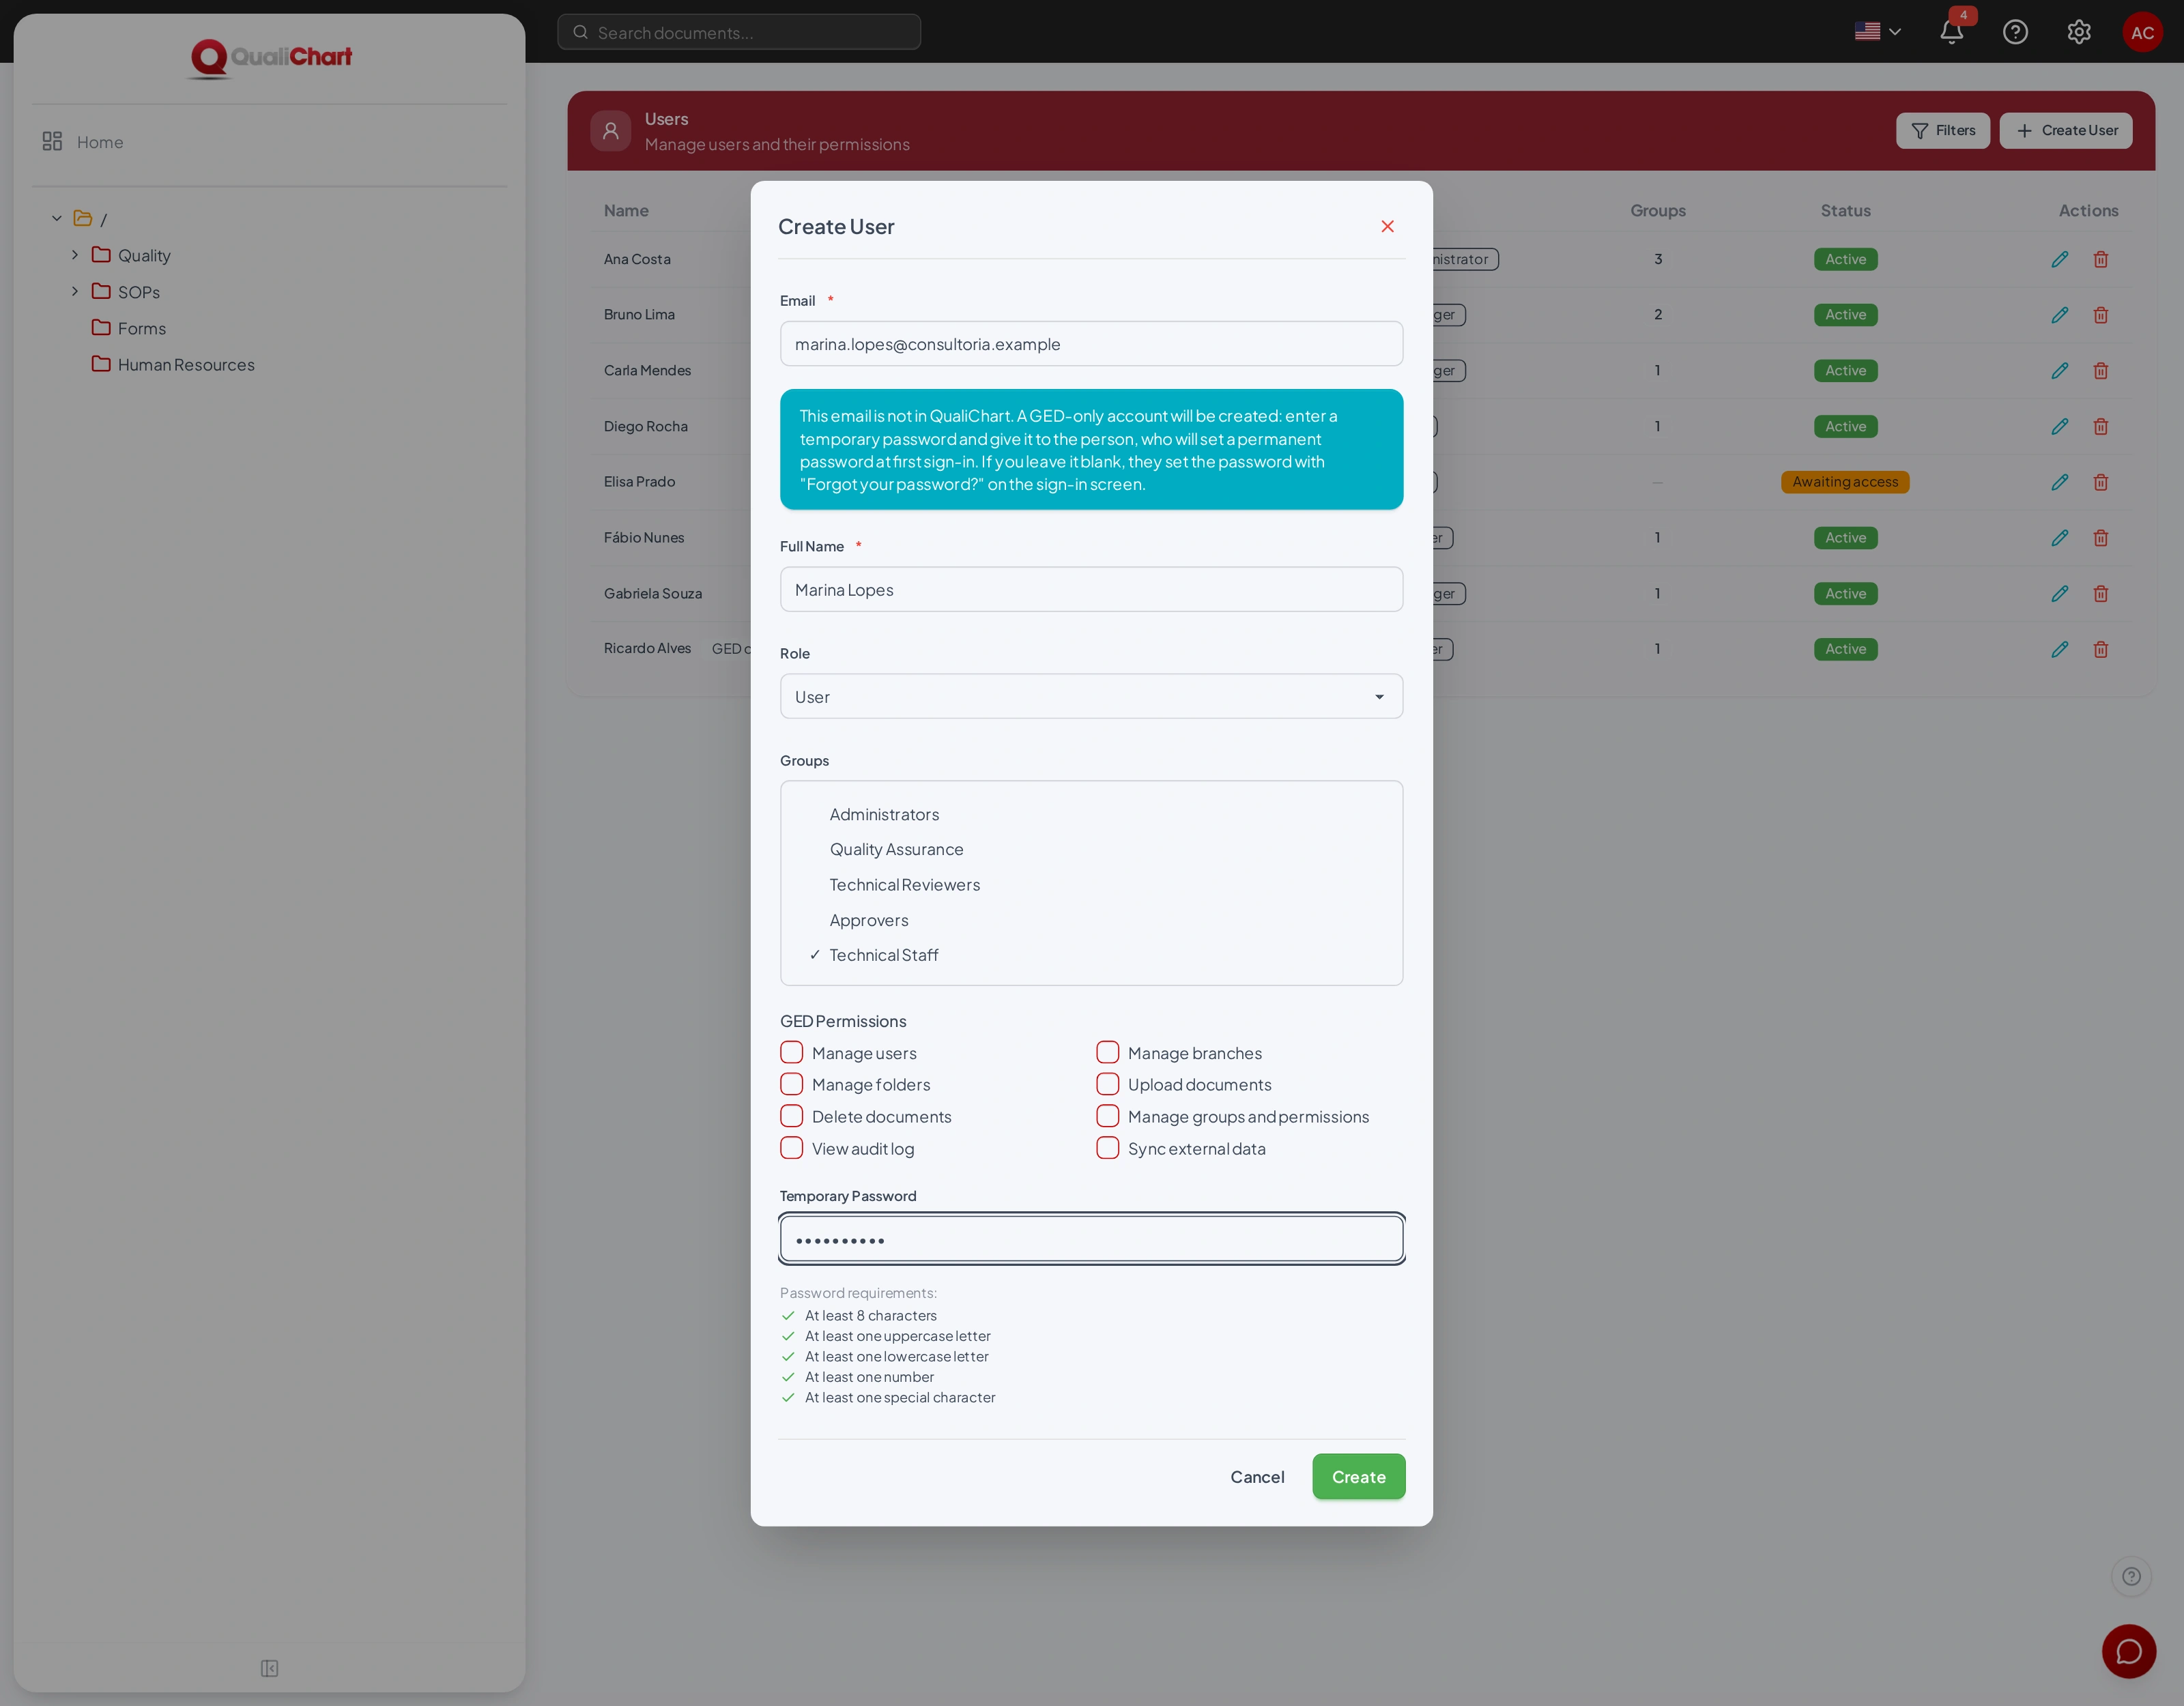
Role and permissions
| Item | Effect |
|---|---|
| Administrator | All rights in all folders, all transitions and all settings. The permissions below do not apply. |
| Manager, User and Viewer | Identify the person's role. What they can do comes from the permissions below and from their groups. |
| Manage users | View and change users and grant access. |
| Manage folders | Create folders and create, edit and delete workflows and document types. |
| Upload documents | Upload documents and new versions, with the corresponding right in the folder. |
| Delete documents | Delete documents and folders, with the Delete right in the folder. |
| Manage groups and permissions | Create, edit and delete groups. |
| View audit log | View and export the Audit log screen, with the record of everything done in GED (see Audit log). |
| Manage branches and Sync external data | Reserved for the integration with QualiChart: branches come from QualiChart at each sign-in. |
Turning off Active User blocks access without erasing the history. Delete removes the person's access to GED; their QualiChart account still exists.
Back to contentsPermissions overview
A summary of what each action requires. The folder right comes from the folder permissions; administrators meet all requirements.
| Action | User permission | Folder right | Note |
|---|---|---|---|
| View folders and documents and download them | — | Read | With Distributed versions only, just the controlled copy |
| Create folder | Manage folders | Create, in the parent folder | — |
| Edit folder and permissions | — | Edit | — |
| Delete folder | Delete documents | Delete | The root folder cannot be deleted |
| Upload document | Upload documents | Create | — |
| Upload new version | Upload documents | Edit | With a workflow, it returns to the initial status |
| Edit document | — | Edit | The type can only change while there is a single version |
| Perform transition | — | Edit | Belong to a group allowed for the transition |
| Delete document | Delete documents | Delete | — |
| Assign required reading | — | Edit | Applies to the distributed version |
| Confirm reading | — | Read | Only people who received the reading |
| Document types and workflows | Manage folders | — | Everyone can view |
| Groups | Manage groups and permissions | — | Everyone can view |
| Users | Manage users | — | — |
| Audit log and export | View audit log | — | Entries from the whole laboratory |
| Search and AI assistant | — | Read | Indexed content only |
| Reports | — | Read | Each person sees the folders they can access |
Compliance reports
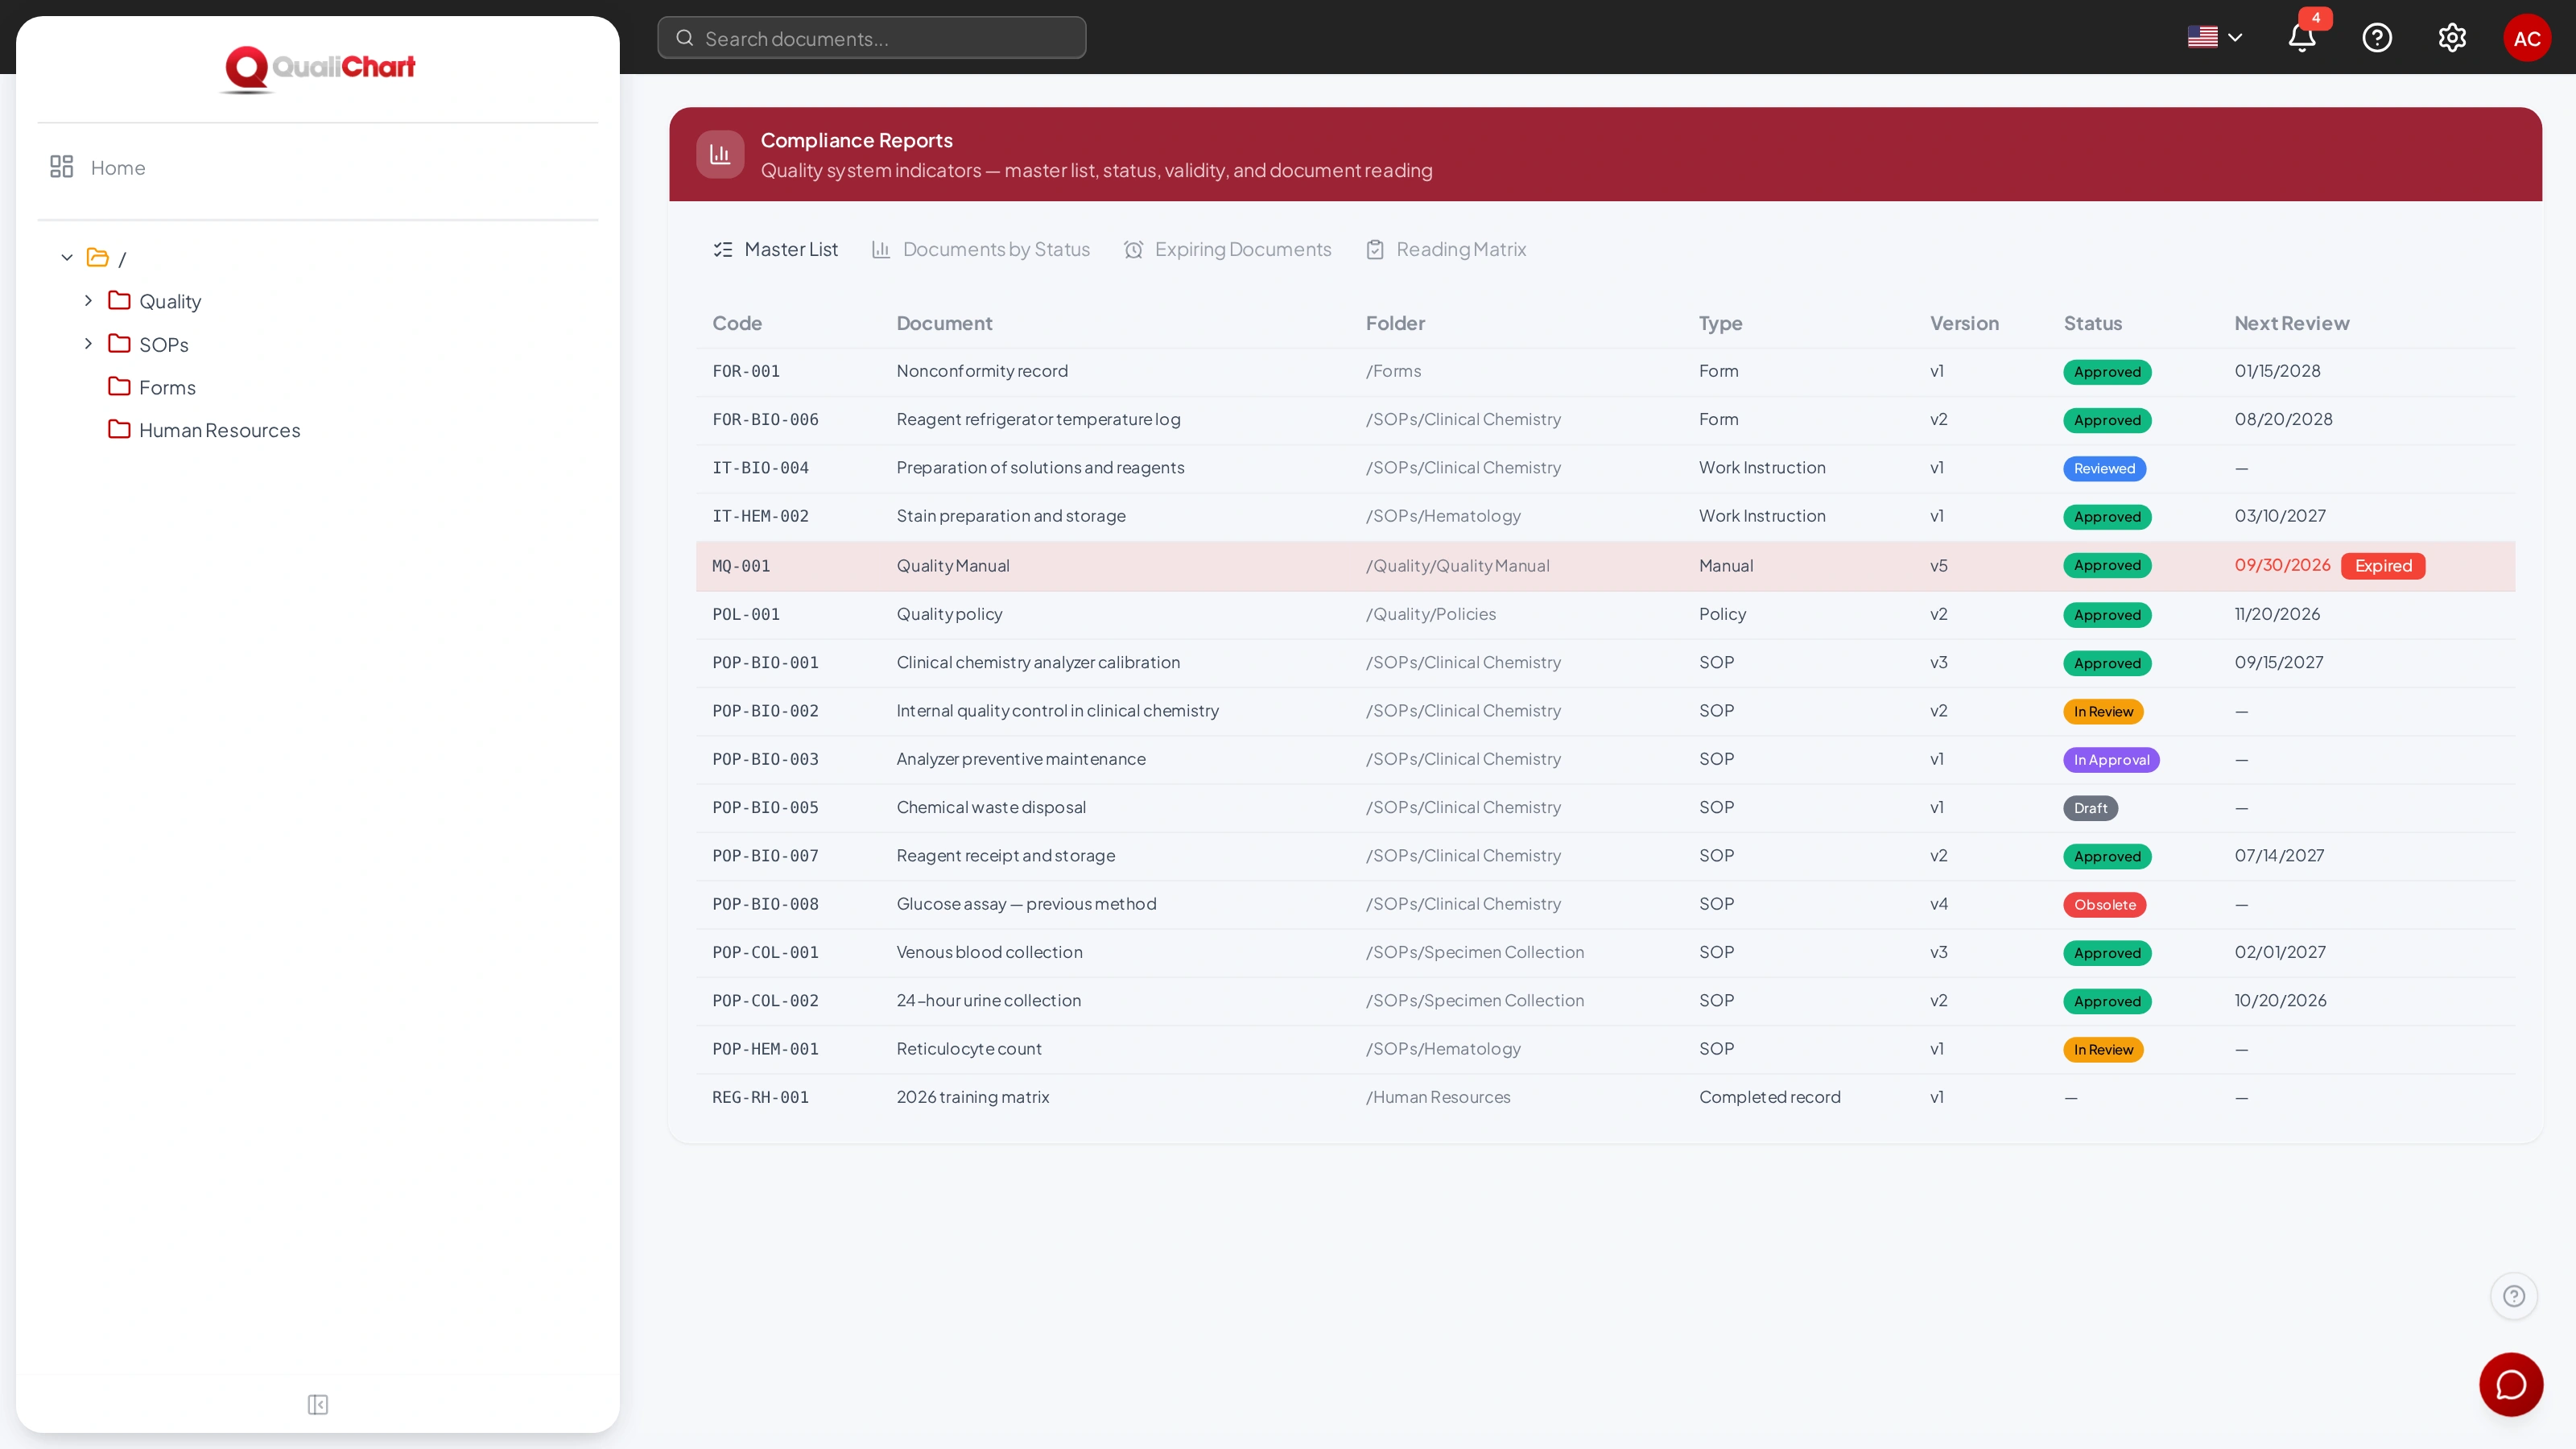
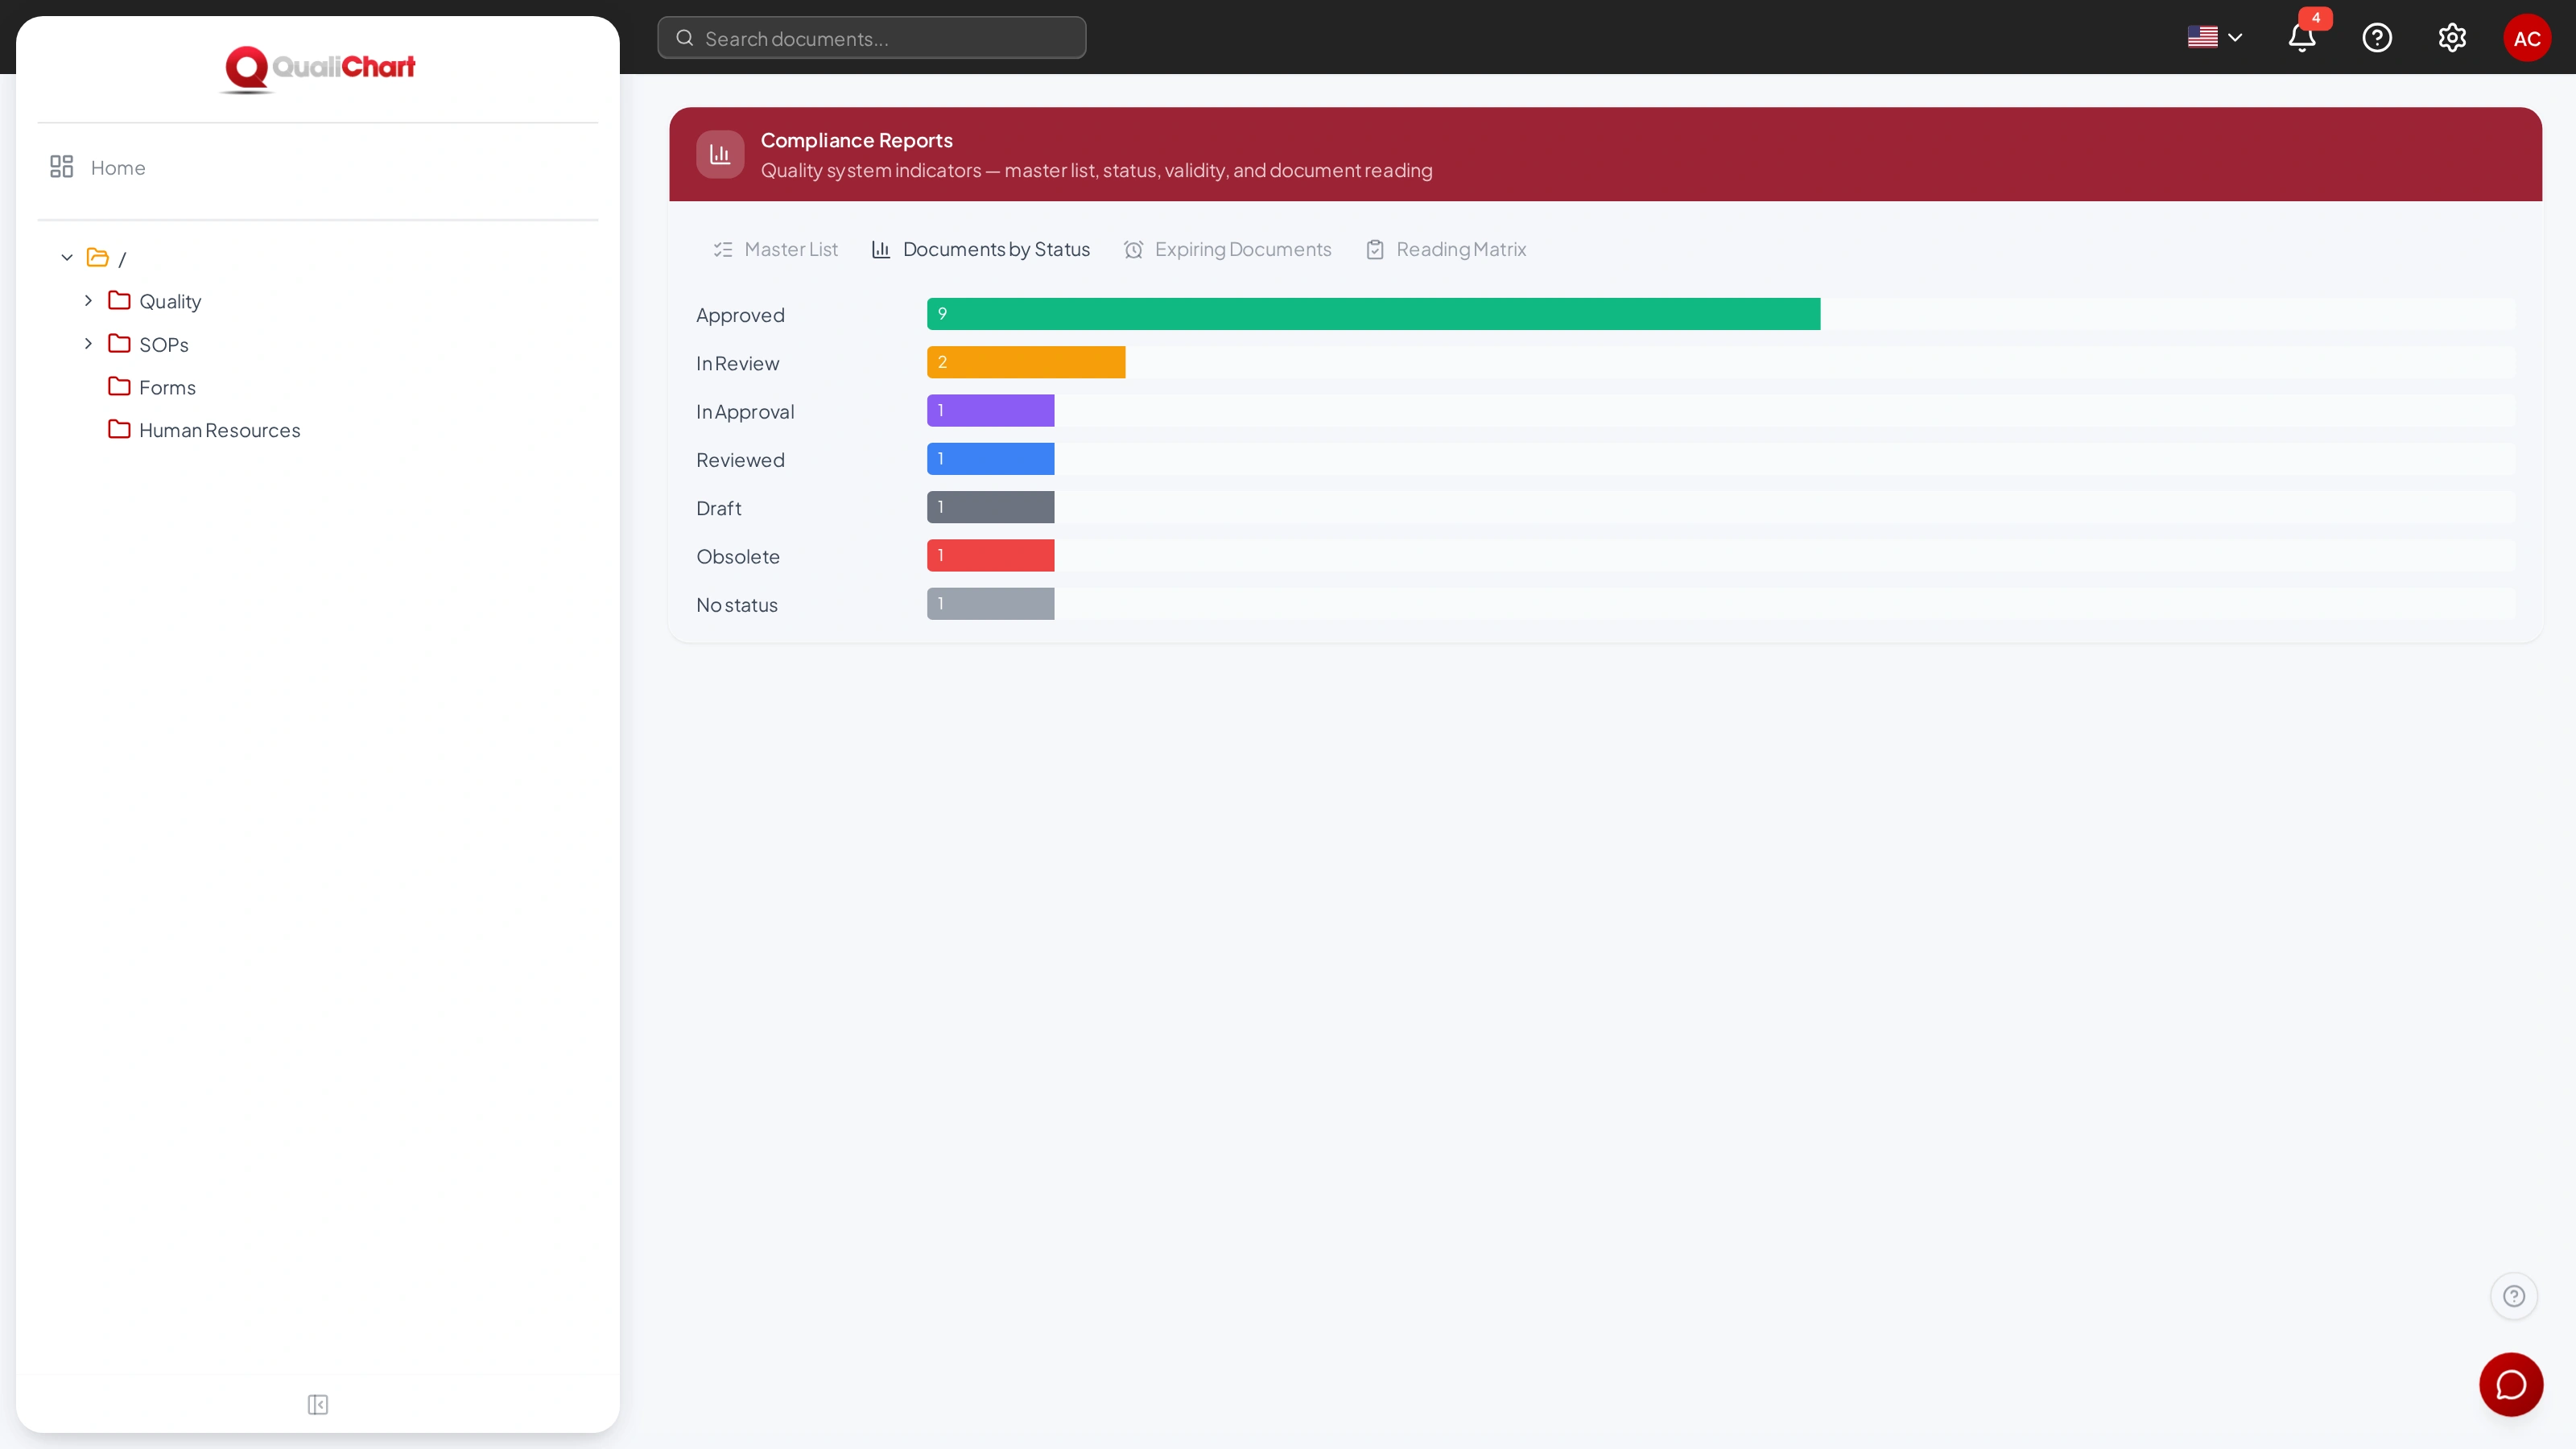
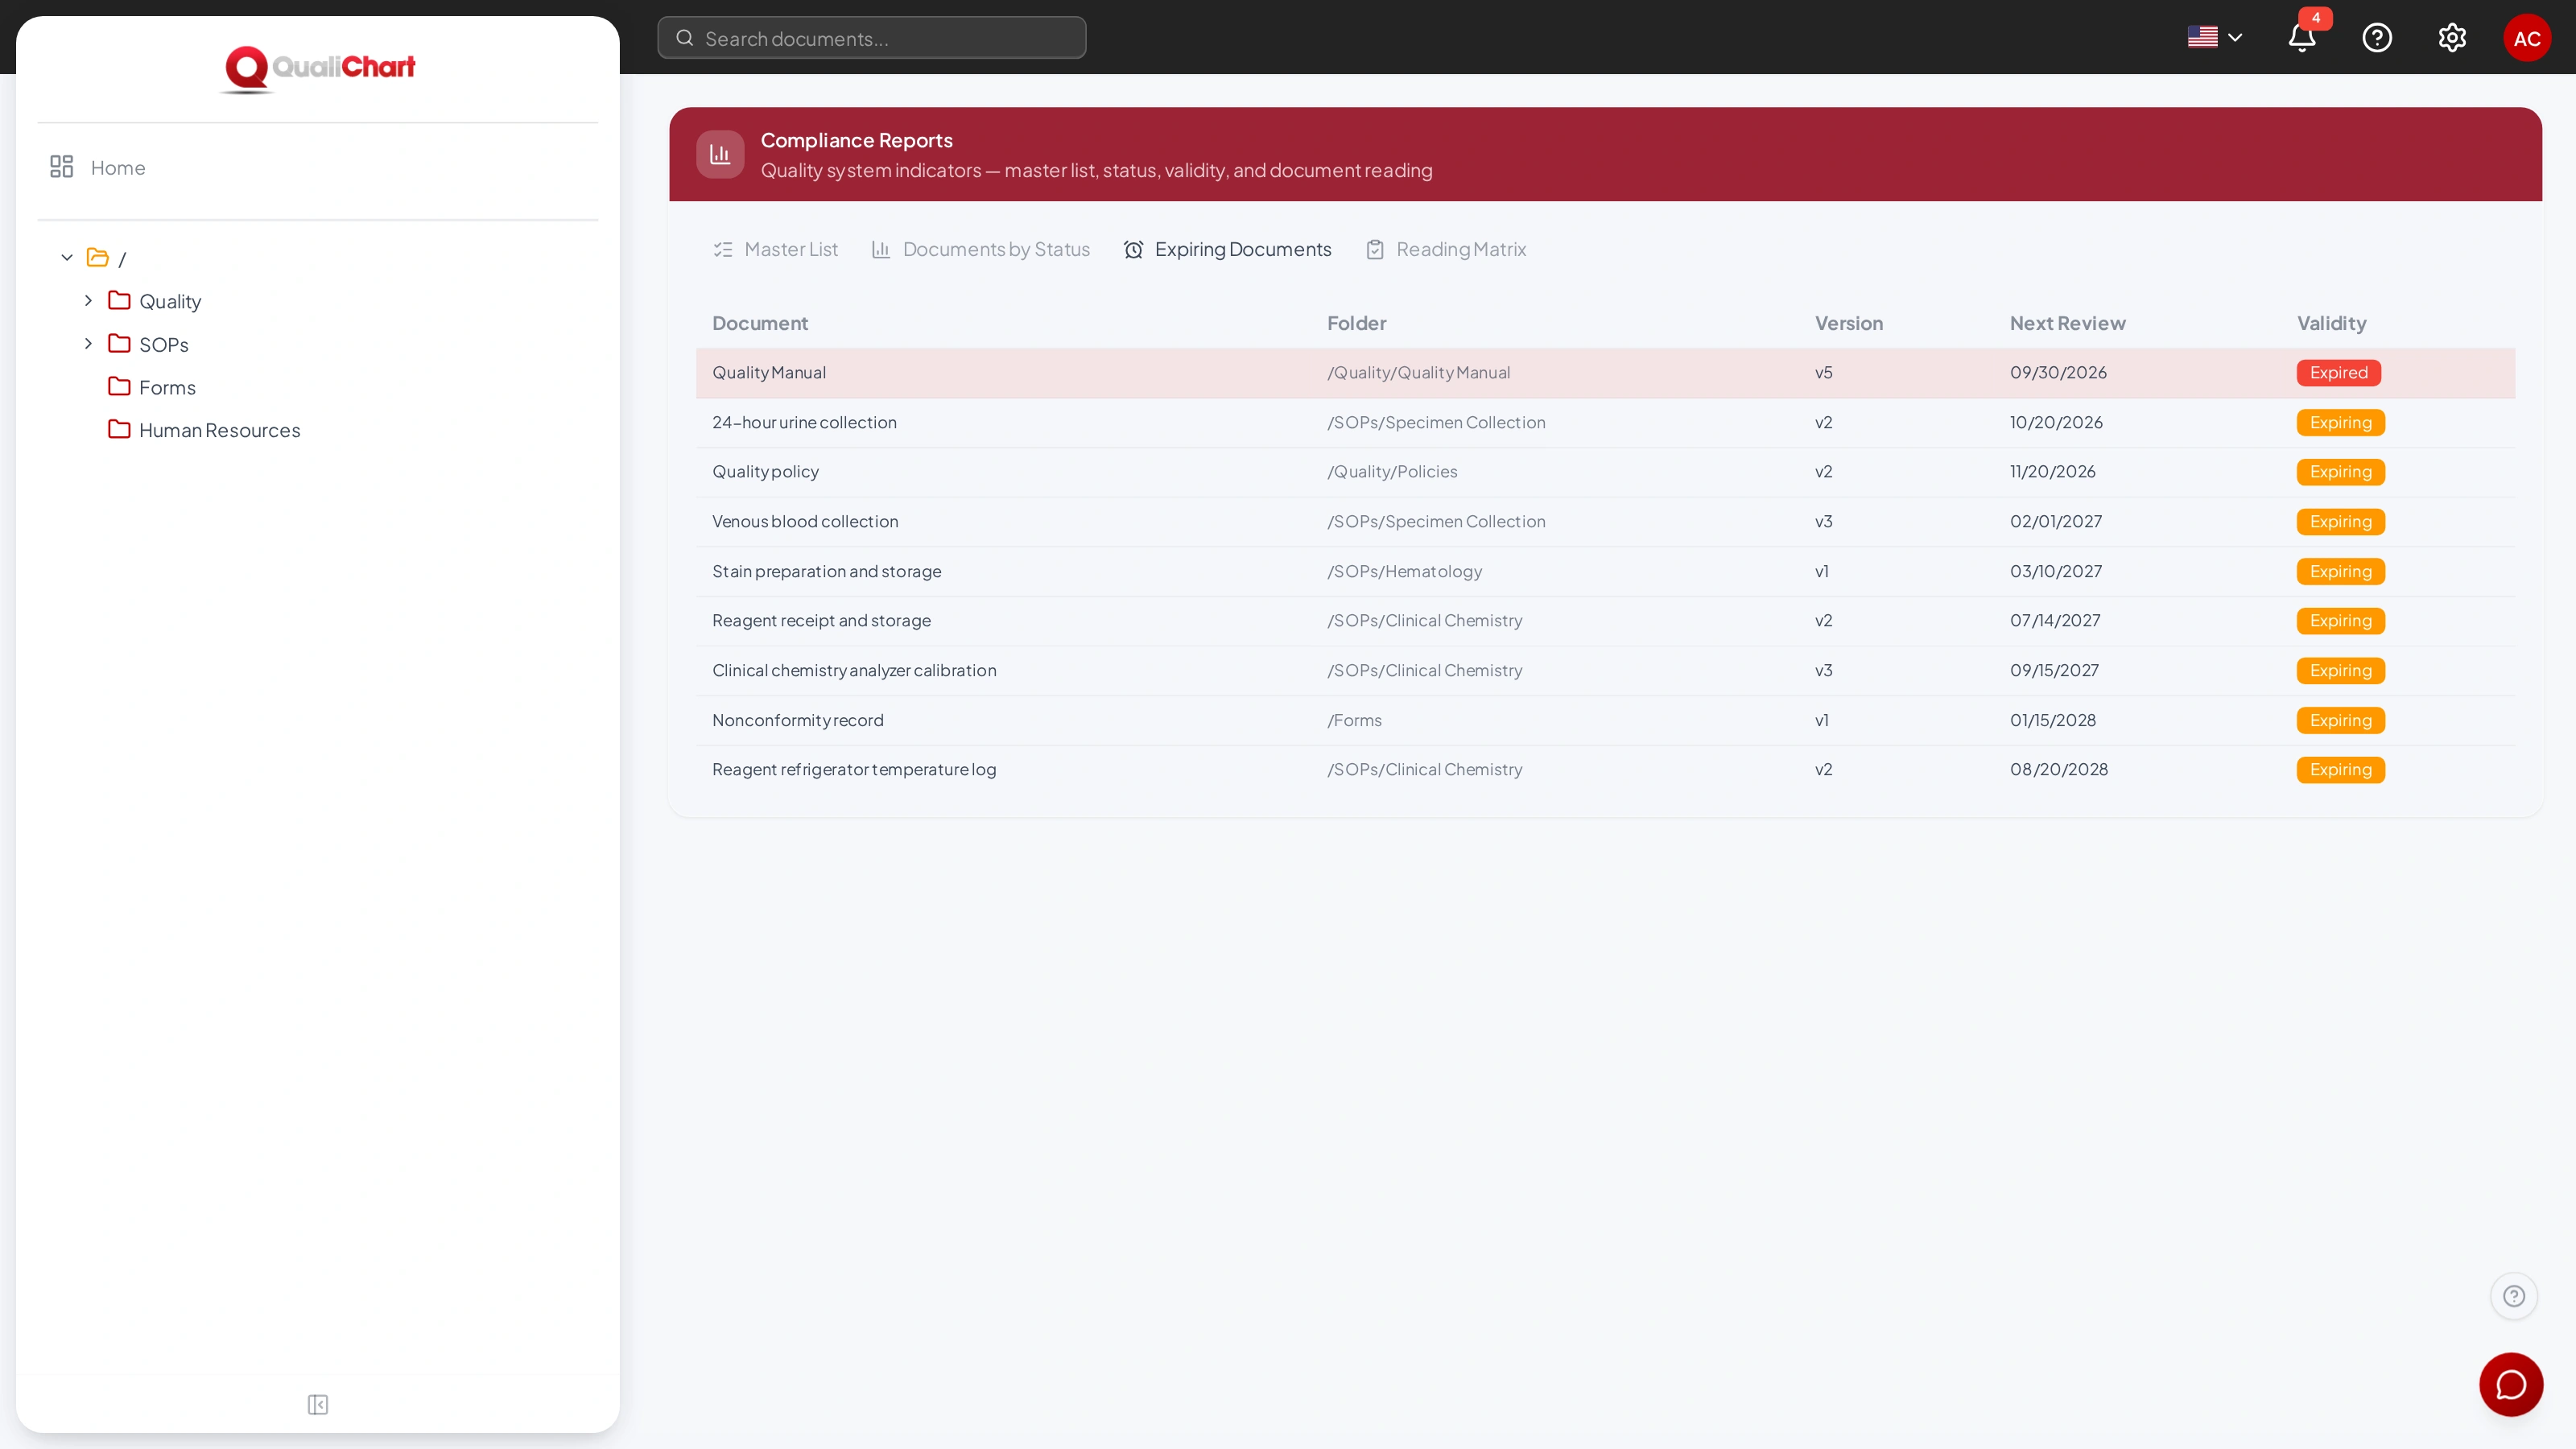
Settings › Reports contains four reports. Each person sees the documents in the folders they can access.
| Report | Content |
|---|---|
| Master List | All documents with code, name, folder, type, version, status and next review. Expired documents are highlighted. |
| Documents by Status | How many documents are in each status, to spot approval bottlenecks. |
| Expiring Documents | Documents with a next review date, from the nearest to the furthest, with the Validity column showing Expired or Expiring. |
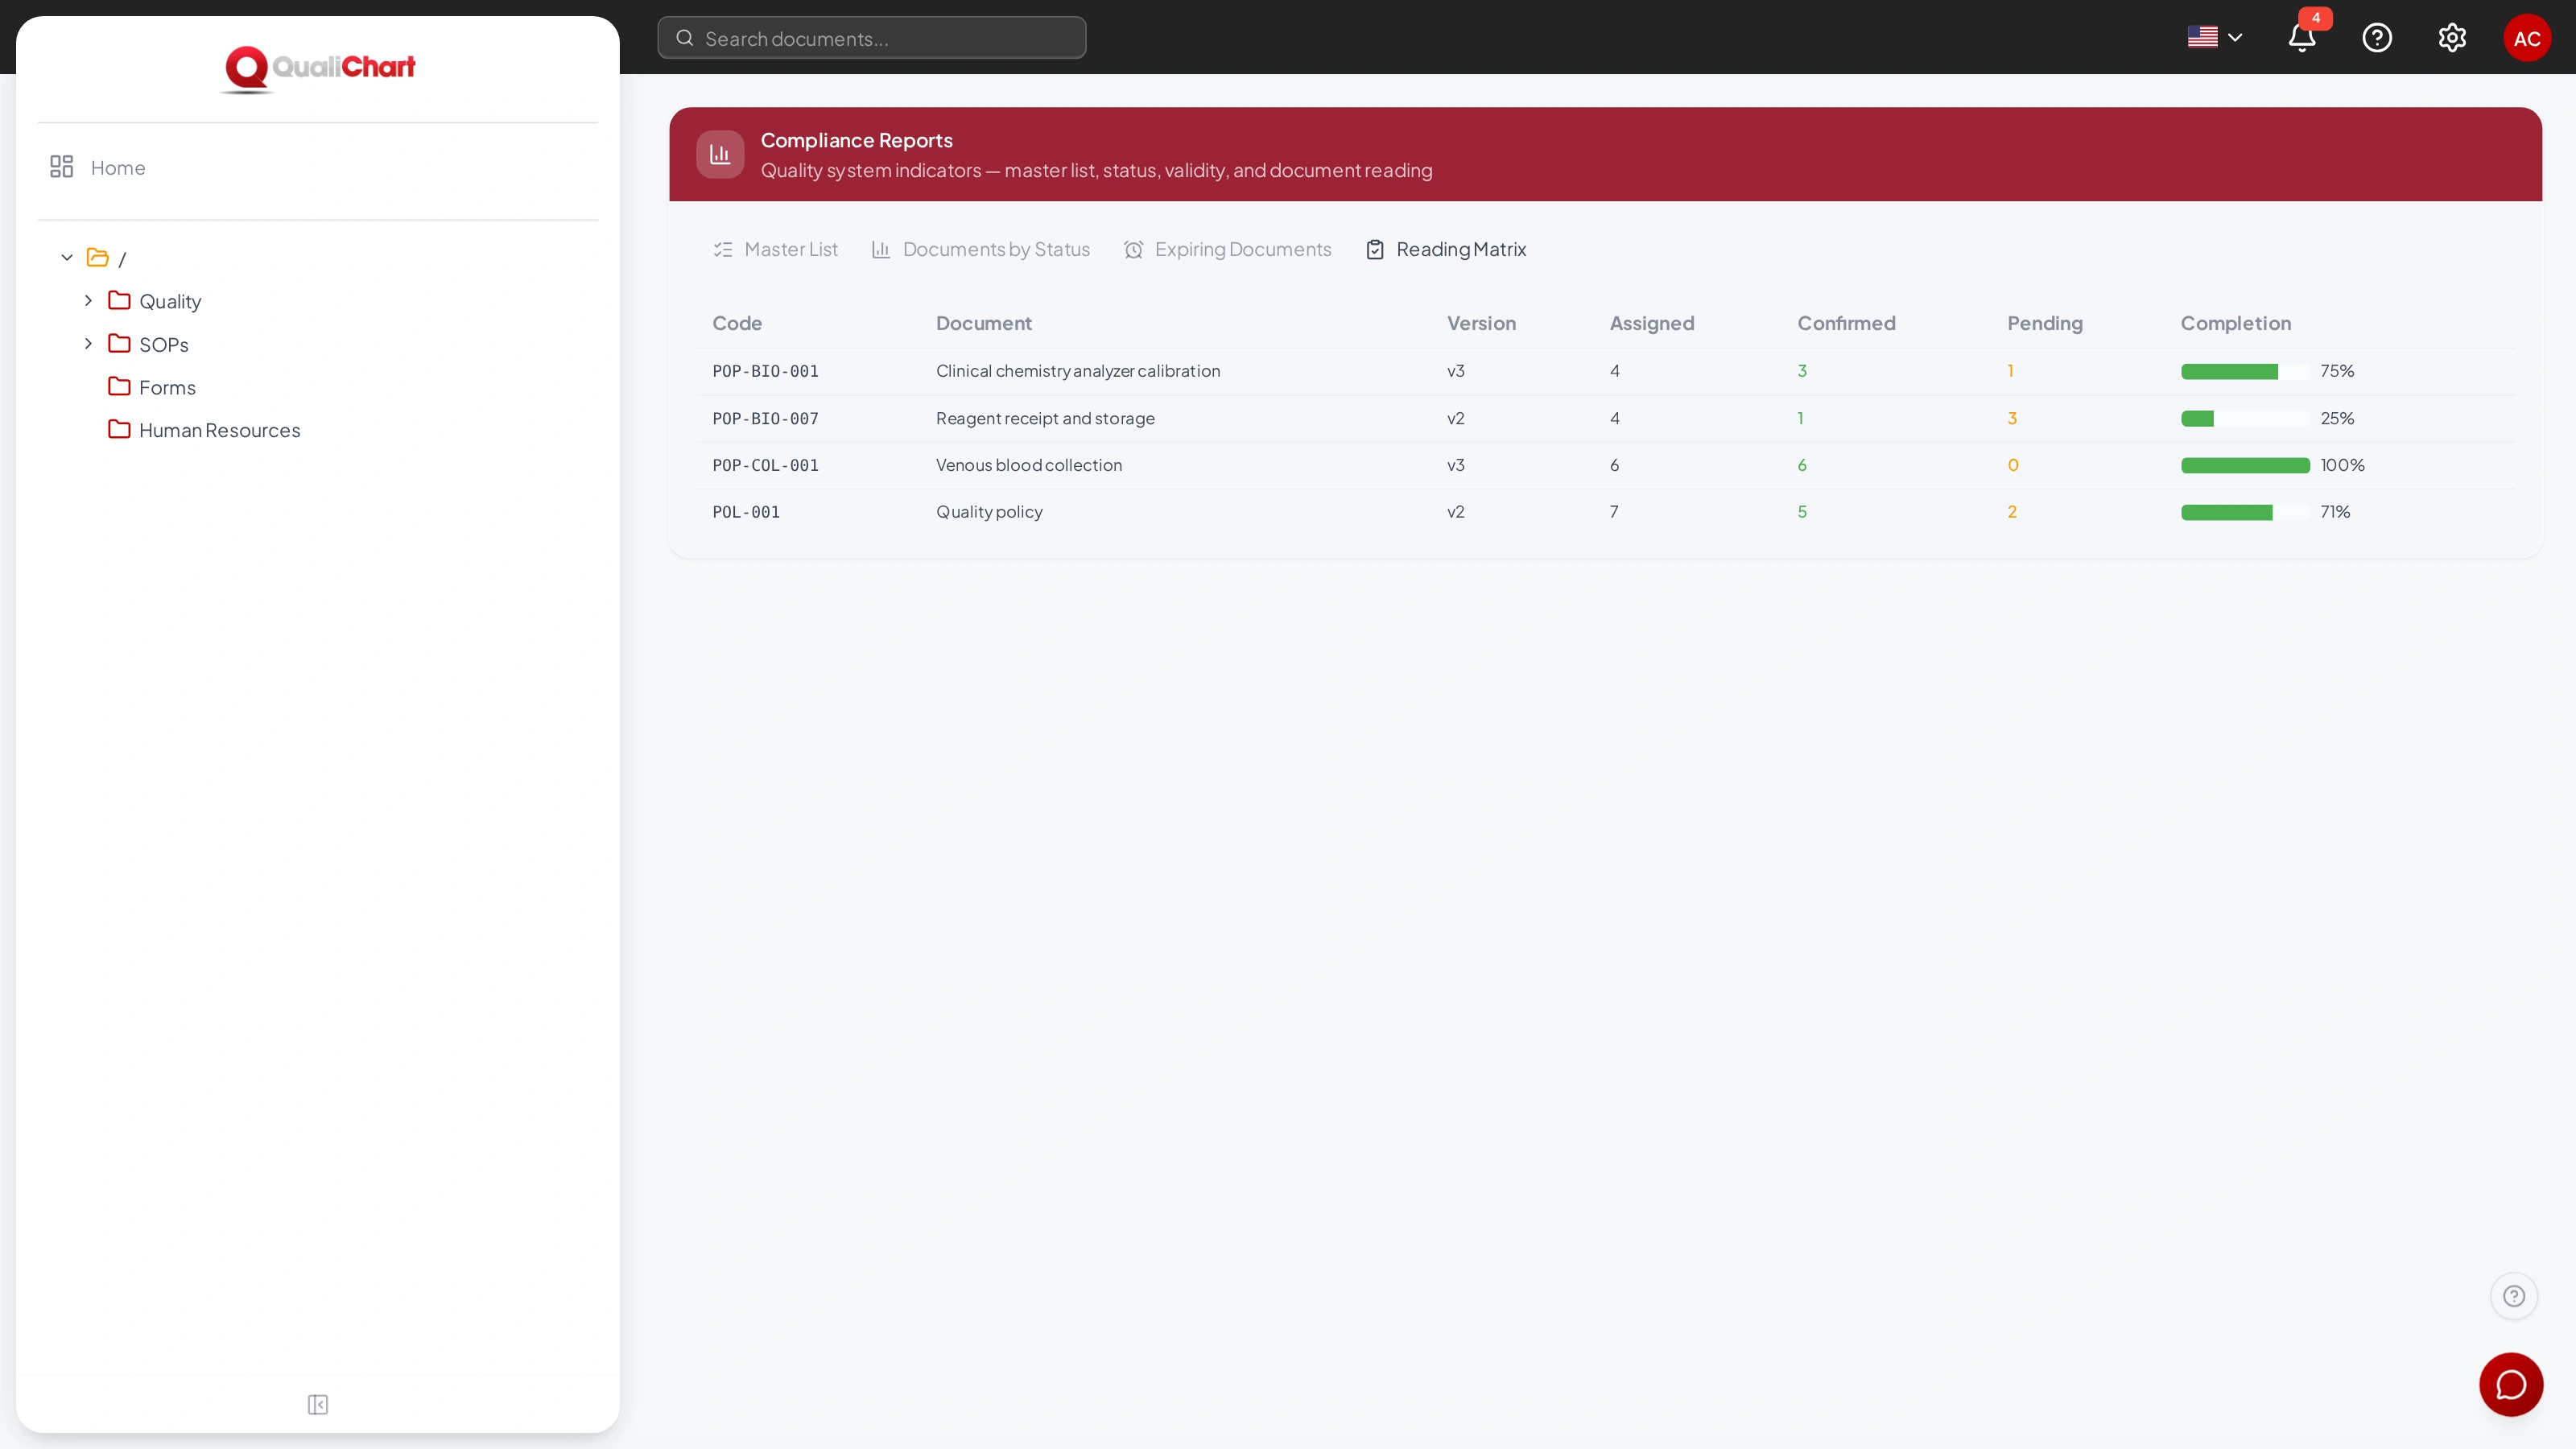
| Reading Matrix | For each document with required reading: code, name, version in force, how many people were assigned, how many confirmed, how many are pending and the completion percentage (see Required reading). |
Traceability and control
GED automatically records the information that demonstrates document control in internal and external audits:
| Record | Where to find it |
|---|---|
| All uploaded versions, preserved | Arrow in the document row and Version History |
| Who uploaded each version, when and why | Version History and the Revision History on the cover page |
| Each transition: who performed it, date, time, source and target status, and comment | Version History |
| Who reviewed and approved the version | Cover page |
| Distribution date and next review | Cover page, Master List and Expiring Documents |
| Withdrawal from circulation | Obsolete status: the version is removed from search and the assistant |
| Access to the current version only, for people not involved in preparing documents | Distributed versions only mode in the folder permissions |
| Who had to read each distributed version and when they confirmed | Required reading and Reading Matrix |
| Who downloaded, edited or uploaded documents | Recent Activity, on the Home screen (last 90 days) |
| Every action, with person, date, time, IP and changed data, for 5 years | Audit log |
Audit log
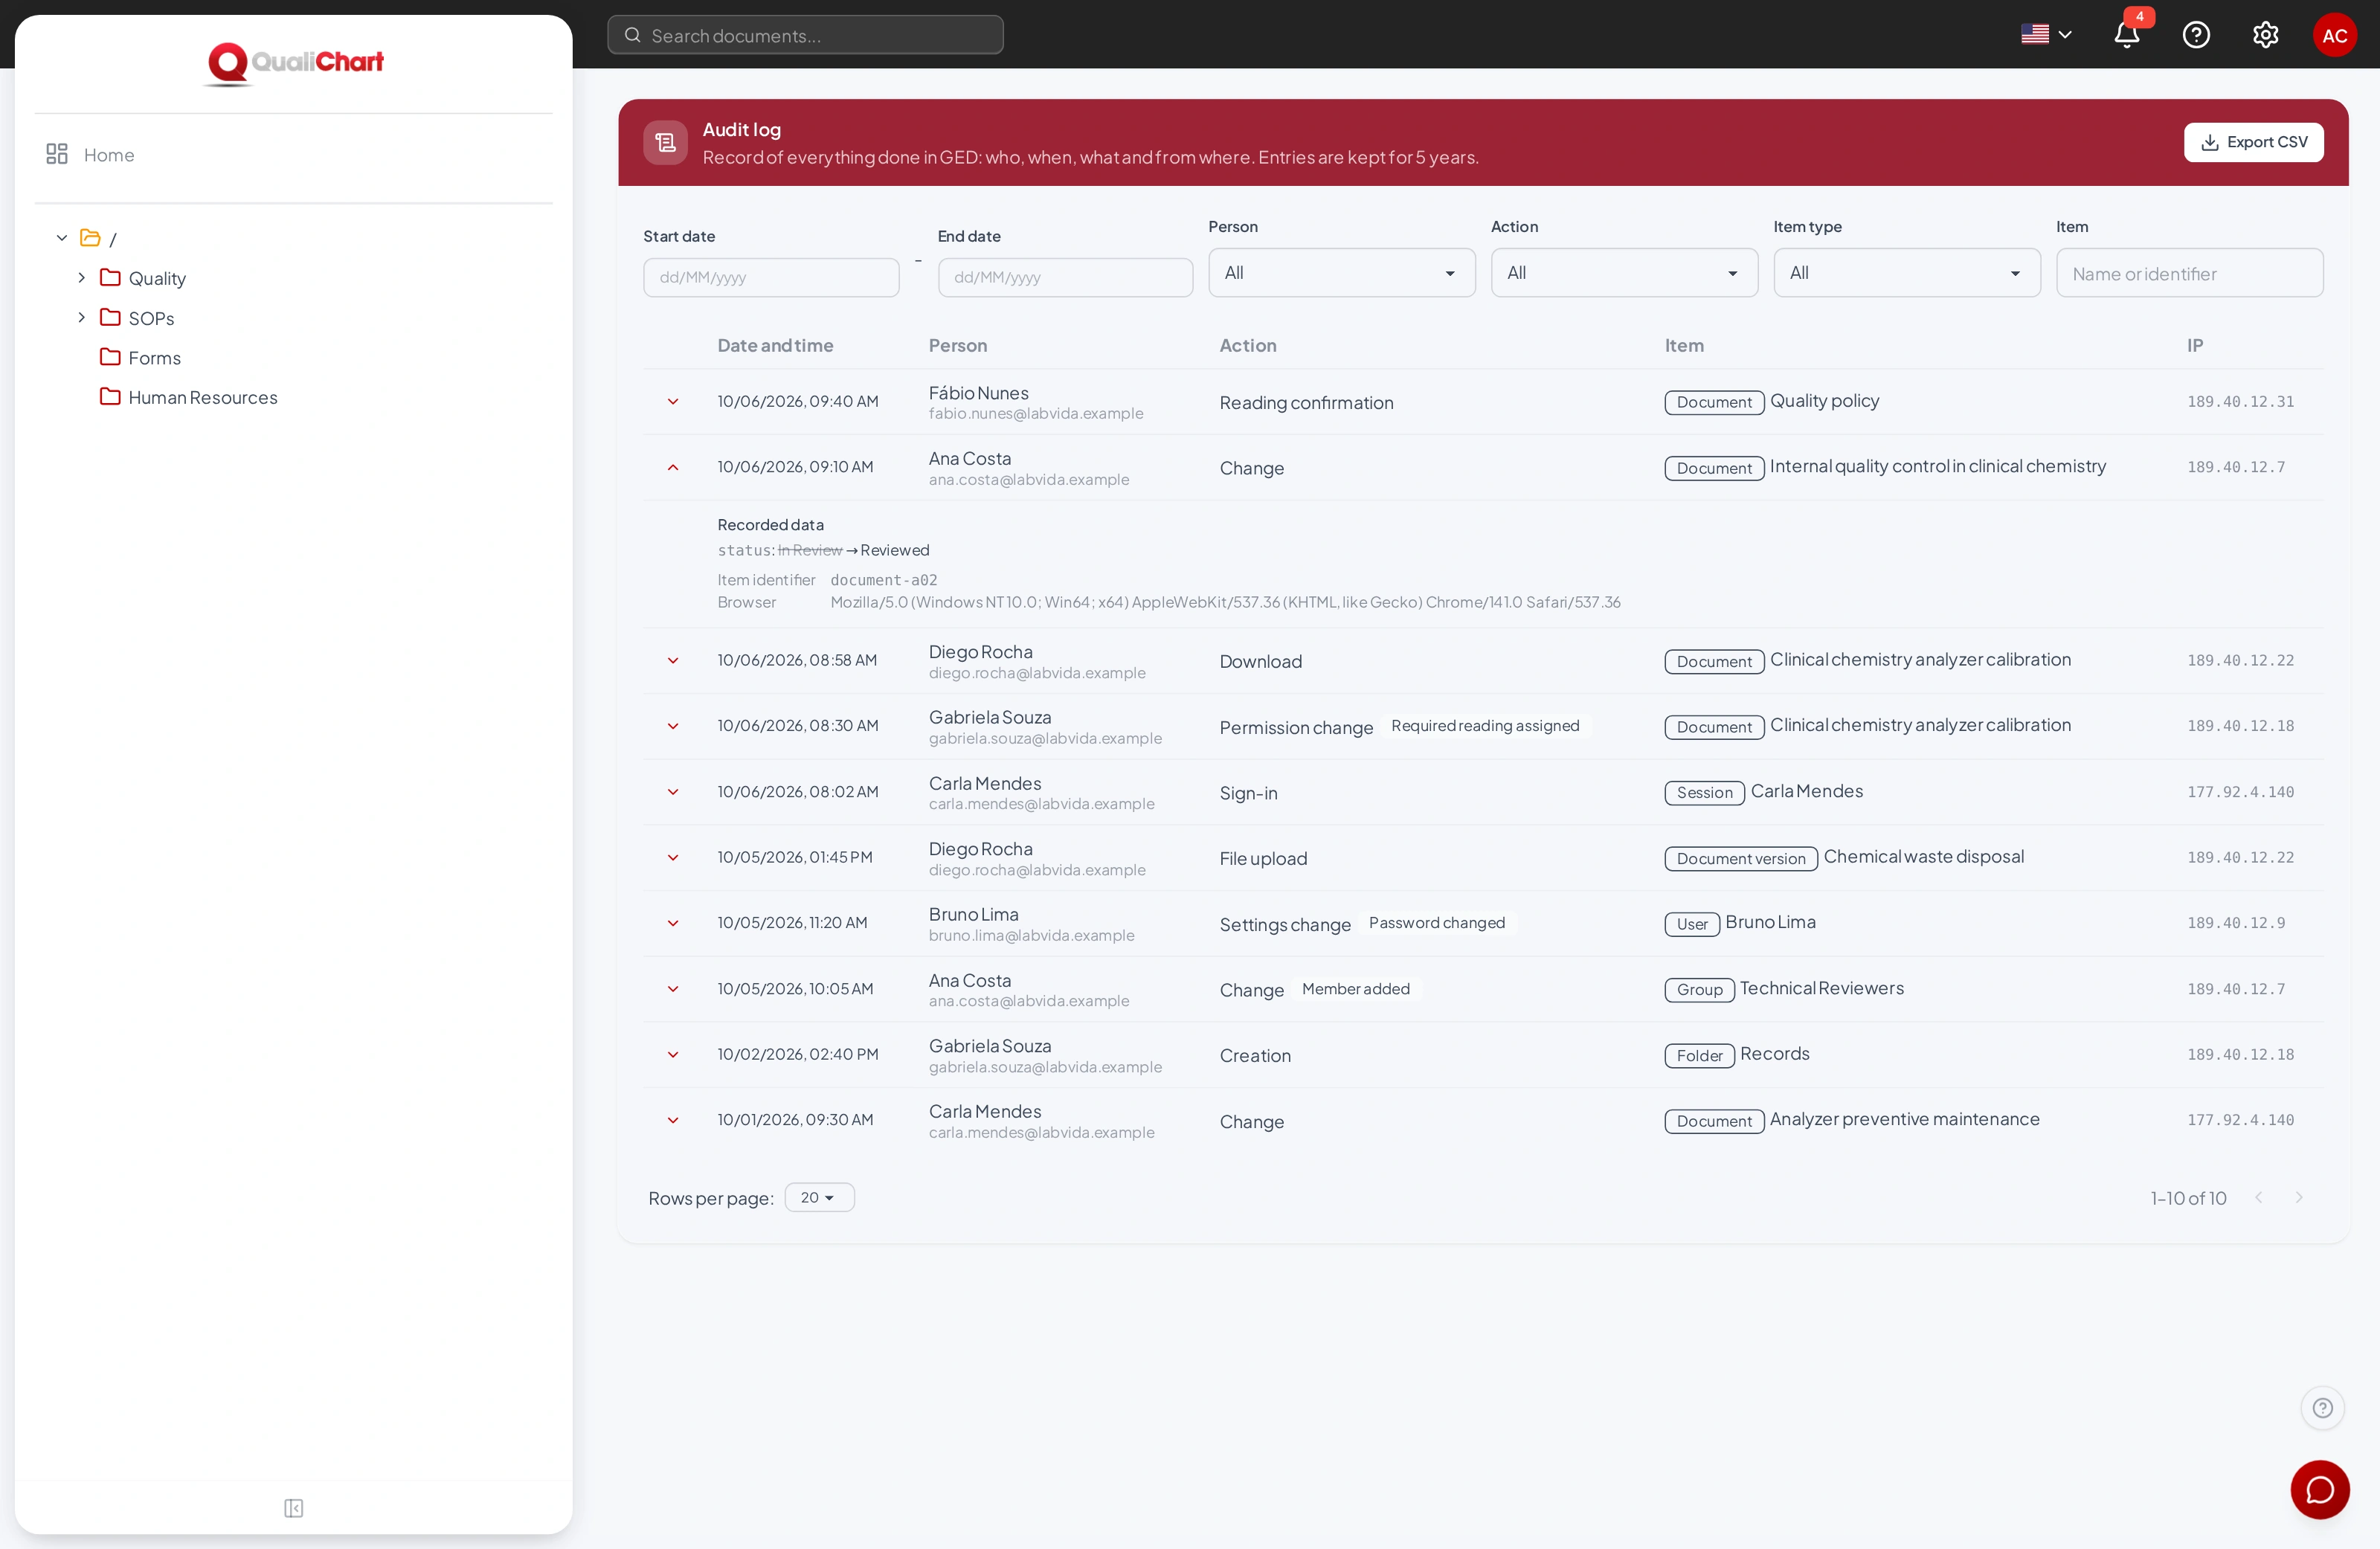
The Audit log screen, in Settings, shows the record of everything done in GED: who did it, when, what, on which item and from which IP address. Entries are recorded automatically, cannot be changed from the screen and are kept for 5 years. It appears for administrators and people with the View audit log permission.
| What is recorded | Examples |
|---|---|
| Access | Sign-ins and sign-outs, password reset requests and resets, password changes, MFA and profile. |
| Documents | Creation, version uploads, downloads with or without cover page, changes, status changes and deletions. |
| Folders and settings | Folders, document types, workflows, groups and their members, users and permissions. |
| Required reading | Reading assignments and confirmations. |
| Exports | Each audit log export, with the number of entries. |
Filter
Combine the period (Start date and End date), Person, Action, Item type and Item, which accepts the item name or identifier. The list shows entries from the newest to the oldest; Clear filters returns to the full list.
Click the arrow on the row to see the recorded data: what changed (previous value → new value), details such as version and file, the item identifier and the browser used.
Export
Export CSV downloads the entries of the current filters, in the language chosen in GED, with date and time in the laboratory time zone. The file opens in spreadsheets such as Excel. Each export accepts up to 50,000 entries; above that, narrow the period or the filters. The export itself is recorded in the audit log.
My account
Open it from the menu under your initials › My Account.
| Area | What to do |
|---|---|
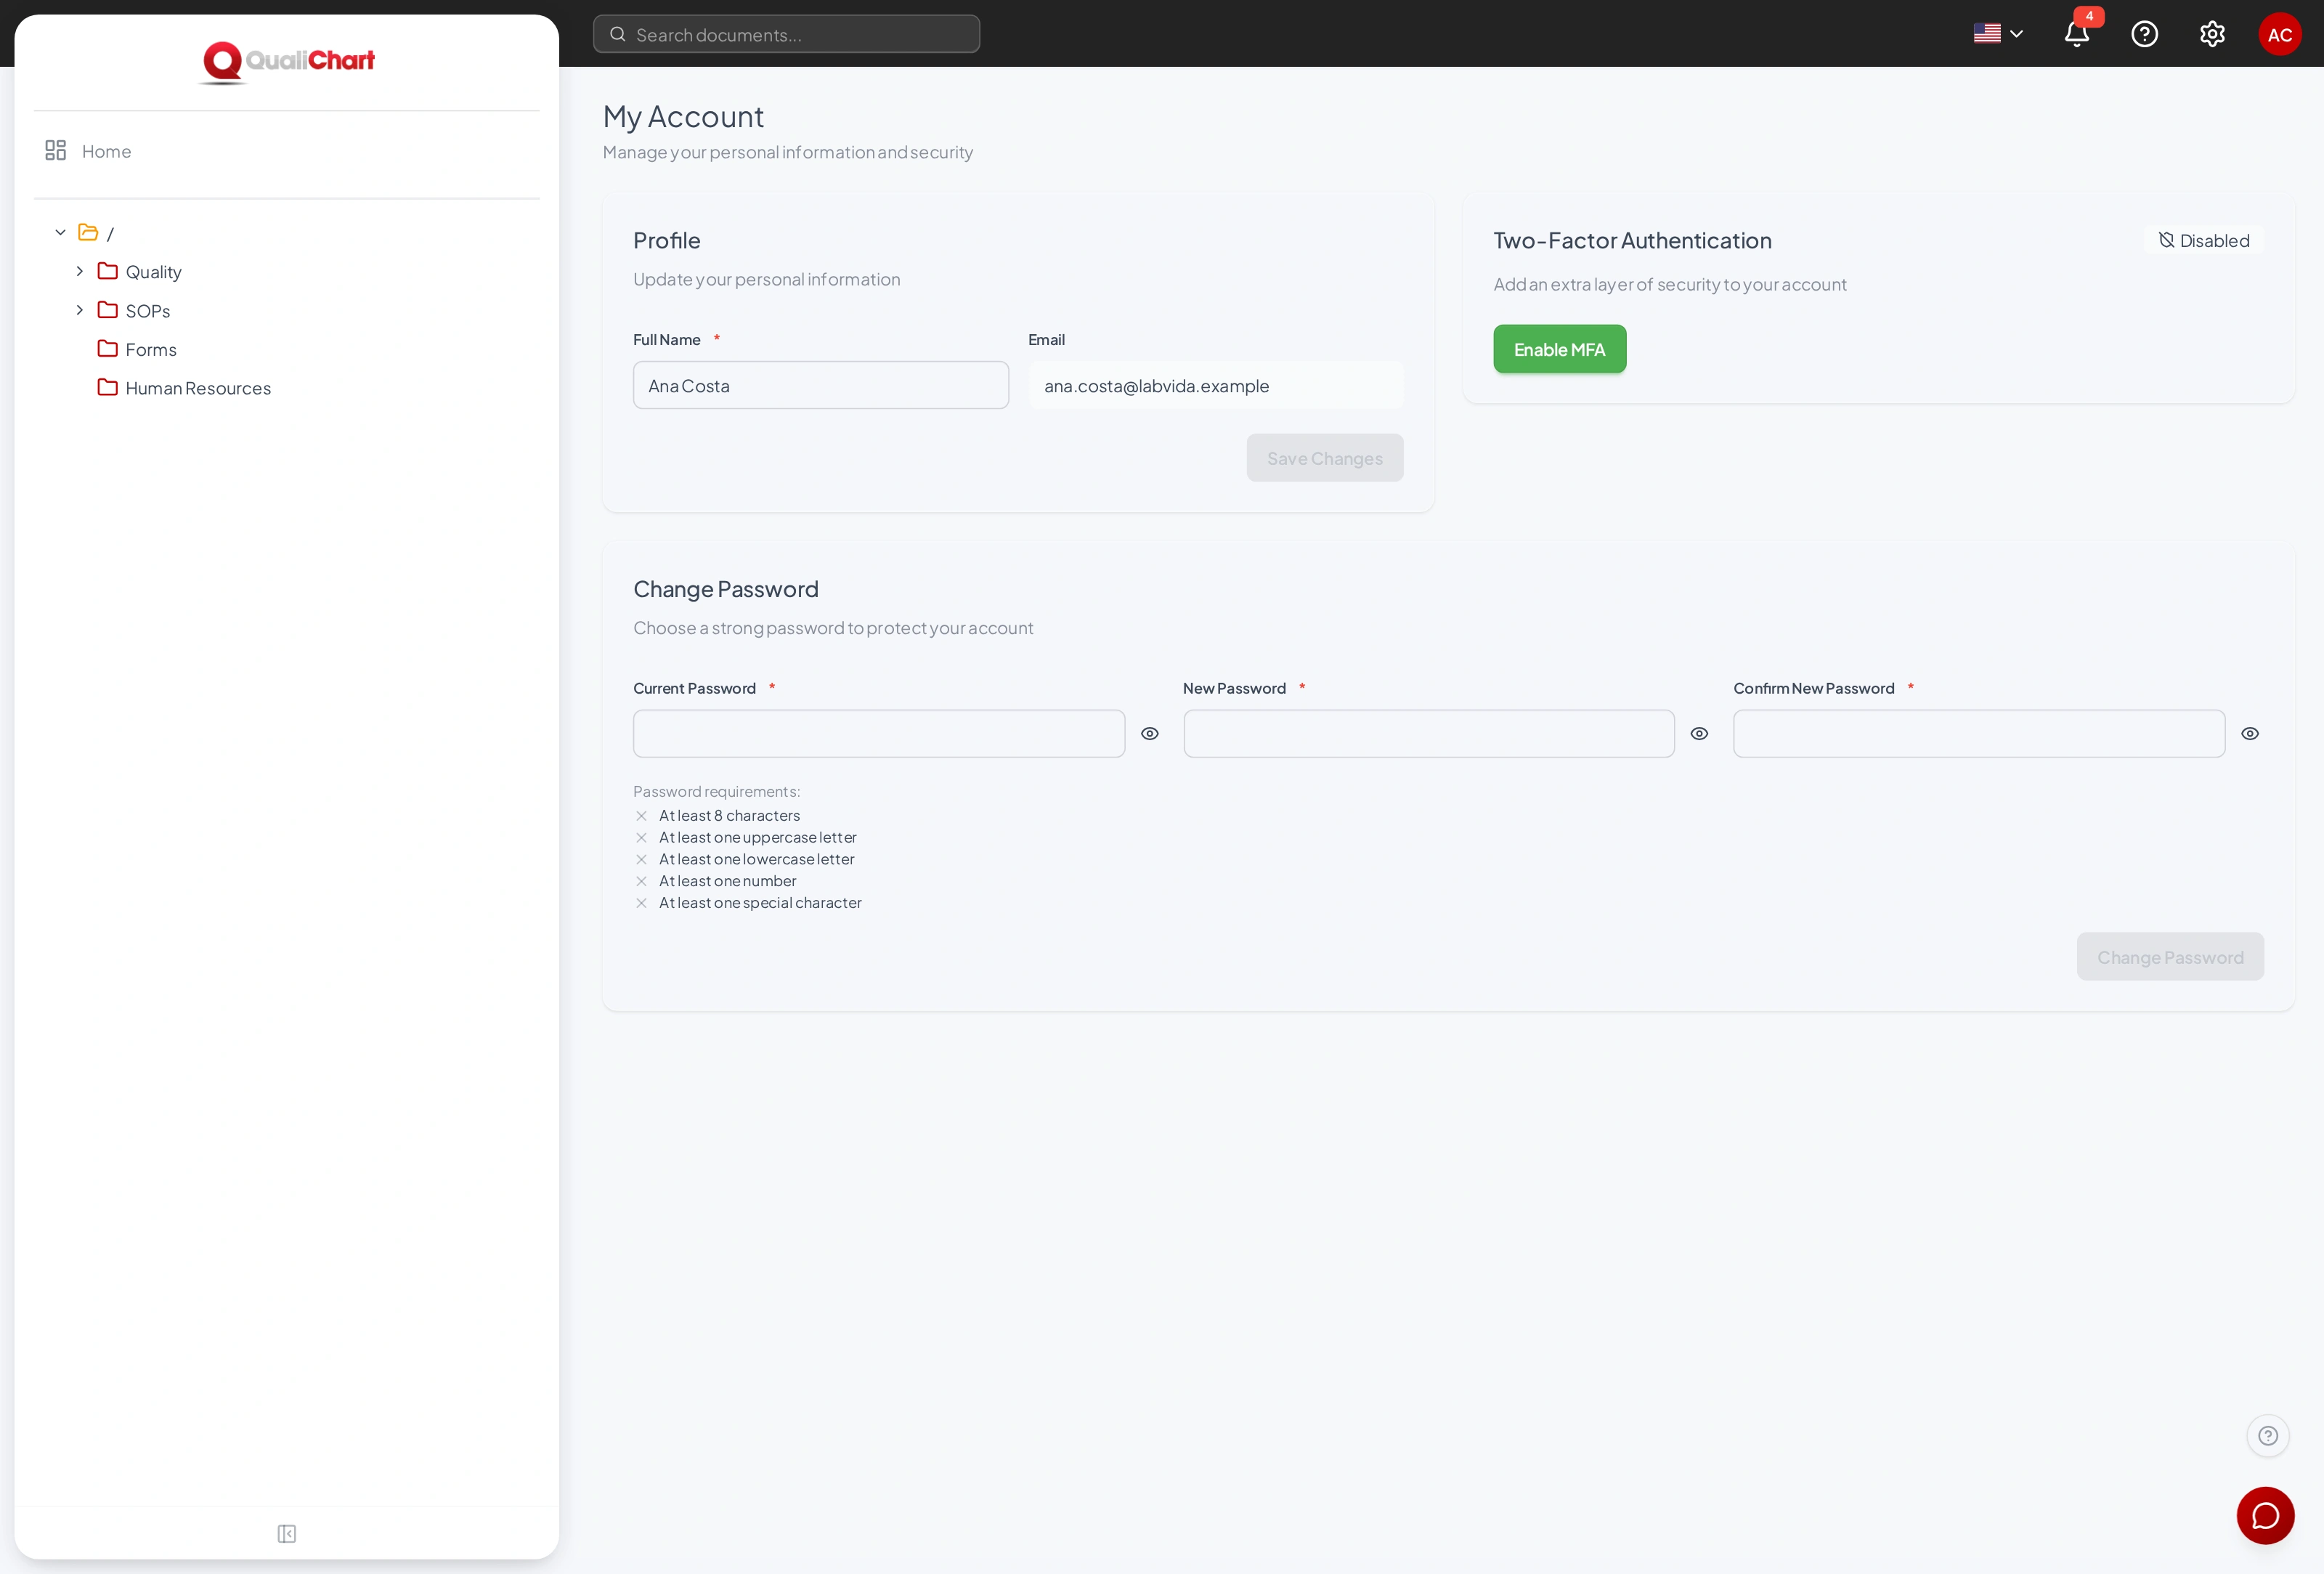
| Profile | Shows your name and email. If you sign in with your QualiChart account, your name is synced at each sign-in: change it in QualiChart. GED-only accounts change their name here. |
| Change Password | Enter your current password, the new password — at least 8 characters, with an uppercase letter, a lowercase letter, a number and a special character — and the confirmation. If you sign in with your QualiChart account, the password is the same in both systems. |
| Two-Factor Authentication | Enable MFA: scan the QR code with an authenticator app, type the 6-digit code and save the backup codes, which are not shown again. To disable it, enter a code from the authenticator and your current password. |
Help and FAQ
The Help menu in the header opens this User Manual and First steps. The ? button in the bottom-right corner opens the manual at the section for the current screen.
I cannot see a folder or a document
You are not in any group with access to the folder, or your groups only see distributed versions and the document has not been distributed yet. Ask an administrator to review the folder permissions.
The status shows no transitions
Only the transitions allowed for your groups from the current status appear, and you need the Edit right in the folder. Documents without a type, or whose type has no workflow, have no transitions; in the Distributed Version view, the status cannot be clicked.
I uploaded a new version and the status went back to Draft
This is expected: each new version restarts the workflow. The previous distributed version remains valid until the new one is distributed.
The document does not appear in search or in the assistant
Documents with a workflow become searchable when they are distributed; scanned files without text and unsupported formats are not read. See What is included in search.
The download came without a cover page
Only PDF and Word (DOCX) files get a cover page; other formats are downloaded as they are.
I see "Waiting for access to be granted"
A GED administrator needs to grant you access in Users. Then click Check access.
I forgot my password or was logged out
Use Forgot your password? on the sign-in screen. Your session ends after 8 hours; just sign in again.
I received a temporary password
Sign in with your email and the temporary password: GED asks for a permanent password that meets the requirements shown.
I cannot register users
Registering users requires the Manage users permission and a QualiChart account; GED-only accounts cannot register other people.
Back to contents